
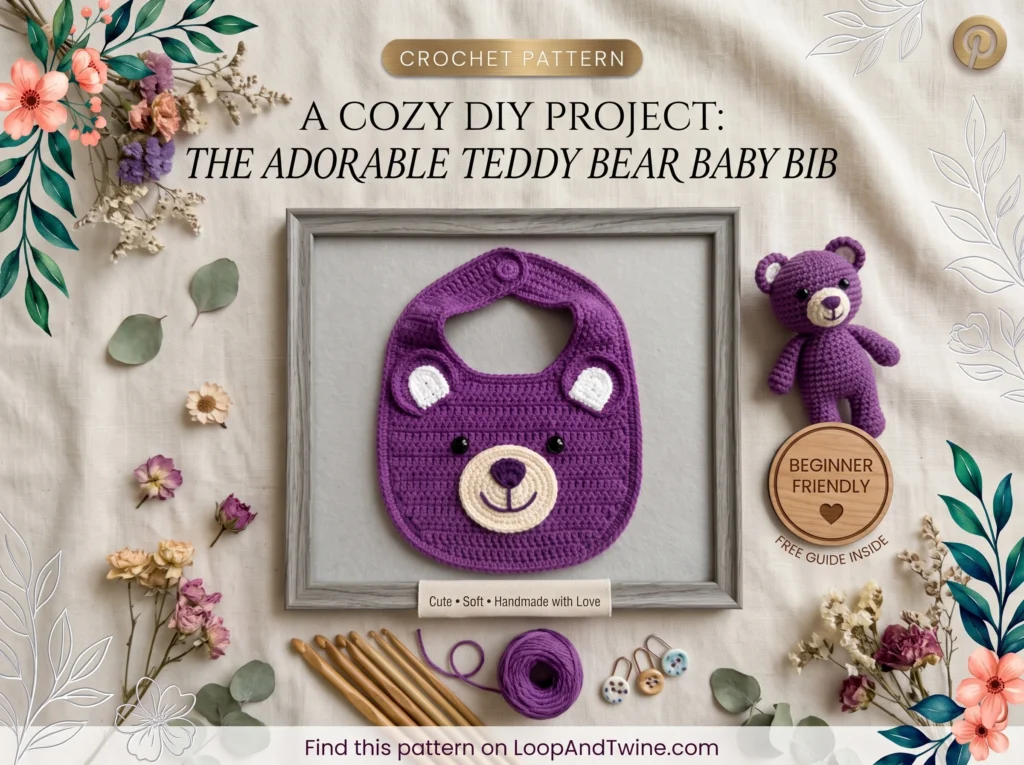
This teddy bear baby bib crochet pattern is one of my favorite quick gifts to make — soft, practical, and that round bear face with tiny ears never fails to get a smile. Few things beat a handmade baby shower present. This is an original Loop & Twine pattern, written for confident beginners who’ve made a few amigurumi rounds before and want to try something wearable.
New to crochet? Our Basic Crochet Stitches guide covers every stitch used in this bib.
Before You Start
- Read through the whole pattern once before starting — the neck opening and shaping happen back-to-back and it helps to see where you’re headed.
- This bib is worked in joined rounds (not a spiral) — slip stitch to close every round, then chain 1 to start the next.
- The chain-1 at the start of each round does not count as a stitch.
- Use a stitch marker to hold your place at the join each round, especially once the stitch count climbs past 40.
- Cotton yarn is a must here — it’s soft on baby skin, holds its shape, and machine washes well.
- New to some of these stitches? The Craft Yarn Council’s crochet stitch guide is a solid free reference for magic ring, increases, and decreases before you dive into this teddy bear baby bib crochet pattern.
Skill Level & Finished Size
- Skill level: Beginner-friendly (magic ring, single crochet, increases/decreases, basic embroidery for the face)
- Finished size: approx. 20 x 22 cm (7.9 x 8.7 in) — fits newborn to 12 months
- Hook: 4.0 mm
- Gauge: 16 sts x 16 rows = 10 cm (4 in) in single crochet — not critical, but keeps the size in the right range
Materials
- DK weight cotton yarn: tan or oatmeal (main color, approx. 60g), white (muzzle and inner ears, approx. 10g), brown (nose, small amount), black (eyes, small amount)
- 4.0 mm crochet hook
- One 2 cm button
- Yarn needle
- Small amount of embroidery floss for the mouth
- Stitch marker
Abbreviations (US terms)
MR magic ring · ch chain · sl st slip stitch · sc single crochet · inc increase (2 sc in same stitch) · dec invisible decrease · st(s) stitch(es) · rep repeat · [ ] total stitch count at end of round
Watch: How to Make a Magic Ring (Video Tutorial)
Every round in this teddy bear baby bib crochet pattern starts from a magic ring, so if you haven’t made one before, watch this quick video first:
New to amigurumi-style crochet? Check out our full magic ring guide and increase/decrease guide before starting this pattern.
Bib Body — Foundation
We start with a flat circle at the bottom of the bib and increase evenly every round to keep it lying flat.
- Round 1: MR, ch 1, 6 sc in ring, join with sl st to first sc. [6]
- Round 2: Ch 1, inc in each st around, join. [12]
- Round 3: Ch 1, (sc, inc) rep around, join. [18]
- Round 4: Ch 1, (2 sc, inc) rep around, join. [24]
Bib Body — Main Construction
- Round 5: Ch 1, (3 sc, inc) rep around, join. [30]
- Round 6: Ch 1, (4 sc, inc) rep around, join. [36]
- Round 7: Ch 1, (5 sc, inc) rep around, join. [42]
- Round 8: Ch 1, (6 sc, inc) rep around, join. [48]
- Round 9: Ch 1, (7 sc, inc) rep around, join. [54]
- Rounds 10–14: Ch 1, sc in each st around, join. [54] (work this round 5 times)
- Round 15: Ch 1, (7 sc, inc) rep around, join. [60]
- Rounds 16–22: Ch 1, sc in each st around, join. [60] (work this round 7 times)
Neck Opening & Upper Shape
- Round 23: Ch 1, sc in next 12 sts, ch 18 (this skips over the neck opening), skip the next 18 sts, sc in each remaining st around, join. [42 sts + 18 ch]
- Round 24: Ch 1, sc in next 12 sts, sc in each of the 18 ch sts, sc in each st around, join. [60]
- Round 25: Ch 1, sc in next 13 sts, sc in next 18 sts, sc in each st around, join. [60]
- Round 26: Ch 1, sc in next 14 sts, sc in next 18 sts, sc in each st around, join. [60]
- Round 27: Ch 1, sc in next 15 sts, sc in next 18 sts, sc in each st around, join. [60]
- Round 28: Ch 1, sc in next 16 sts, sc in next 18 sts, sc in each st around, join. [60]
- Round 29: Ch 1, sc in next 17 sts, sc in next 18 sts, sc in each st around, join. [60]
Each round in this section shifts one stitch further along, which is what gradually shapes the shoulder straps upward on both sides of the neck opening.
Border & Button Strap
- Border Round 1: Join yarn with sl st in any stitch at the bottom of the bib. Ch 1, sc evenly around the entire outer edge (including around the neck opening), working 3 sc into each corner stitch at the bottom curve to keep it flat, join. [approx. 110–120 sts]
- Border Round 2: Ch 1, sc in each st around, working 3 sc into the center stitch of each bottom corner, join. [approx. 115–125 sts]
- Border Round 3: Ch 1, sc in each st around, join, fasten off and weave in the end.
- Button loop: On one shoulder strap, join yarn at the tip, ch 12, sl st back into the same stitch to form the loop, fasten off.
- Button: On the other strap, sew your button in place so it lines up with the loop when the bib is closed.
Bear Ears (make 2)
- Outer ear, in main color: MR, ch 1, 6 sc in ring, join. [6]
- Ch 1, inc in each st, join. [12]
- Ch 1, (sc, inc) rep around, join. [18] — fasten off, leaving a long tail. Do not stuff; flatten the piece.
- Inner ear, in white: MR, ch 1, 6 sc in ring, join. [6]
- Ch 1, inc in each st, join. [12] — fasten off, leaving a tail. Flatten the piece.
- Center the white inner circle on top of the main-color outer ear and sew around the edge using the tail to join them.
Face Details
- Muzzle (white): MR, ch 1, 6 sc, join [6]; Round 2: inc in each st, join [12]; Round 3: (sc, inc) rep, join [18] — fasten off leaving a long tail for sewing.
- Nose (brown): MR, ch 1, 6 sc, join [6] — fasten off leaving a tail. Sew it to the top-center of the muzzle.
- Position the muzzle in the lower-middle of the bib front, roughly centered between the neck opening and the bottom edge, and sew around the edge to secure.
- Embroider two small straight-stitch eyes in black yarn just above the muzzle, spaced evenly apart on either side of center.
- Using embroidery floss, make one small vertical stitch down from the bottom of the nose, then a curved stitch out to each side to form a simple smile.
- Sew the ears to the top corners of the bib, angled slightly outward, aligning the bottom curve of each ear with the top few rounds of the border.
Resizing This Teddy Bear Baby Bib Crochet Pattern
This size fits most babies from newborn to about 12 months, but bibs are one of the easiest projects to resize on the fly:
- For a smaller/newborn fit: stop after Round 20 instead of Round 22 in the Main Construction section, before starting the neck opening.
- For a toddler-sized bib: work 2 extra plain rounds (repeat Round 16’s instruction twice more) before the neck opening, and add 2 extra chains (ch 20 instead of ch 18) so it still fits over the head comfortably.
- Whatever size you land on, try the neck opening against a similar-sized bib — or against the actual baby if you can — before finishing the border.
Finishing Touches & Troubleshooting
- Neck opening too tight or loose? Adjust the chain count in Round 23 (fewer chains = tighter, more chains = looser) — just keep the stitch count consistent in the rounds that follow.
- Bib doesn’t lie flat? This usually means the corner increases in the border were skipped — go back and make sure you worked 3 sc into each bottom corner in both border rounds.
- Face looks off-center? Pin the muzzle and ears in place first and check from a few steps back before sewing anything permanently.
- Ears look uneven? Double-check both outer ears have the same final stitch count (18) before joining the inner circles — a missed increase round is the usual culprit.
- Weave in ends as you finish each piece rather than saving them all for last — future you will be grateful.
And there you have it — a soft, sweet little bear bib ready for feeding time or a gift box. Since this teddy bear baby bib crochet pattern is an original written pattern, feel free to swap the main color for whatever suits the nursery, and make it your own.
This pattern is free for personal use. If you make one, I’d love to see it — tag your finished bib and share the love for handmade crochet! Looking for another quick amigurumi gift? Check out our free crochet patterns, including the Little Vampire Crochet Doll.
Reviews
There are no reviews yet. Be the first one to write one.