
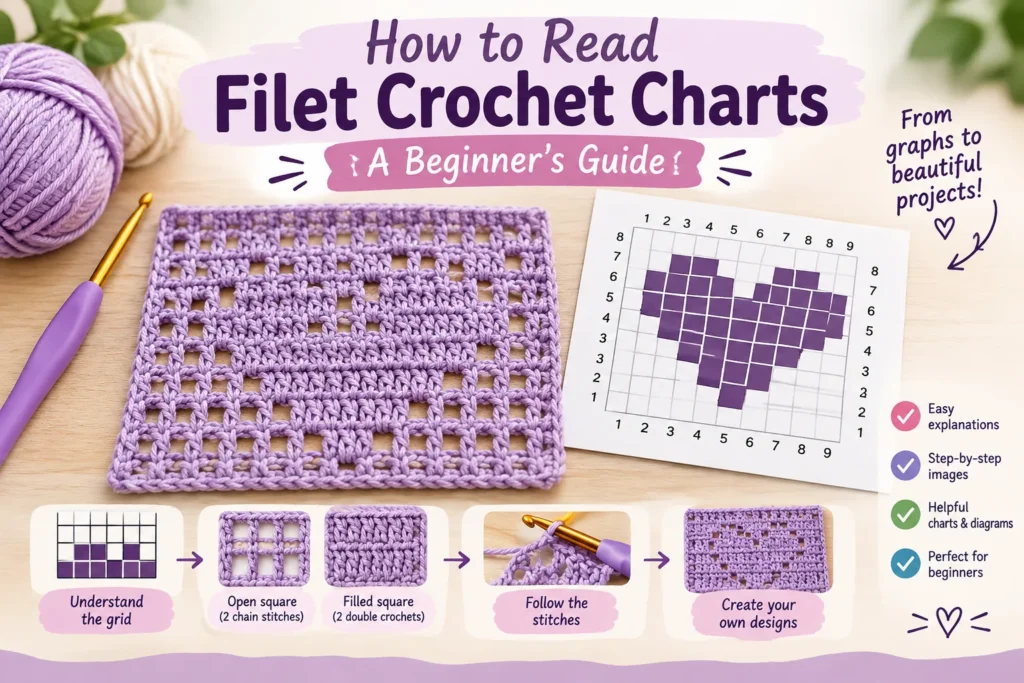
Hey, it’s Sofia! Confused by those little black-and-white squares in a filet crochet graph? You’re not alone. In this beginner-friendly guide, you’ll learn exactly how to read a filet crochet graph, count the stitches, work out your foundation chain, and turn each square into actual crochet stitches.
If you haven’t crocheted from a chart before, it helps to be comfortable with your basic stitches first — this guide walks through reading the chart itself.
Quick Answers
What is filet crochet? A technique that uses a grid of filled and open squares, worked in a single color, to form a picture or pattern in your crochet fabric.
How do you read a filet crochet graph? Bottom to top, with symmetrical designs worked in either direction and asymmetrical designs alternating direction every row.
How many chains do you need to start? (Number of columns × 3) + 3 if the first square is filled, or (number of columns × 3) + 5 if the first square is open.
What does a filled square mean? Work a pair of double crochet stitches into that space.
What does an empty square mean? Skip it with 2 chain stitches instead of double crocheting.
I remember chaining up my very first filet piece, working the first row, and still ending up with the wrong stitch count — more than once. It took me embarrassingly long to realize the whole thing comes down to that one simple idea above: every square is either “filled” or “open.” Once that clicks, filet crochet graphs stop being a mystery. Let’s break down exactly how.
What Is Filet Crochet?
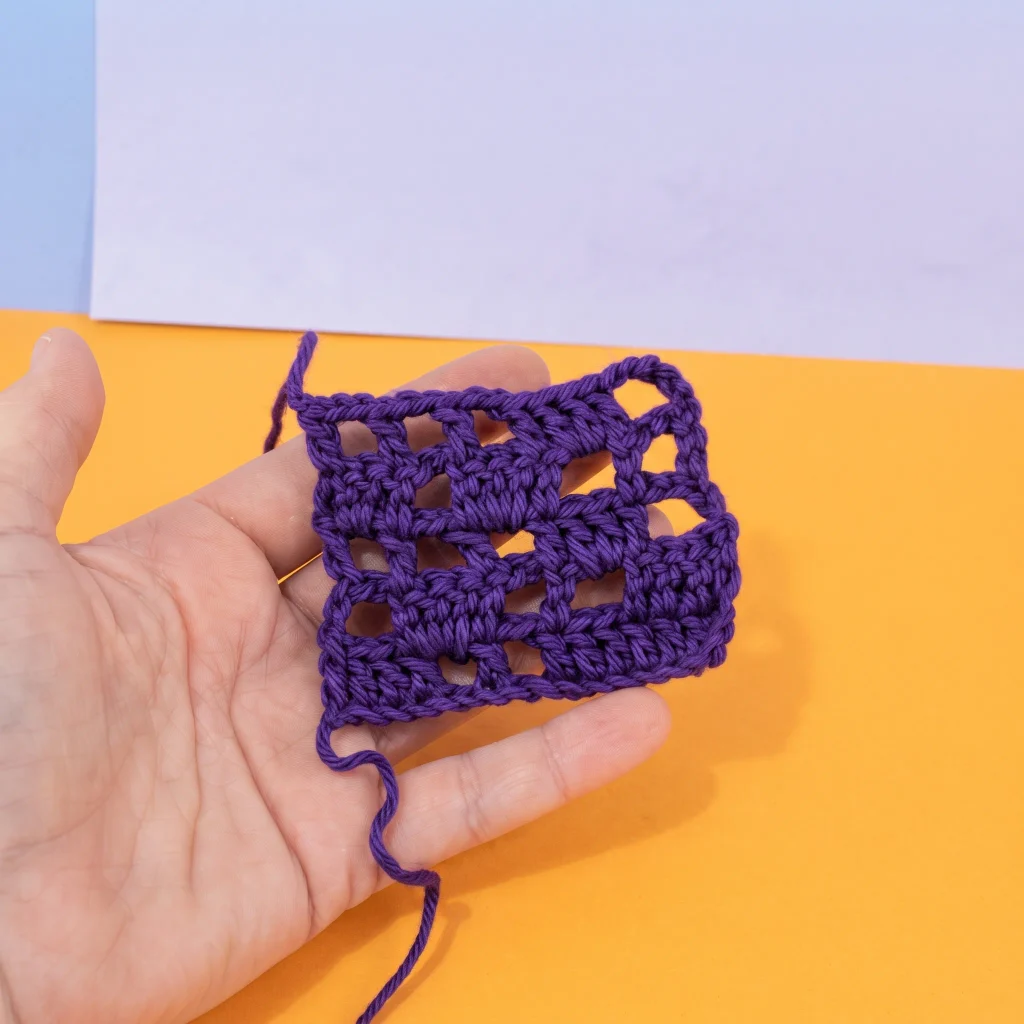
Filet crochet uses just two building blocks repeated over and over: a solid “filled” square made from double crochet stitches, and an open “empty” square made from chain stitches. Put enough of those two squares next to each other in the right order and a picture emerges in your fabric — a heart, a letter, a flower, whatever the graph shows. It’s almost always worked in a single color, since the pattern comes from texture and gaps, not color changes.
A smooth, light worsted or DK weight cotton tends to give the crispest result. Fuzzy or textured yarns blur the edges of your design, which makes it harder to tell a filled square from an open one once it’s off the hook.
How to Read a Filet Crochet Graph
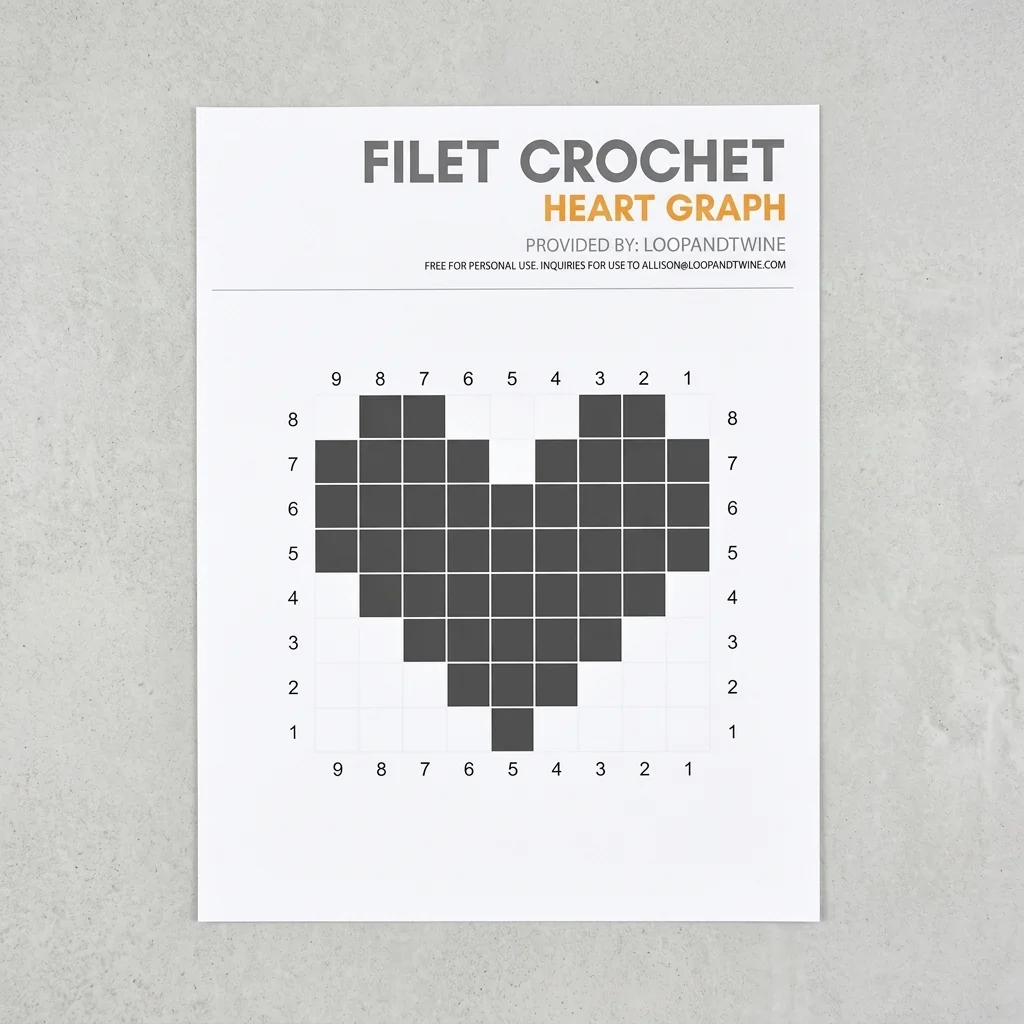
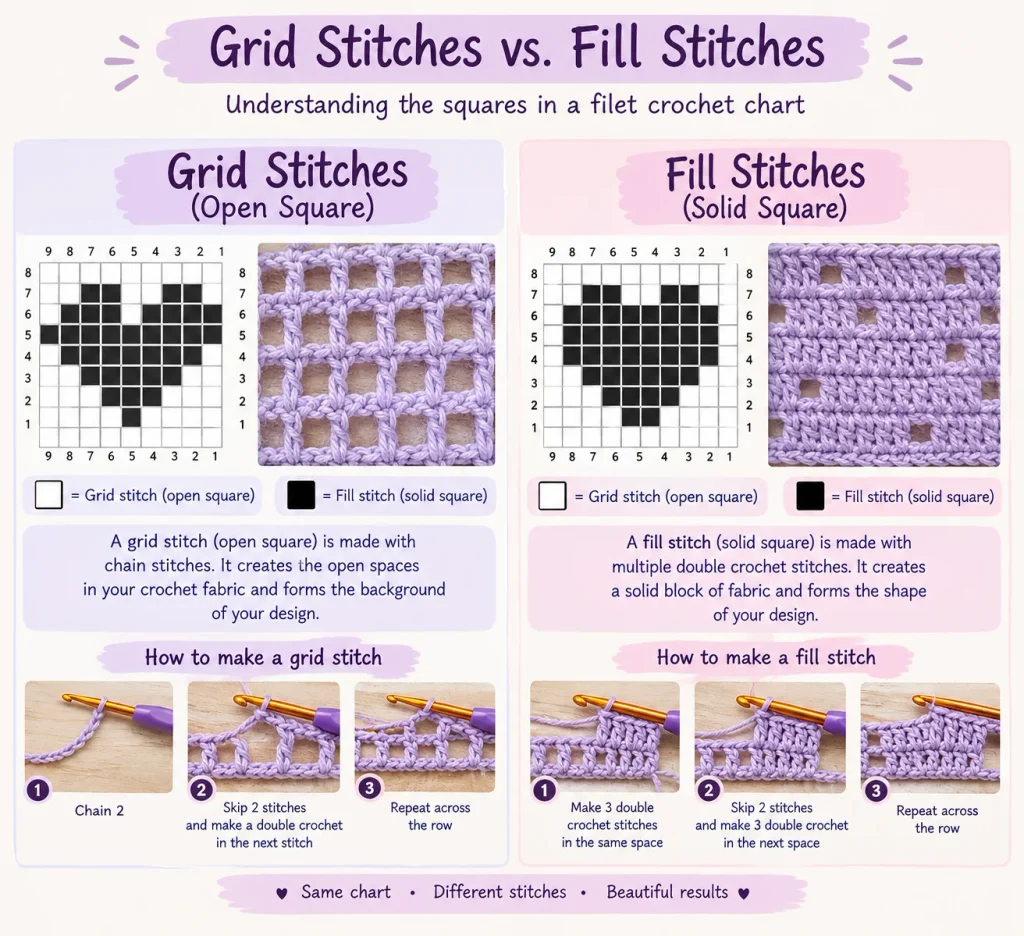
A filet crochet graph is just a grid — so many columns across, so many rows up. The dark squares are the ones you’ll fill with double crochet. The blank squares are the ones you’ll skip with chain stitches.
- Symmetrical designs (the same on both sides, like a simple heart) can be worked left to right or right to left — it doesn’t matter, since the pattern mirrors itself.
- Asymmetrical designs are read in alternating directions: right to left on one row, left to right on the next, switching every row as you move up the graph. If a designer gives specific direction notes, follow those over this general rule.
- Graphs are read from the bottom up, the opposite of how you’d read a page of text. Plenty of crocheters (myself included, more often than I’d like to admit) default to reading top-to-bottom out of habit and still get a correct result — just keep track of which row you’re actually on.
Understanding the Grid
Here’s the piece that finally made filet crochet click for me: underneath every graph is a fixed “skeleton” of stitches that never changes, row after row. Think of it as scaffolding. Into that scaffolding, you either add a pair of double crochets to fill a square, or a pair of chains to leave it open. The scaffolding stitches themselves are always there — what changes from row to row is only what you stuff into each square.
Counting Stitches on a Filet Graph
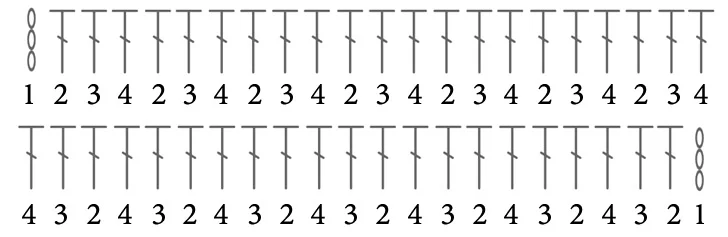
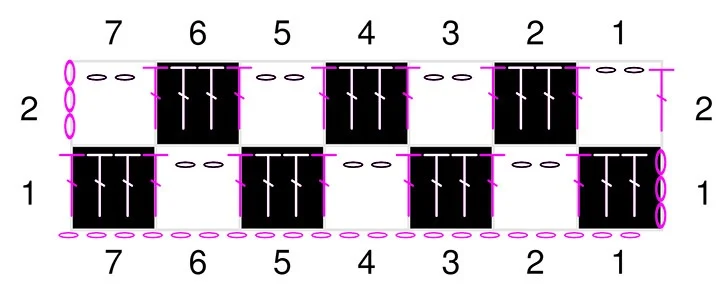
Here’s where most people (me included, for a long time) trip up. Each stitch at the edge of a square pulls double duty — it’s the last stitch of one square and the first stitch of the next. Your very first stitch of the row is usually a chain-3 standing in for a double crochet. From there, each square adds three more stitches.
A count that works well out loud: “one, two, three, four-is-one, two, three, four-is-one, two, three, four.” That fourth stitch of each square doubles as stitch one of the next square, so you’re not actually adding an extra stitch when you say “four is one” — you’re just renaming it so the count keeps making sense.
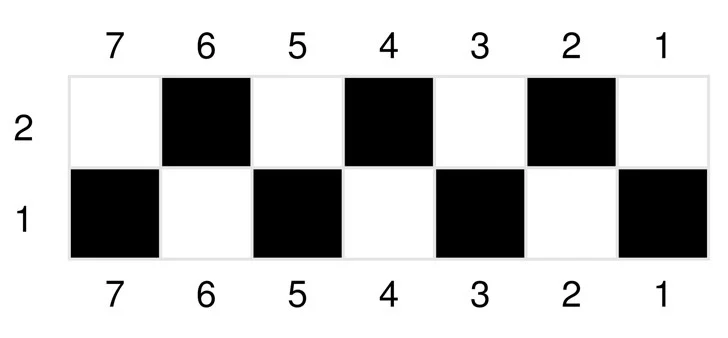
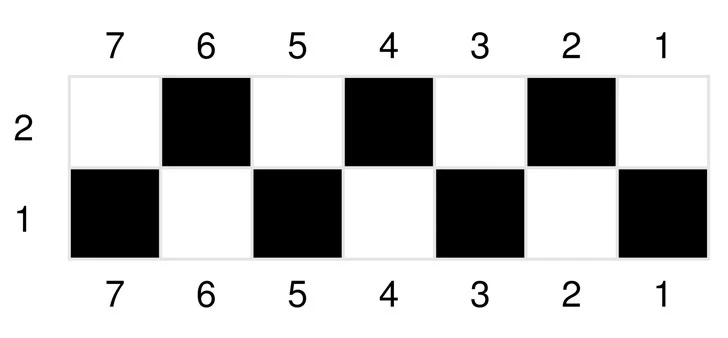
As a quick check once a row is done: multiply the number of columns in your graph by 3, then add 1 for that very first standing stitch. A 7-column graph should give you (7 × 3) + 1 = 22 stitches across.
How Many Chains Do You Need to Start?
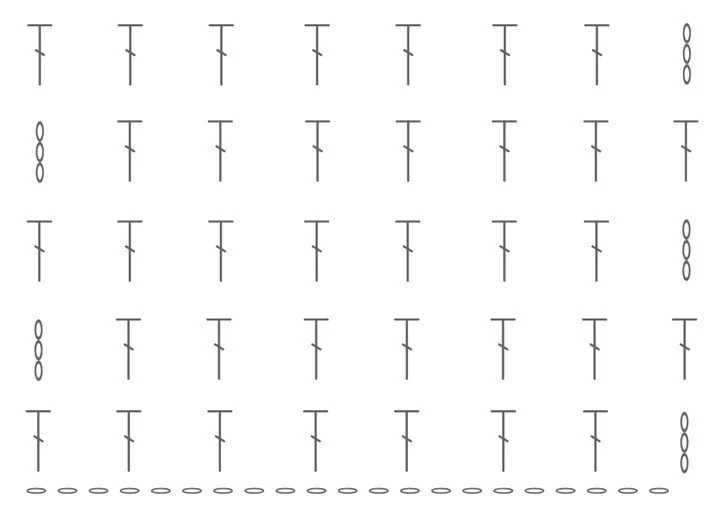
Your foundation chain needs to match the width of your graph, and the math depends on whether the very first square (bottom corner) is filled or open.
- First square closed (filled): (number of columns × 3) + 3
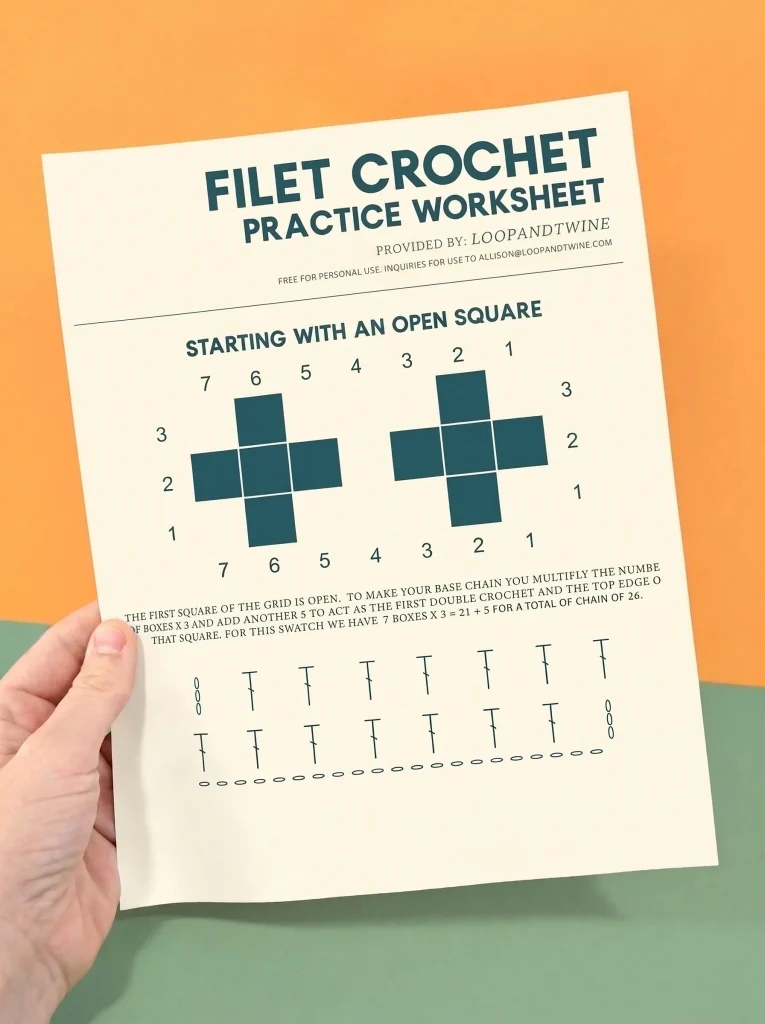
- First square open: (number of columns × 3) + 5
Why the difference? Every column needs 3 chains no matter what. Then you add 3 more to act as your first standing double crochet if the first square is filled — or 2 extra chains on top of that same 3 (5 total) if the first square needs to stay open, since an open square needs its own 2-chain gap in addition to the standing stitch.
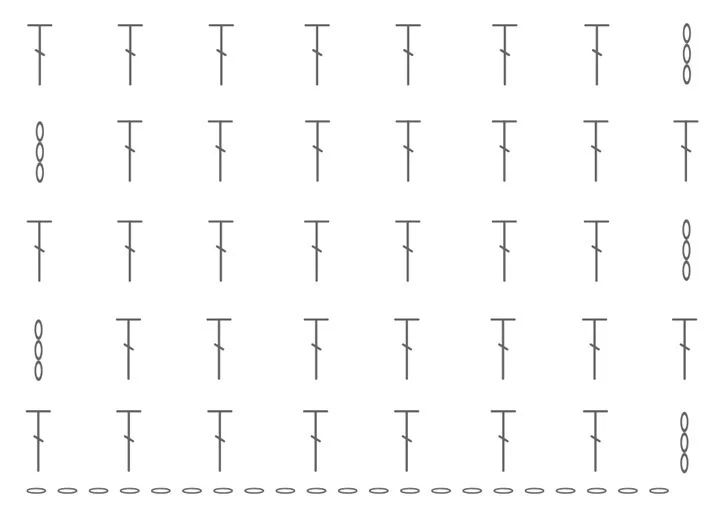
For a graph that opens with a blank square instead, say 9 columns wide, the math changes to (9 × 3) + 5 = 32 starting chains.
Translating the Graph Into Real Stitches
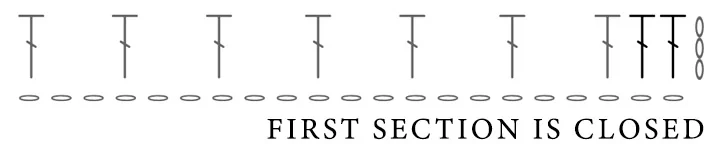
Let’s walk through an actual row. Say you’ve chained 24 for a 7-column graph with a filled first square. Your chain-3 stands in as stitch one. Working into the 4th chain from your hook, double crochet once (stitch two). Double crochet again in the next chain to fill the square (stitch three). One more double crochet finishes that square and doubles as the first stitch of the next one (stitch “four is one”).
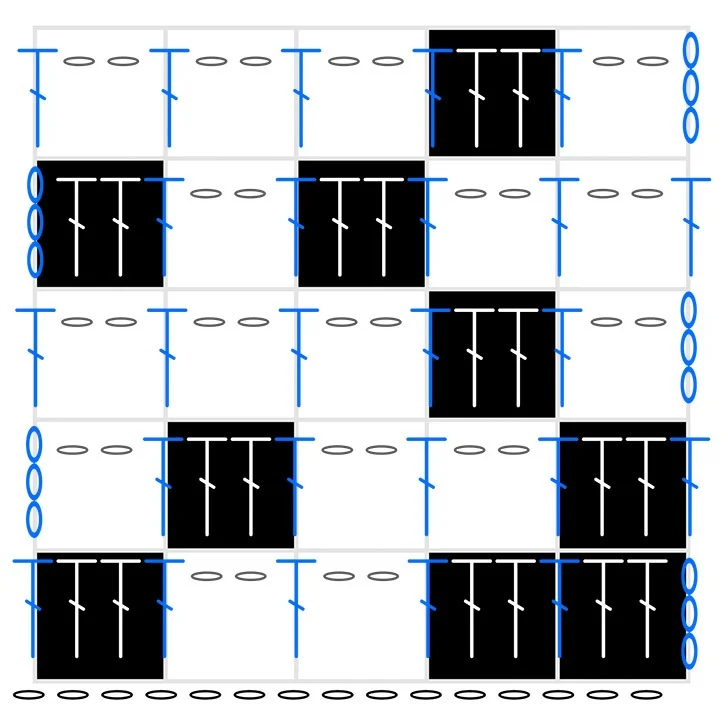
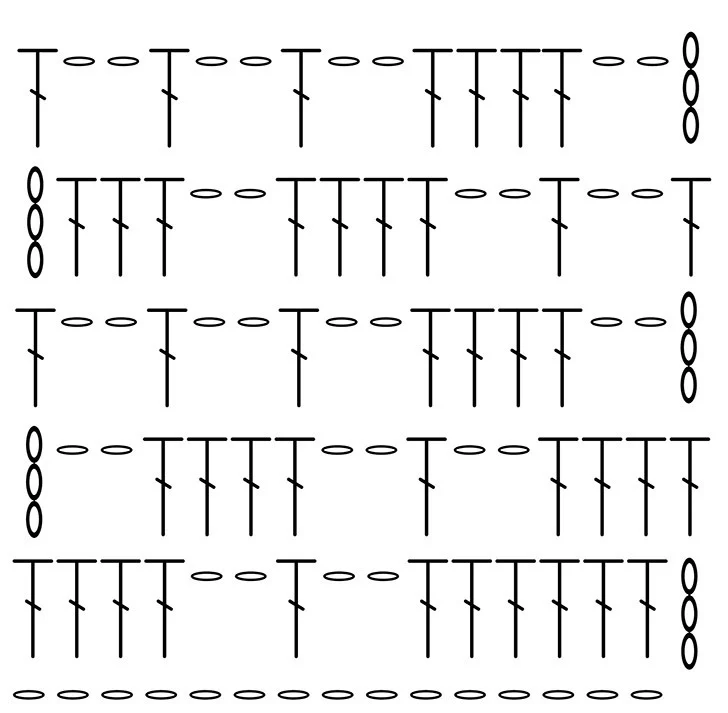
It helps enormously to lay actual crochet symbols over your printed graph while you’re learning — a quick double-crochet symbol for filled squares, a little chain symbol for open ones. Once you can see the stitch symbols sitting on top of the grid, the whole thing stops looking like an abstract puzzle and starts looking like, well, crochet.
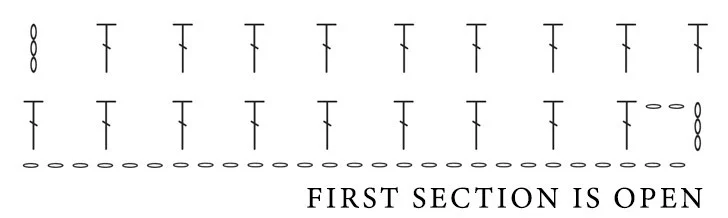
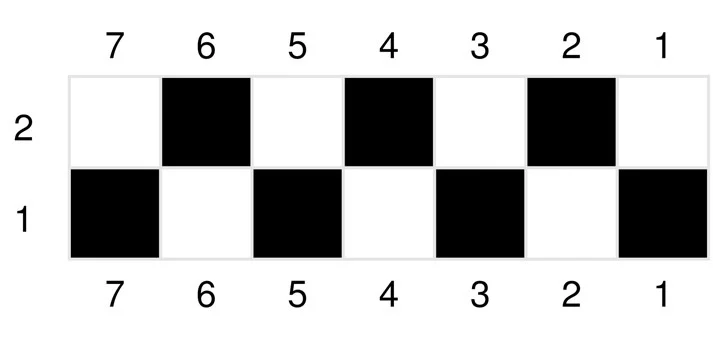
Working Through a Full Example
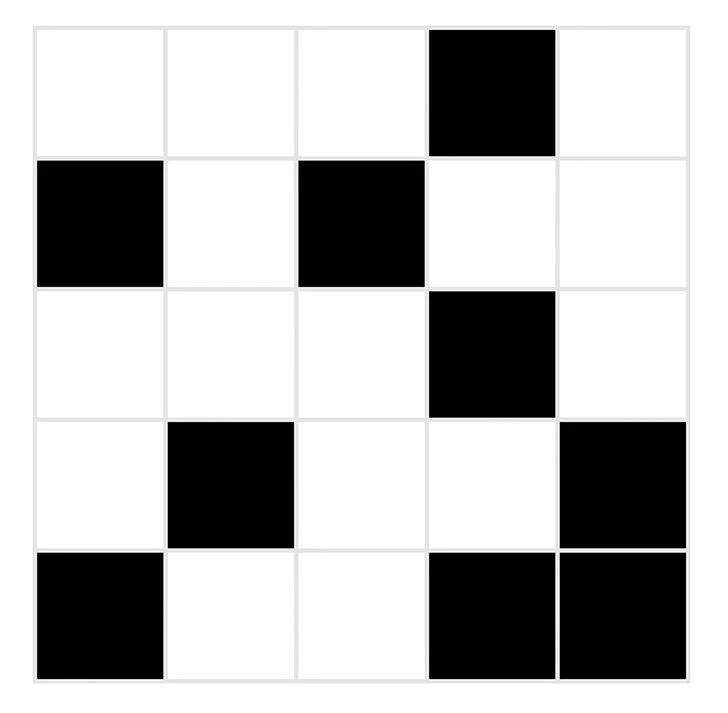
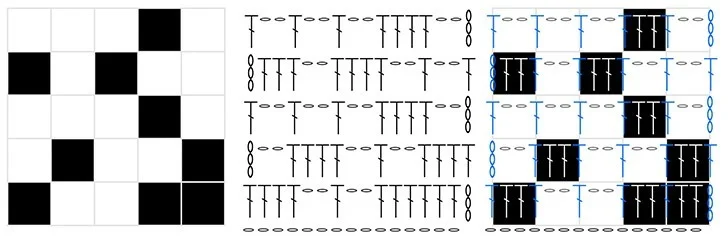
Let’s put it all together on a small, intentionally asymmetrical 5-column, 5-row graph, starting with a closed square. Our foundation chain is (5 × 3) + 3 = 18 chains. Because the design isn’t symmetrical, we’ll alternate direction every row — right to left, then left to right, switching each time we move up.
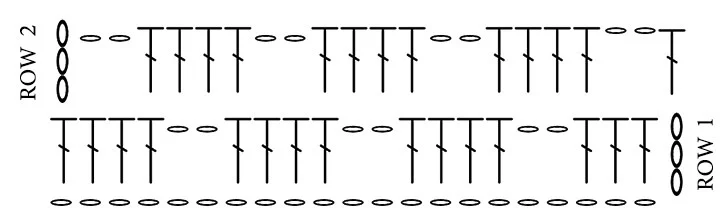
- Chain 18 to start.
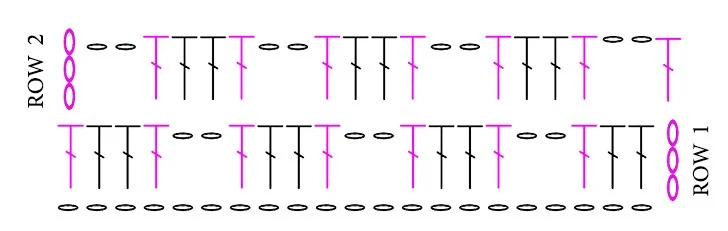
- Row 1: Double crochet in the 4th chain from the hook, then in each of the next 6 chains. Chain 2, skip 2, double crochet in the next stitch. Chain 2, skip 2, double crochet in the next stitch, then in each of the remaining 3 stitches.
- Row 2: Chain 3 (counts as first double crochet). Chain 2, skip 2. Double crochet in each of the next 4 stitches. Chain 2, skip 2. Double crochet once, chain 2, skip 2, then double crochet in the last 4 stitches.
- Row 3: Chain 5 (counts as first double crochet plus one open square). Skip 2, double crochet in the next 4 stitches. Chain 2, skip 2, double crochet once. Chain 2, skip 2, double crochet once. Chain 2, skip 2, double crochet in the last stitch.
- Row 4: Chain 3. Double crochet in the next 3 stitches. Chain 2, skip 2, double crochet in the next 4 stitches. Chain 2, skip 2, double crochet in the last stitch.
- Row 5: Chain 5. Skip 2, double crochet in the next 4 stitches, then continue in double crochet across, chaining 2 and skipping 2 wherever the graph shows an open square, finishing with a double crochet in the last stitch.
New to any of the stitches used here? Our crochet basics reference guide and increase and decrease guide cover the fundamentals with photos, and the Craft Yarn Council’s stitch guide is a solid official reference for standard stitch symbols too.
Try It Yourself: A Simple Heart Graph
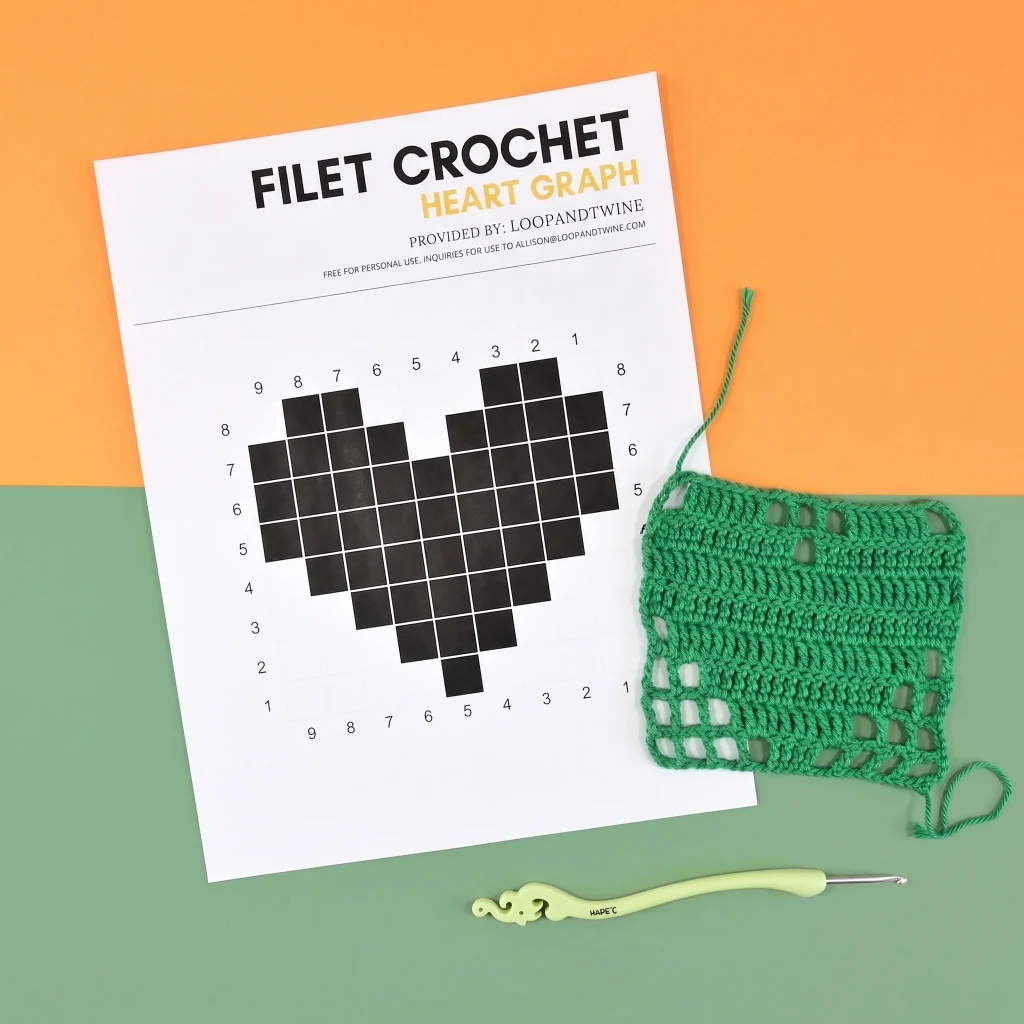
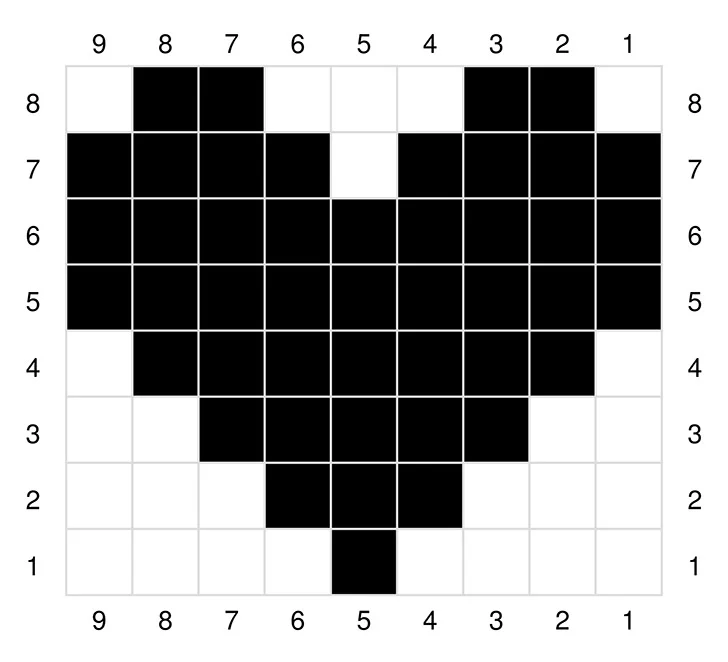
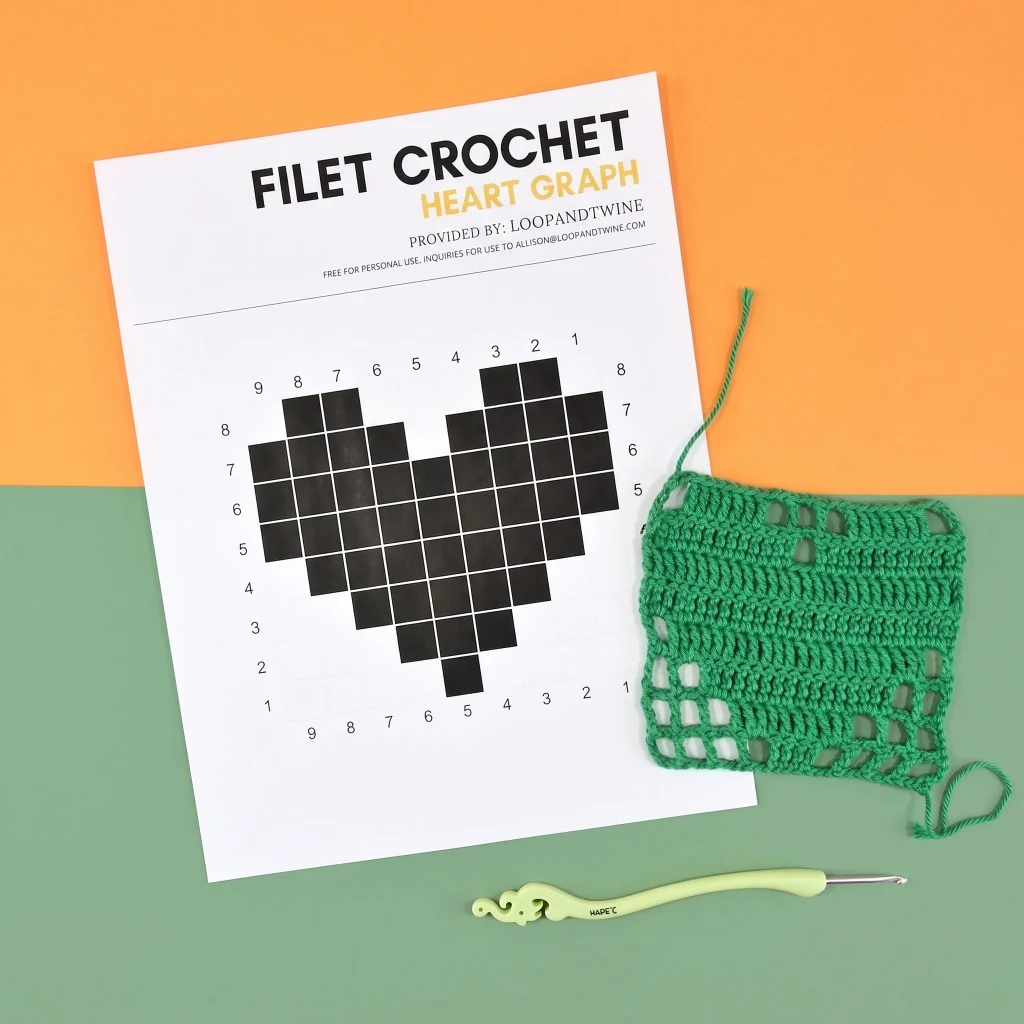
Once the method clicks, a symmetrical design is the easiest way to practice, since you don’t have to worry about switching direction mid-row. A 9-column, 8-row heart is a nice size to try — big enough to see the shape clearly, small enough to finish in one sitting. Since this graph starts with an open square, your math is (9 × 3) + 5 = 32 starting chains.
Fixing Squares That Come Out Short and Squatty
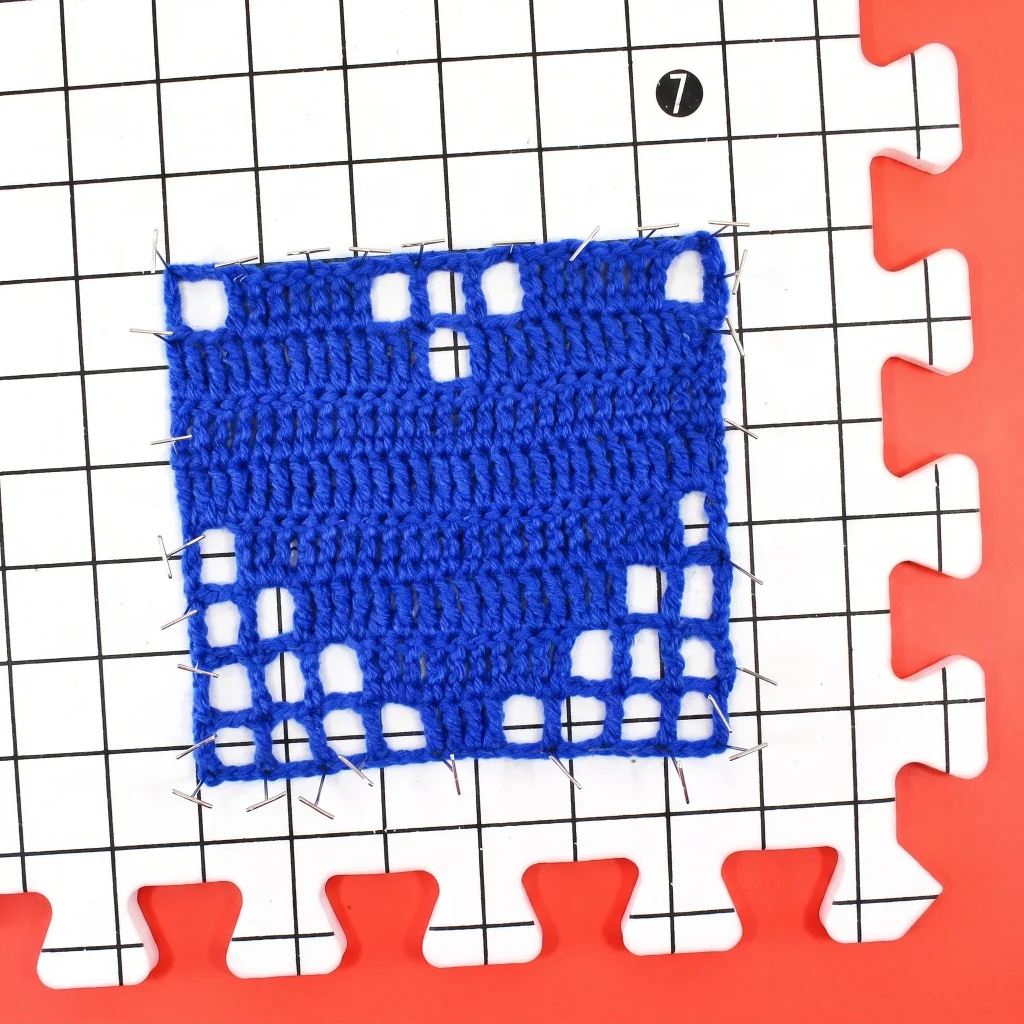
If your finished squares look more like short rectangles than true squares, you’re not alone — this one took me a while to track down too. Standard double crochet stitches don’t come out exactly as tall as they are wide for every crocheter, and your personal tension plays a big role in that.
The fix is to swatch a small 3-column, 3-row test square and measure it. If double crochet comes out noticeably shorter than wide, try an extended double crochet, or go up to a treble crochet instead, and measure again. Keep adjusting the stitch height until your test square actually measures square.
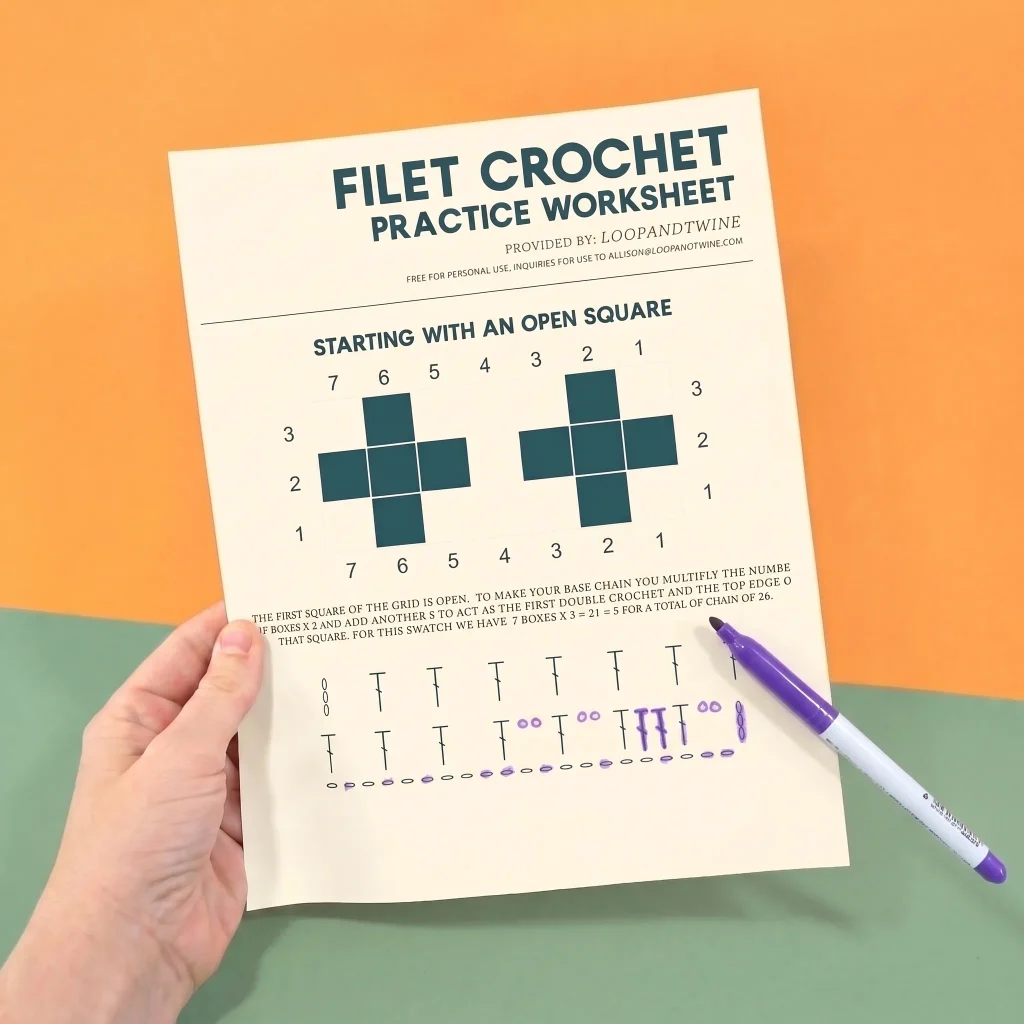
Switching stitch height changes your starting-chain math too. If you move to a treble crochet (which typically needs a chain-4 to stand in as your first stitch, instead of a chain-3), add 1 more chain to each of the formulas above: (columns × 3) + 4 for a closed start, or (columns × 3) + 6 for an open start.
One thing I didn’t expect when I first started: tension genuinely changes over time. My own grip has loosened up over the years, partly just from crocheting a lot more and partly from an old hand injury that makes a tight grip less comfortable than it used to be. Whatever the reason, it’s worth re-swatching occasionally, especially any time you switch yarn brands or weights, rather than assuming your gauge from last year’s project still holds.
Quick Reference: Filet Crochet Chain Math
- Standard double crochet, closed start: (columns × 3) + 3
- Standard double crochet, open start: (columns × 3) + 5
- Treble crochet, closed start: (columns × 3) + 4
- Treble crochet, open start: (columns × 3) + 6
- Checking a finished row: (columns × 3) + 1 stitches total
Filet crochet really is one of those techniques that looks far more intimidating on paper than it is once your hands actually get moving. The grid-and-fill logic is the same no matter how complicated the picture looks — a bigger, busier graph is just more of the same two squares repeated more times, not a harder technique. Grab a simple graph, count out your foundation chain, and give it a try.

Happy crocheting! 🧶
— Sofia, Loop & Twine