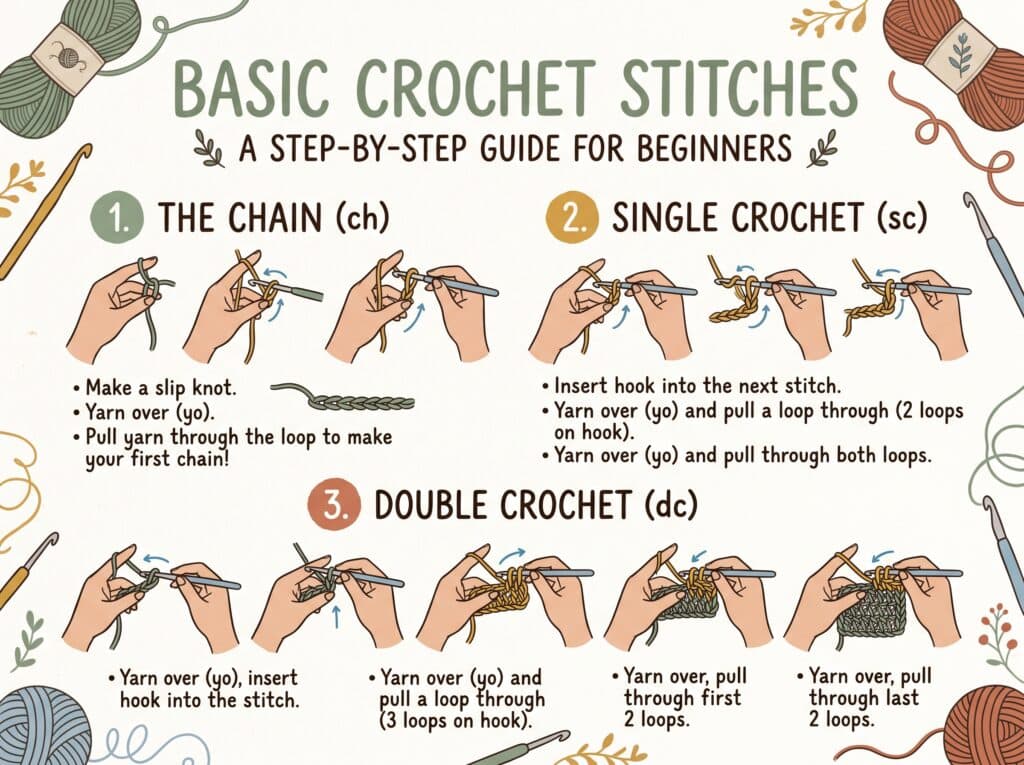
Learning the basic crochet stitches is the single most important step any beginner can take — and the good news is that there are only a handful you need to know to make almost anything. Master these basic crochet stitches and you’ll have the skills to follow most free patterns online, from beginner dishcloths to cosy blankets and beyond.
In this guide you’ll find every essential basic crochet stitch explained step by step, with diagrams and tips for each one. We use US terminology throughout (see the comparison table below if you’re following a UK pattern). If you’re brand new, start with our complete beginner’s guide to how to crochet first, then come back here to go deeper on each stitch.
Supplies You Need Before Starting
- Yarn — worsted weight (category 4) in a light colour so you can see every stitch clearly
- Hook — 5.0 mm (H-8) pairs perfectly with worsted yarn
- Scissors — for snipping yarn tails cleanly
- Tapestry needle — for weaving in ends when you finish
- Stitch markers — optional but helpful for marking round starts
1. The Slip Knot — Your Very First Basic Crochet Stitch
Before you make any of the basic crochet stitches, you need to attach the yarn to your hook. The slip knot is that attachment — a simple adjustable loop that sits firmly on the hook without sliding off on its own.

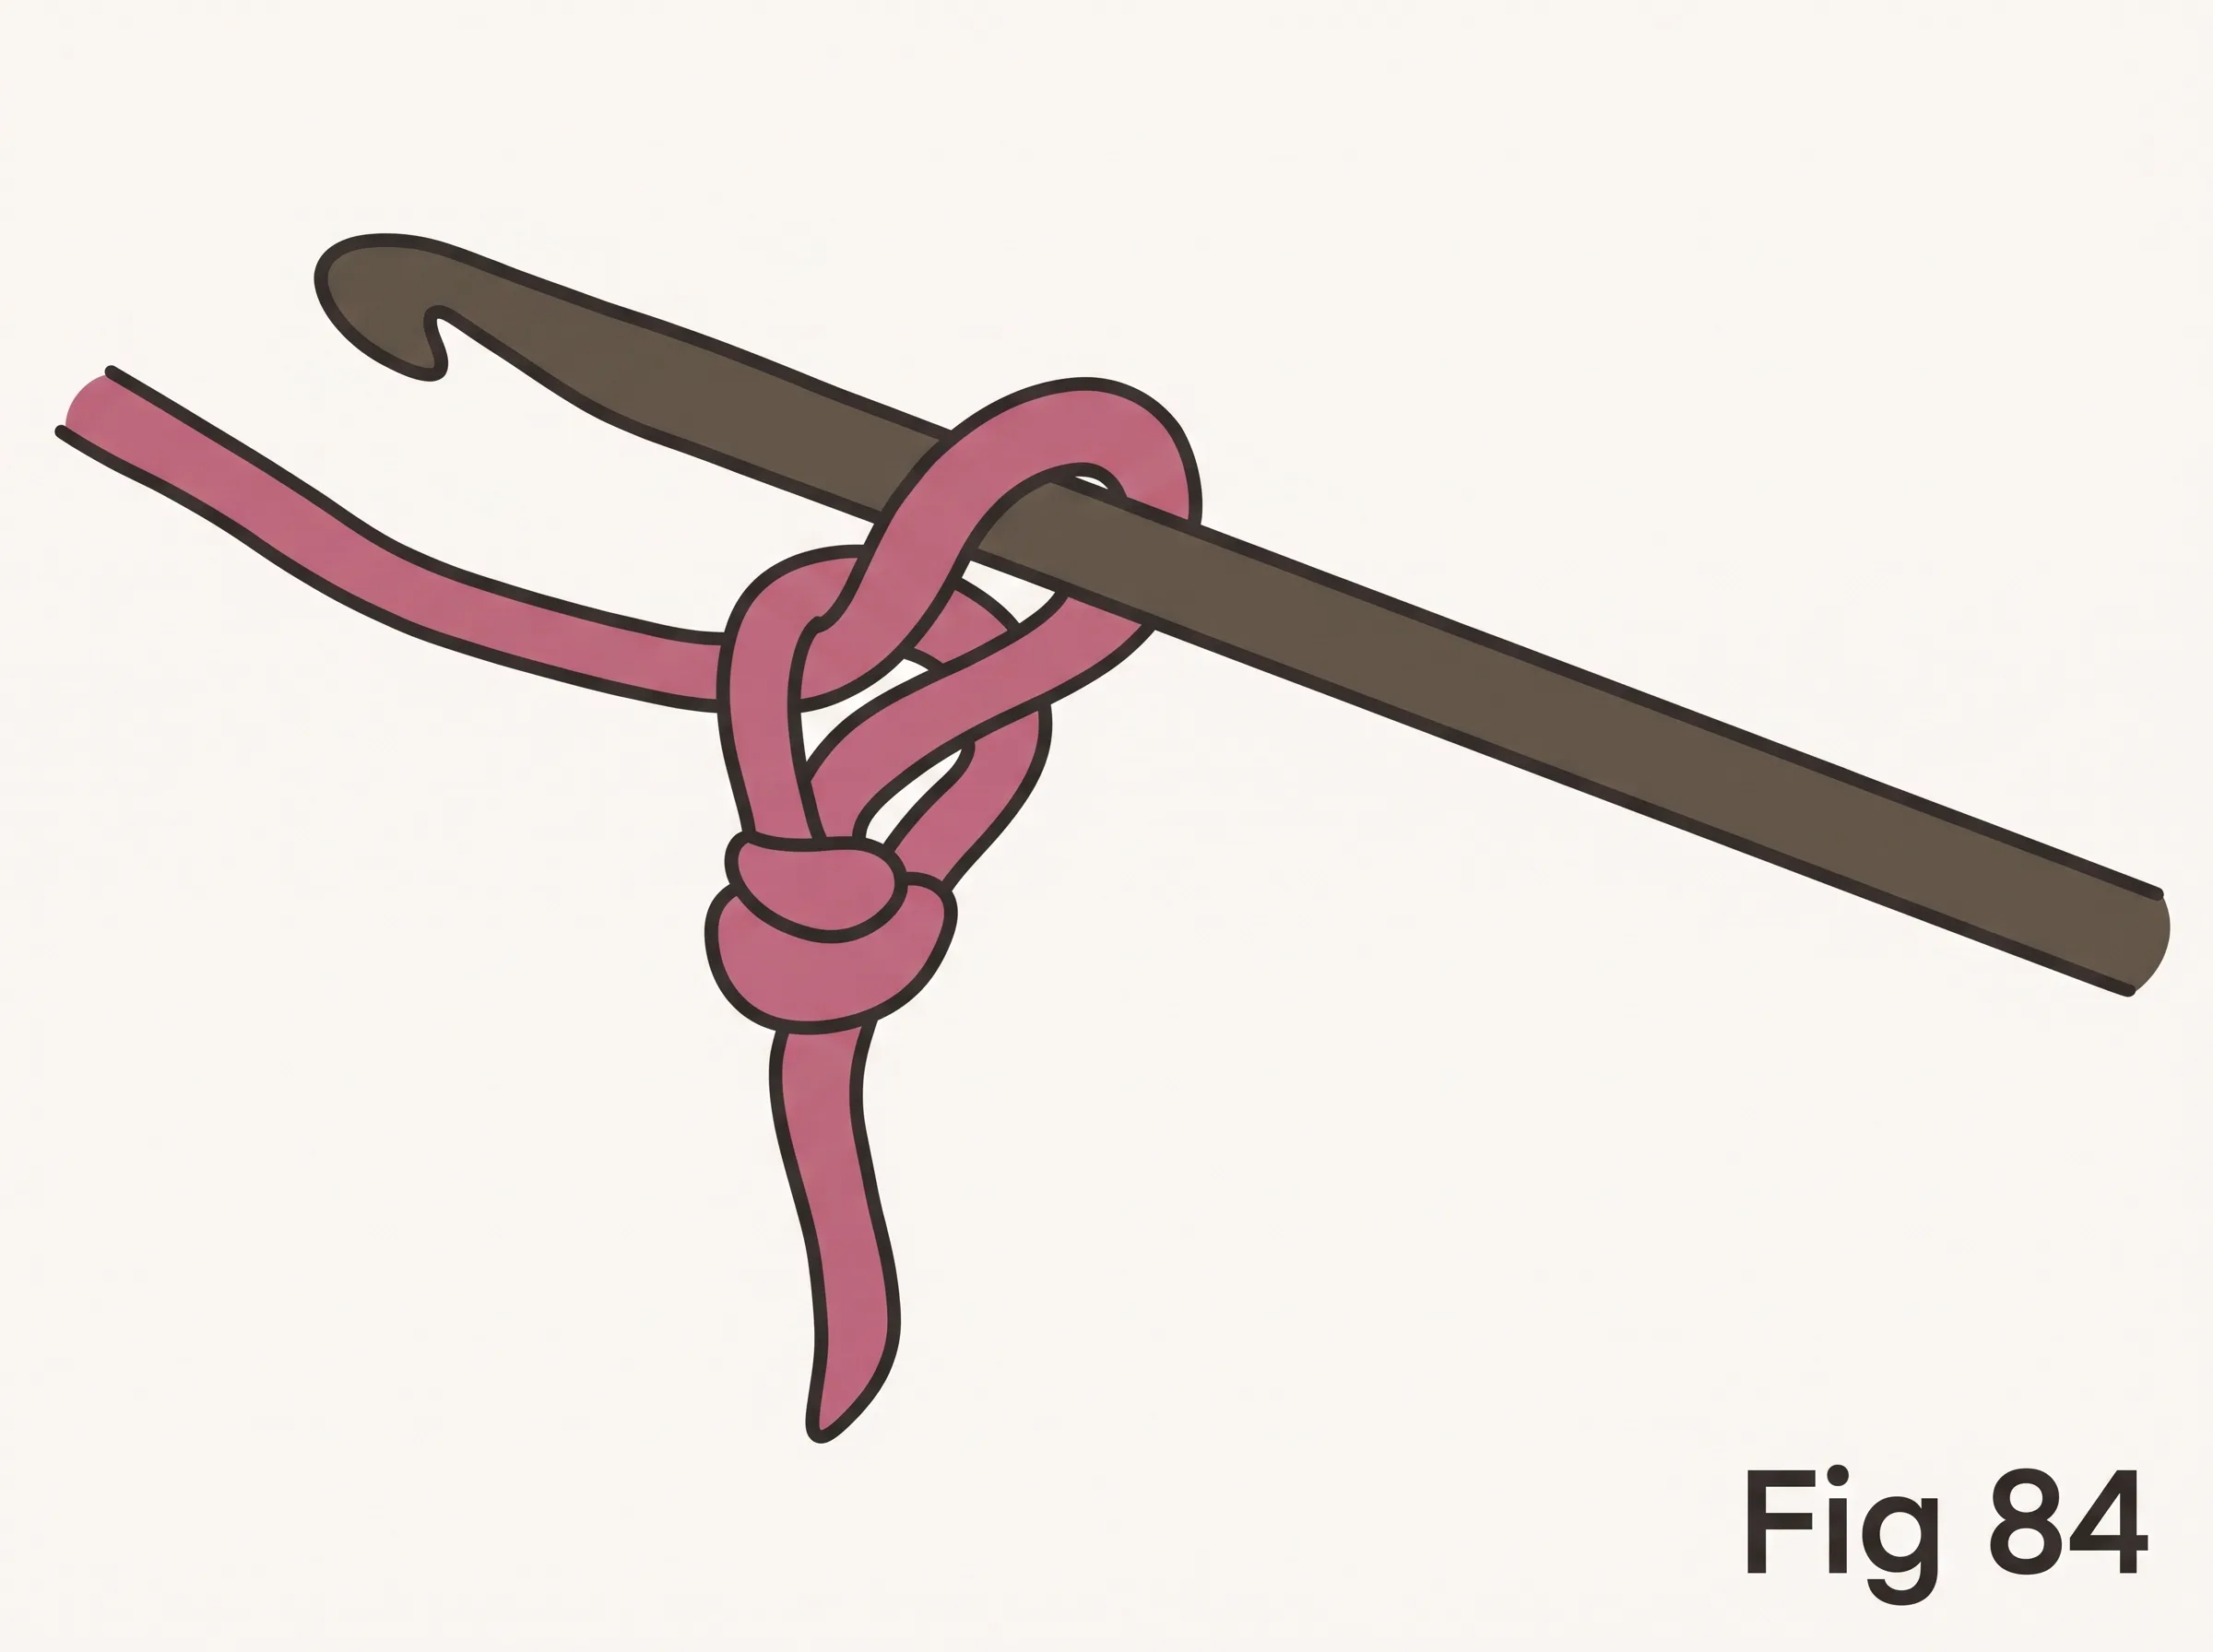
- Make a loop by crossing the yarn over itself, leaving a 6-inch tail hanging free.
- Reach through the loop and pull the working yarn through to create a new loop (Fig 83).
- Slide this new loop onto your hook and gently pull both ends to snug it down (Fig 84).
2. Chain Stitch (ch) — The Foundation of All Basic Crochet Stitches
Almost every crochet project begins with a row of chain stitches called the foundation chain. This is one of the most important basic crochet stitches to master because it creates the base your very first row is worked into.

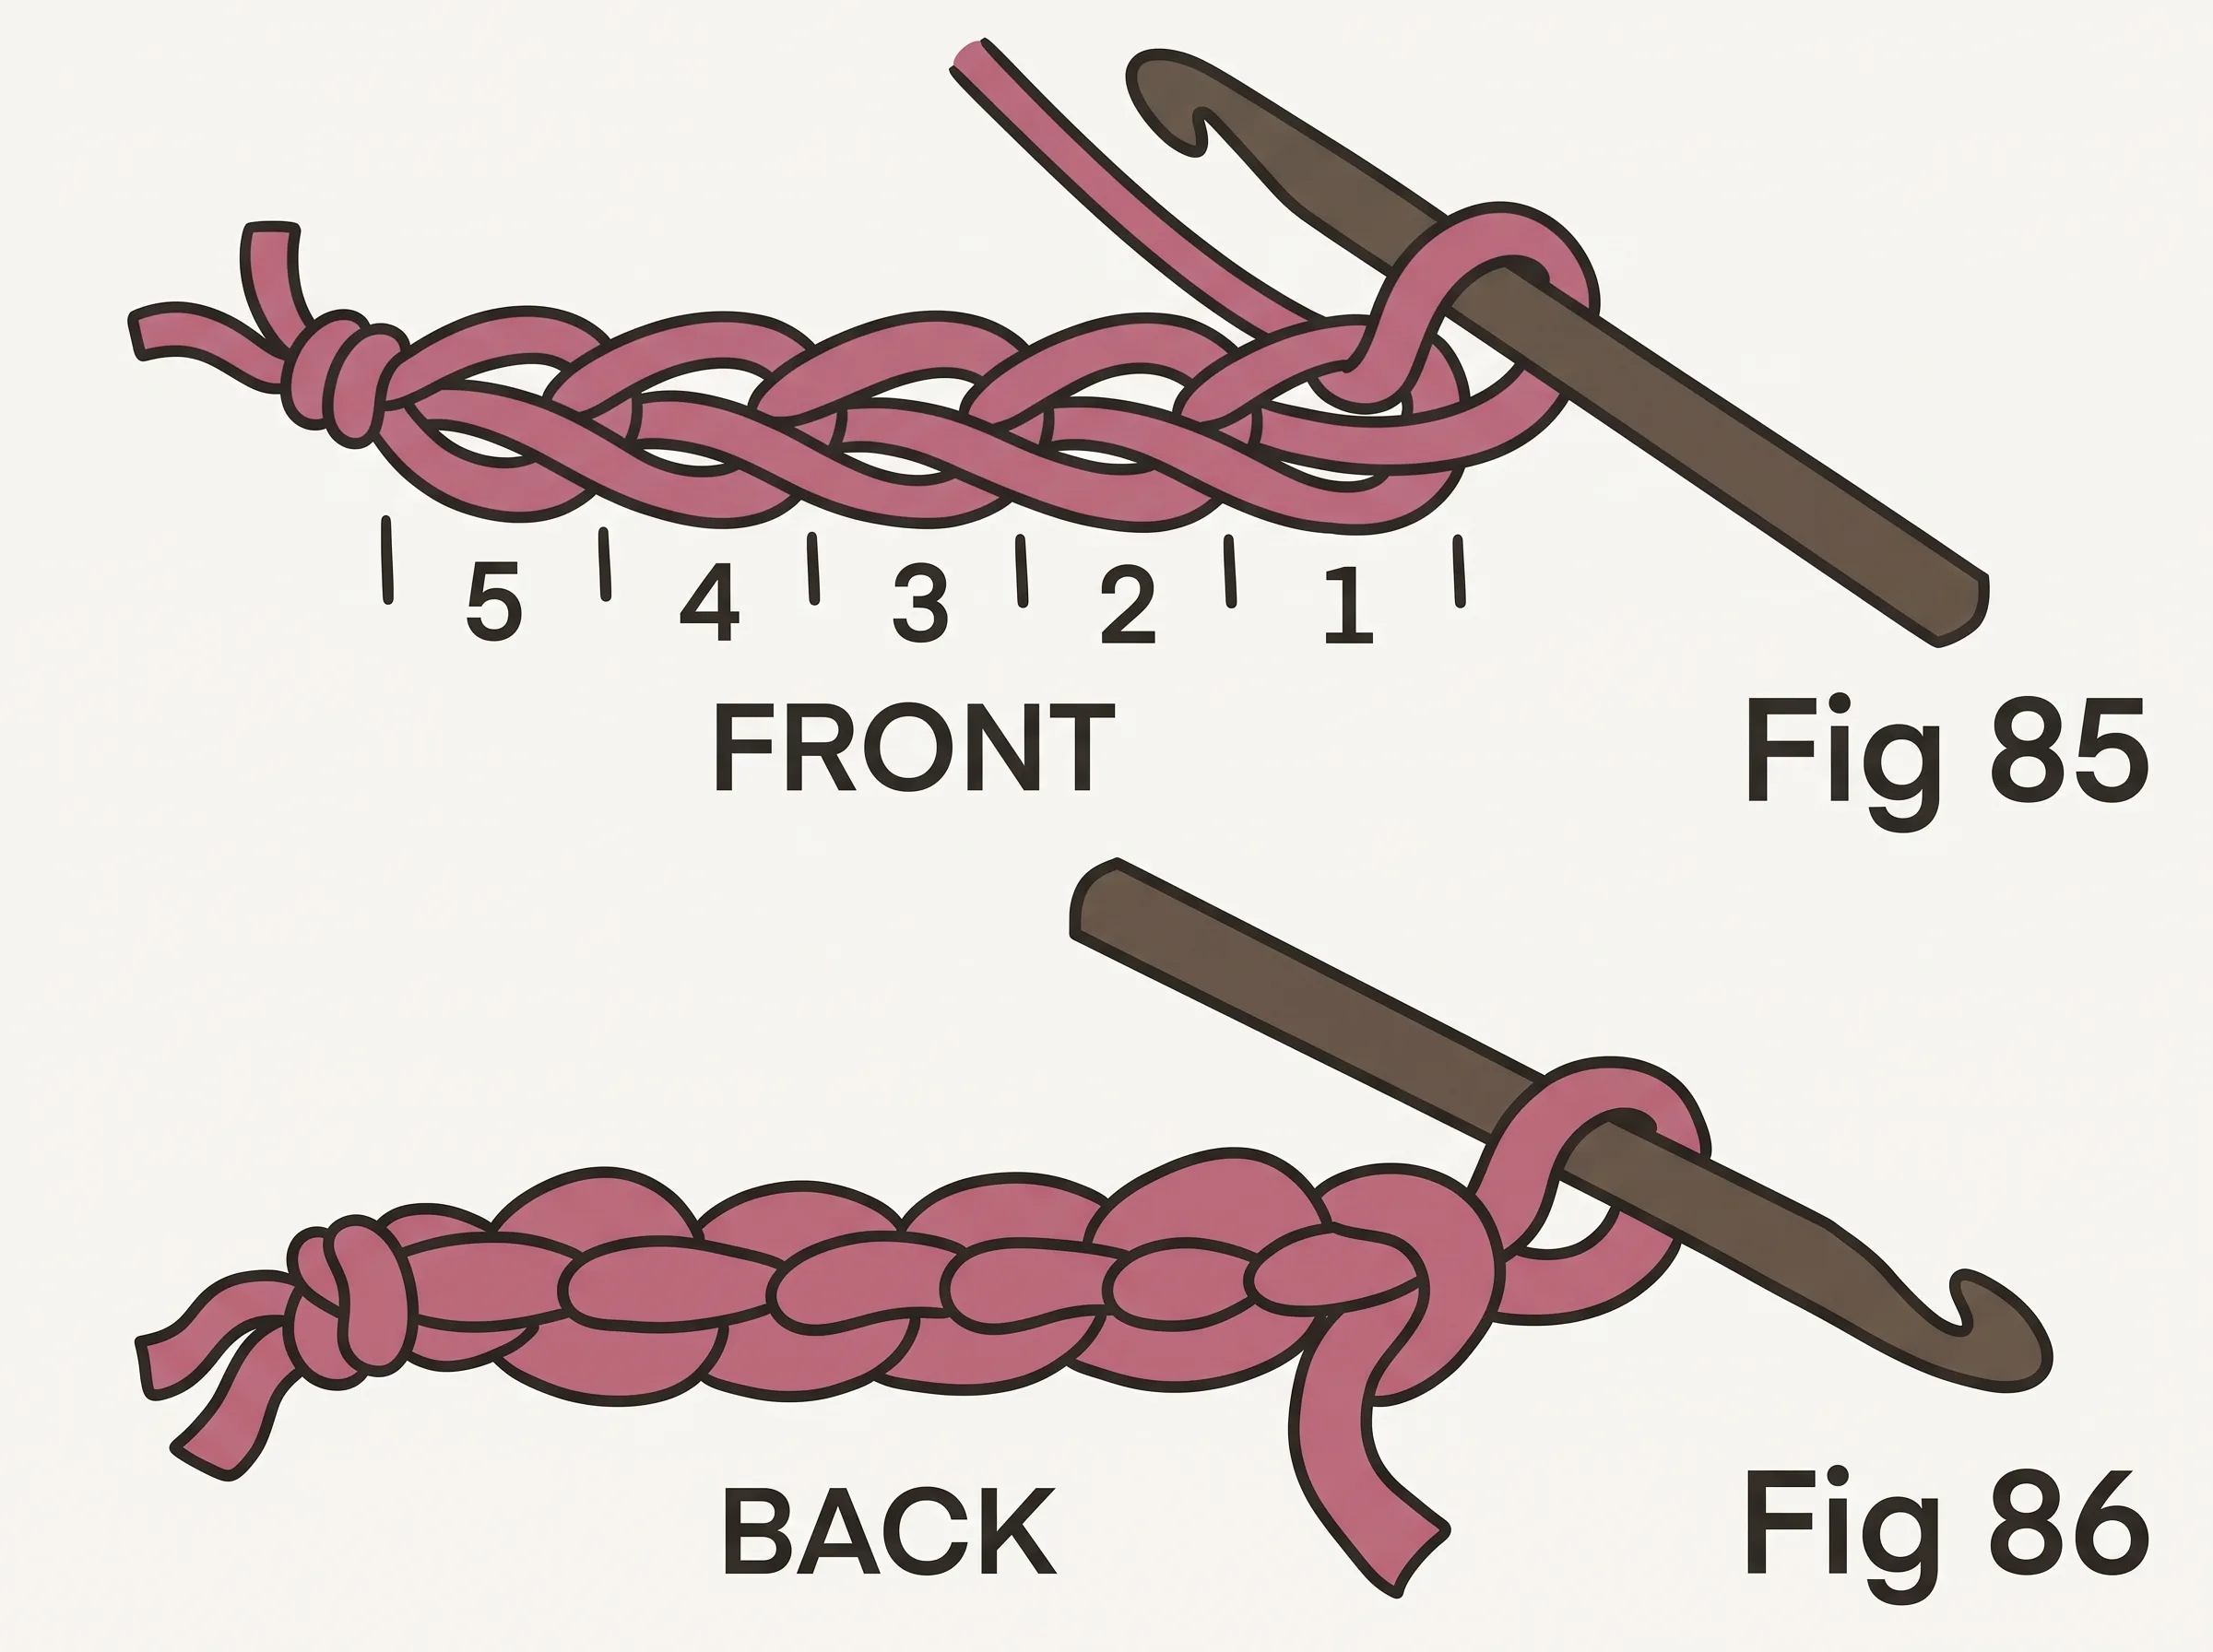
- Start with your slip knot on the hook. Hold the hook in your dominant hand, feed yarn with the other.
- Wrap the working yarn over the hook from back to front — this is a yarn over (yo).
- Draw the yarn through the loop already on your hook. That’s one chain made.
- Repeat for as many chains as your pattern requires.
How to count chains: Look at the front (Fig 85) — each V-shape is one chain. The back (Fig 86) shows a bump behind each V. Do not count the slip knot or the live loop on your hook.
3. Slip Stitch (sl st) — The Flattest of the Basic Crochet Stitches
The slip stitch creates almost no height and is used mainly for joining rounds (essential for granny squares), moving your hook to a new position, or finishing off a row neatly.
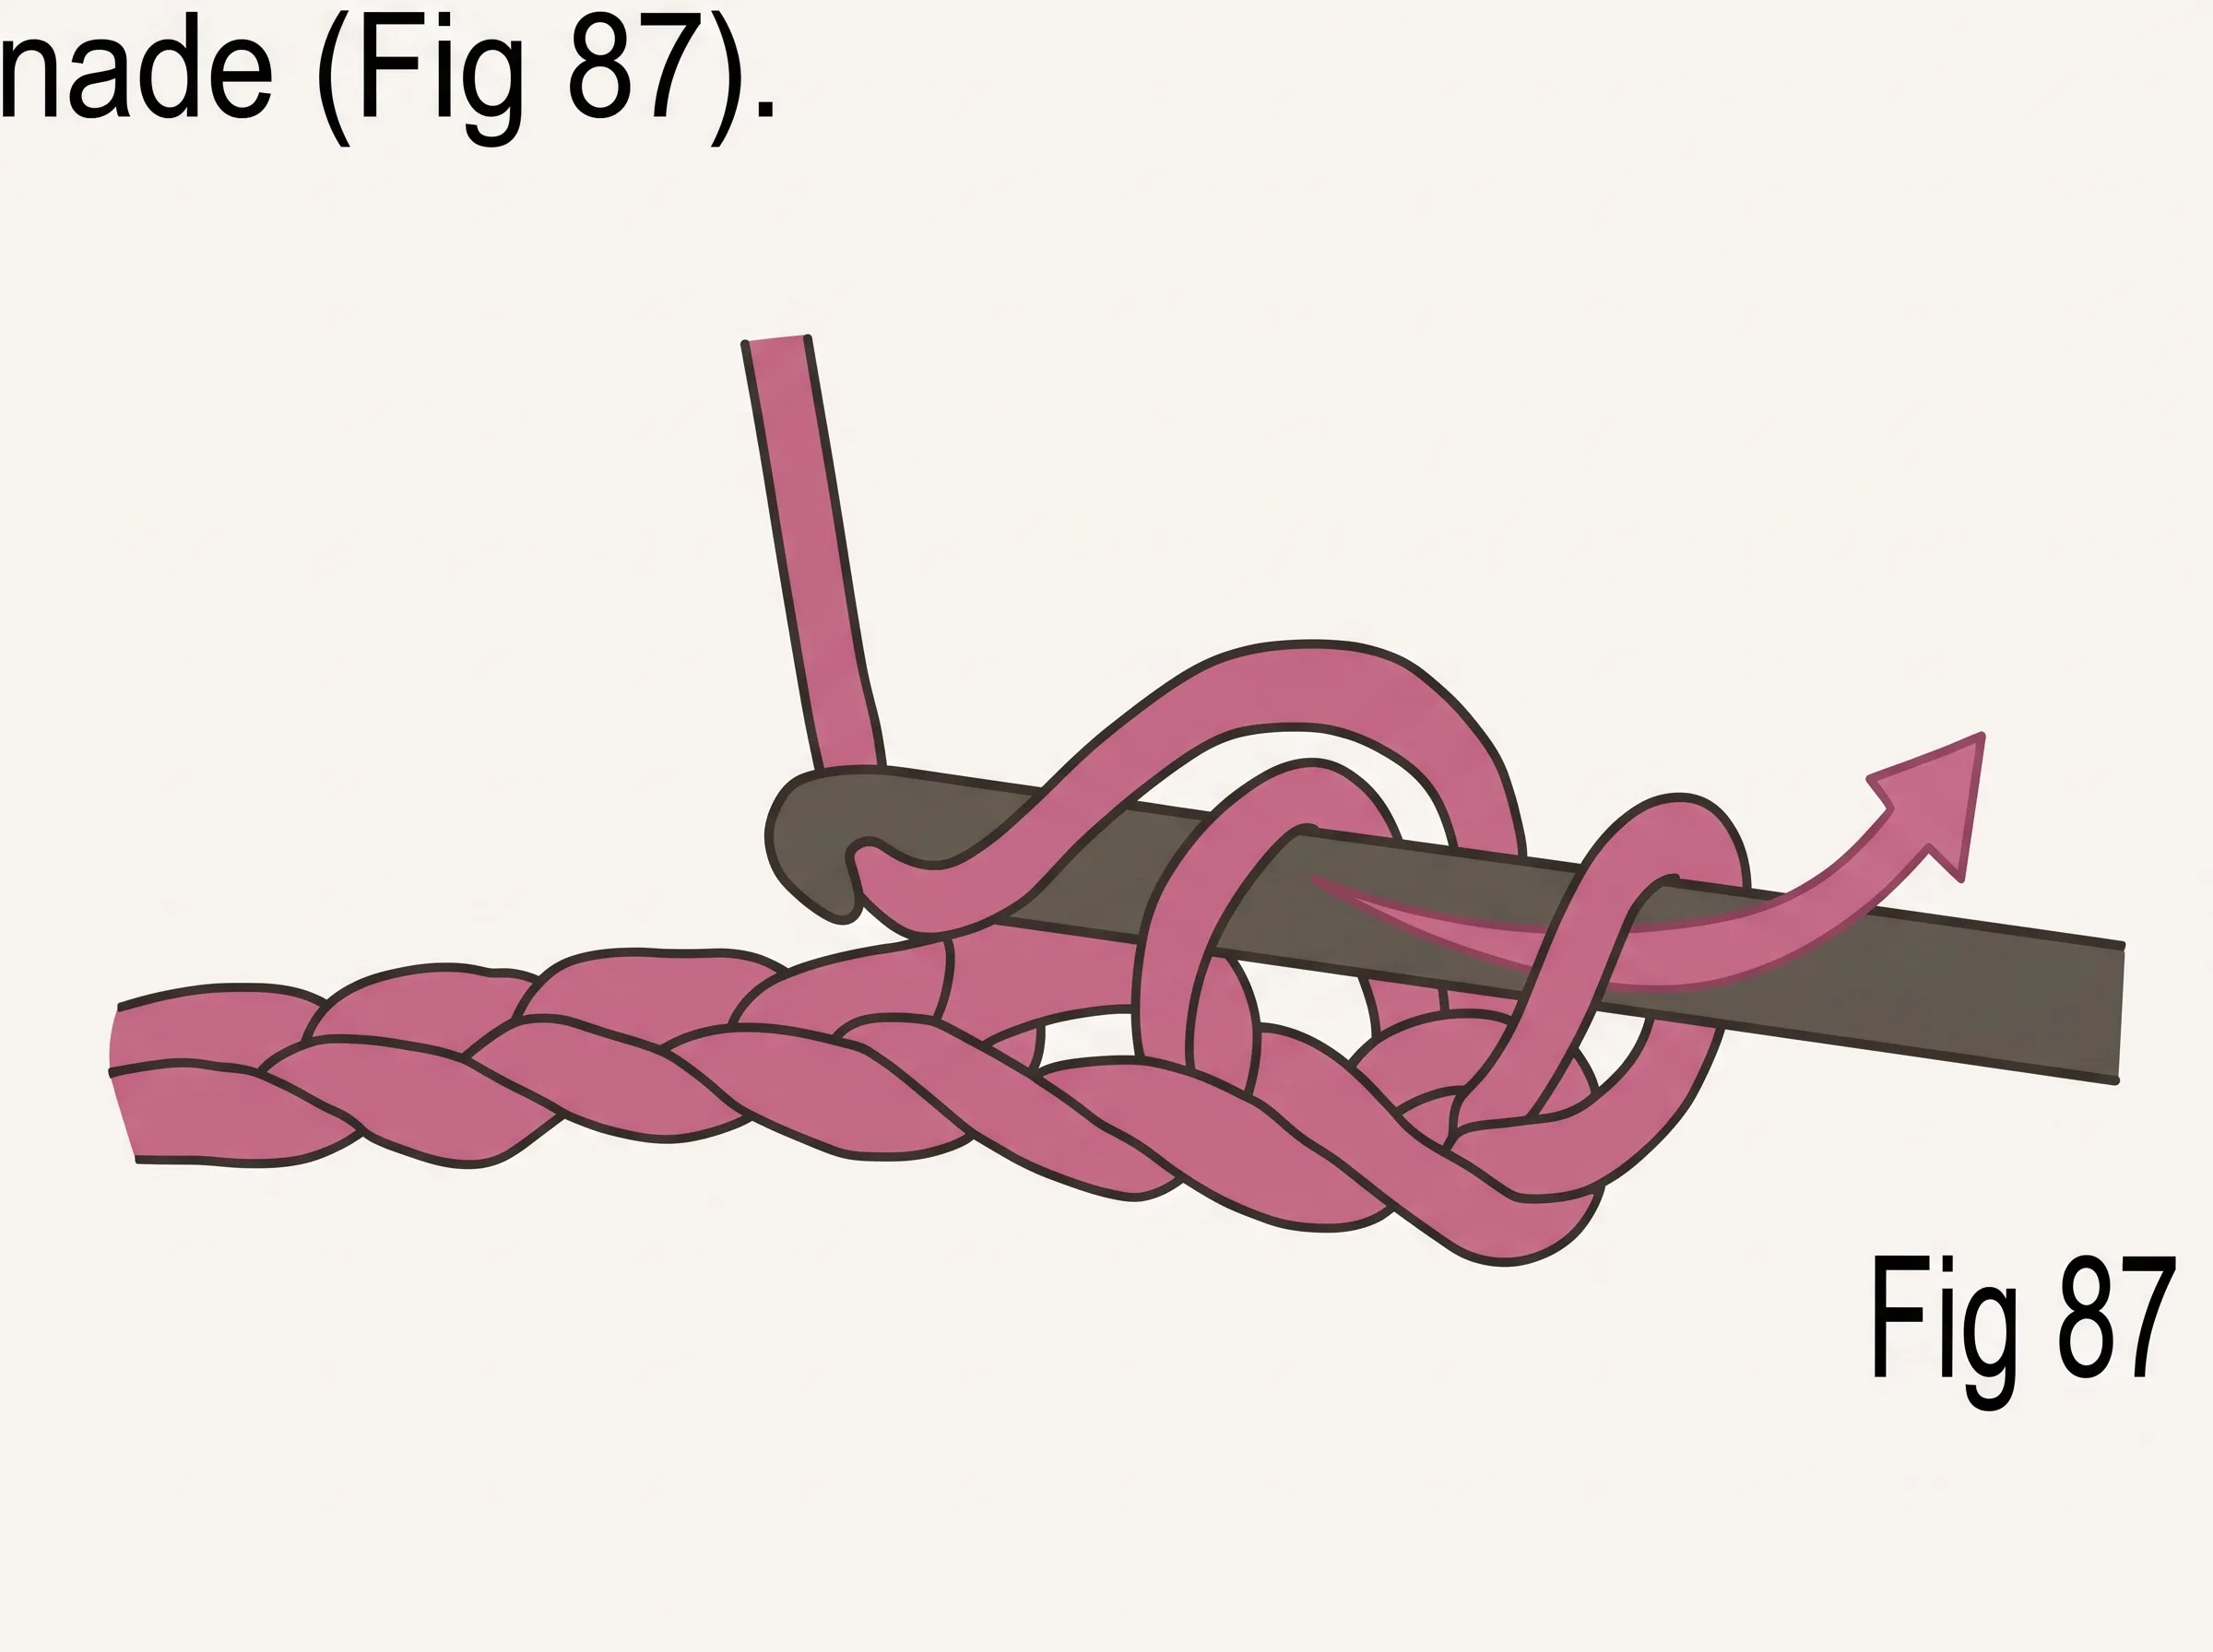
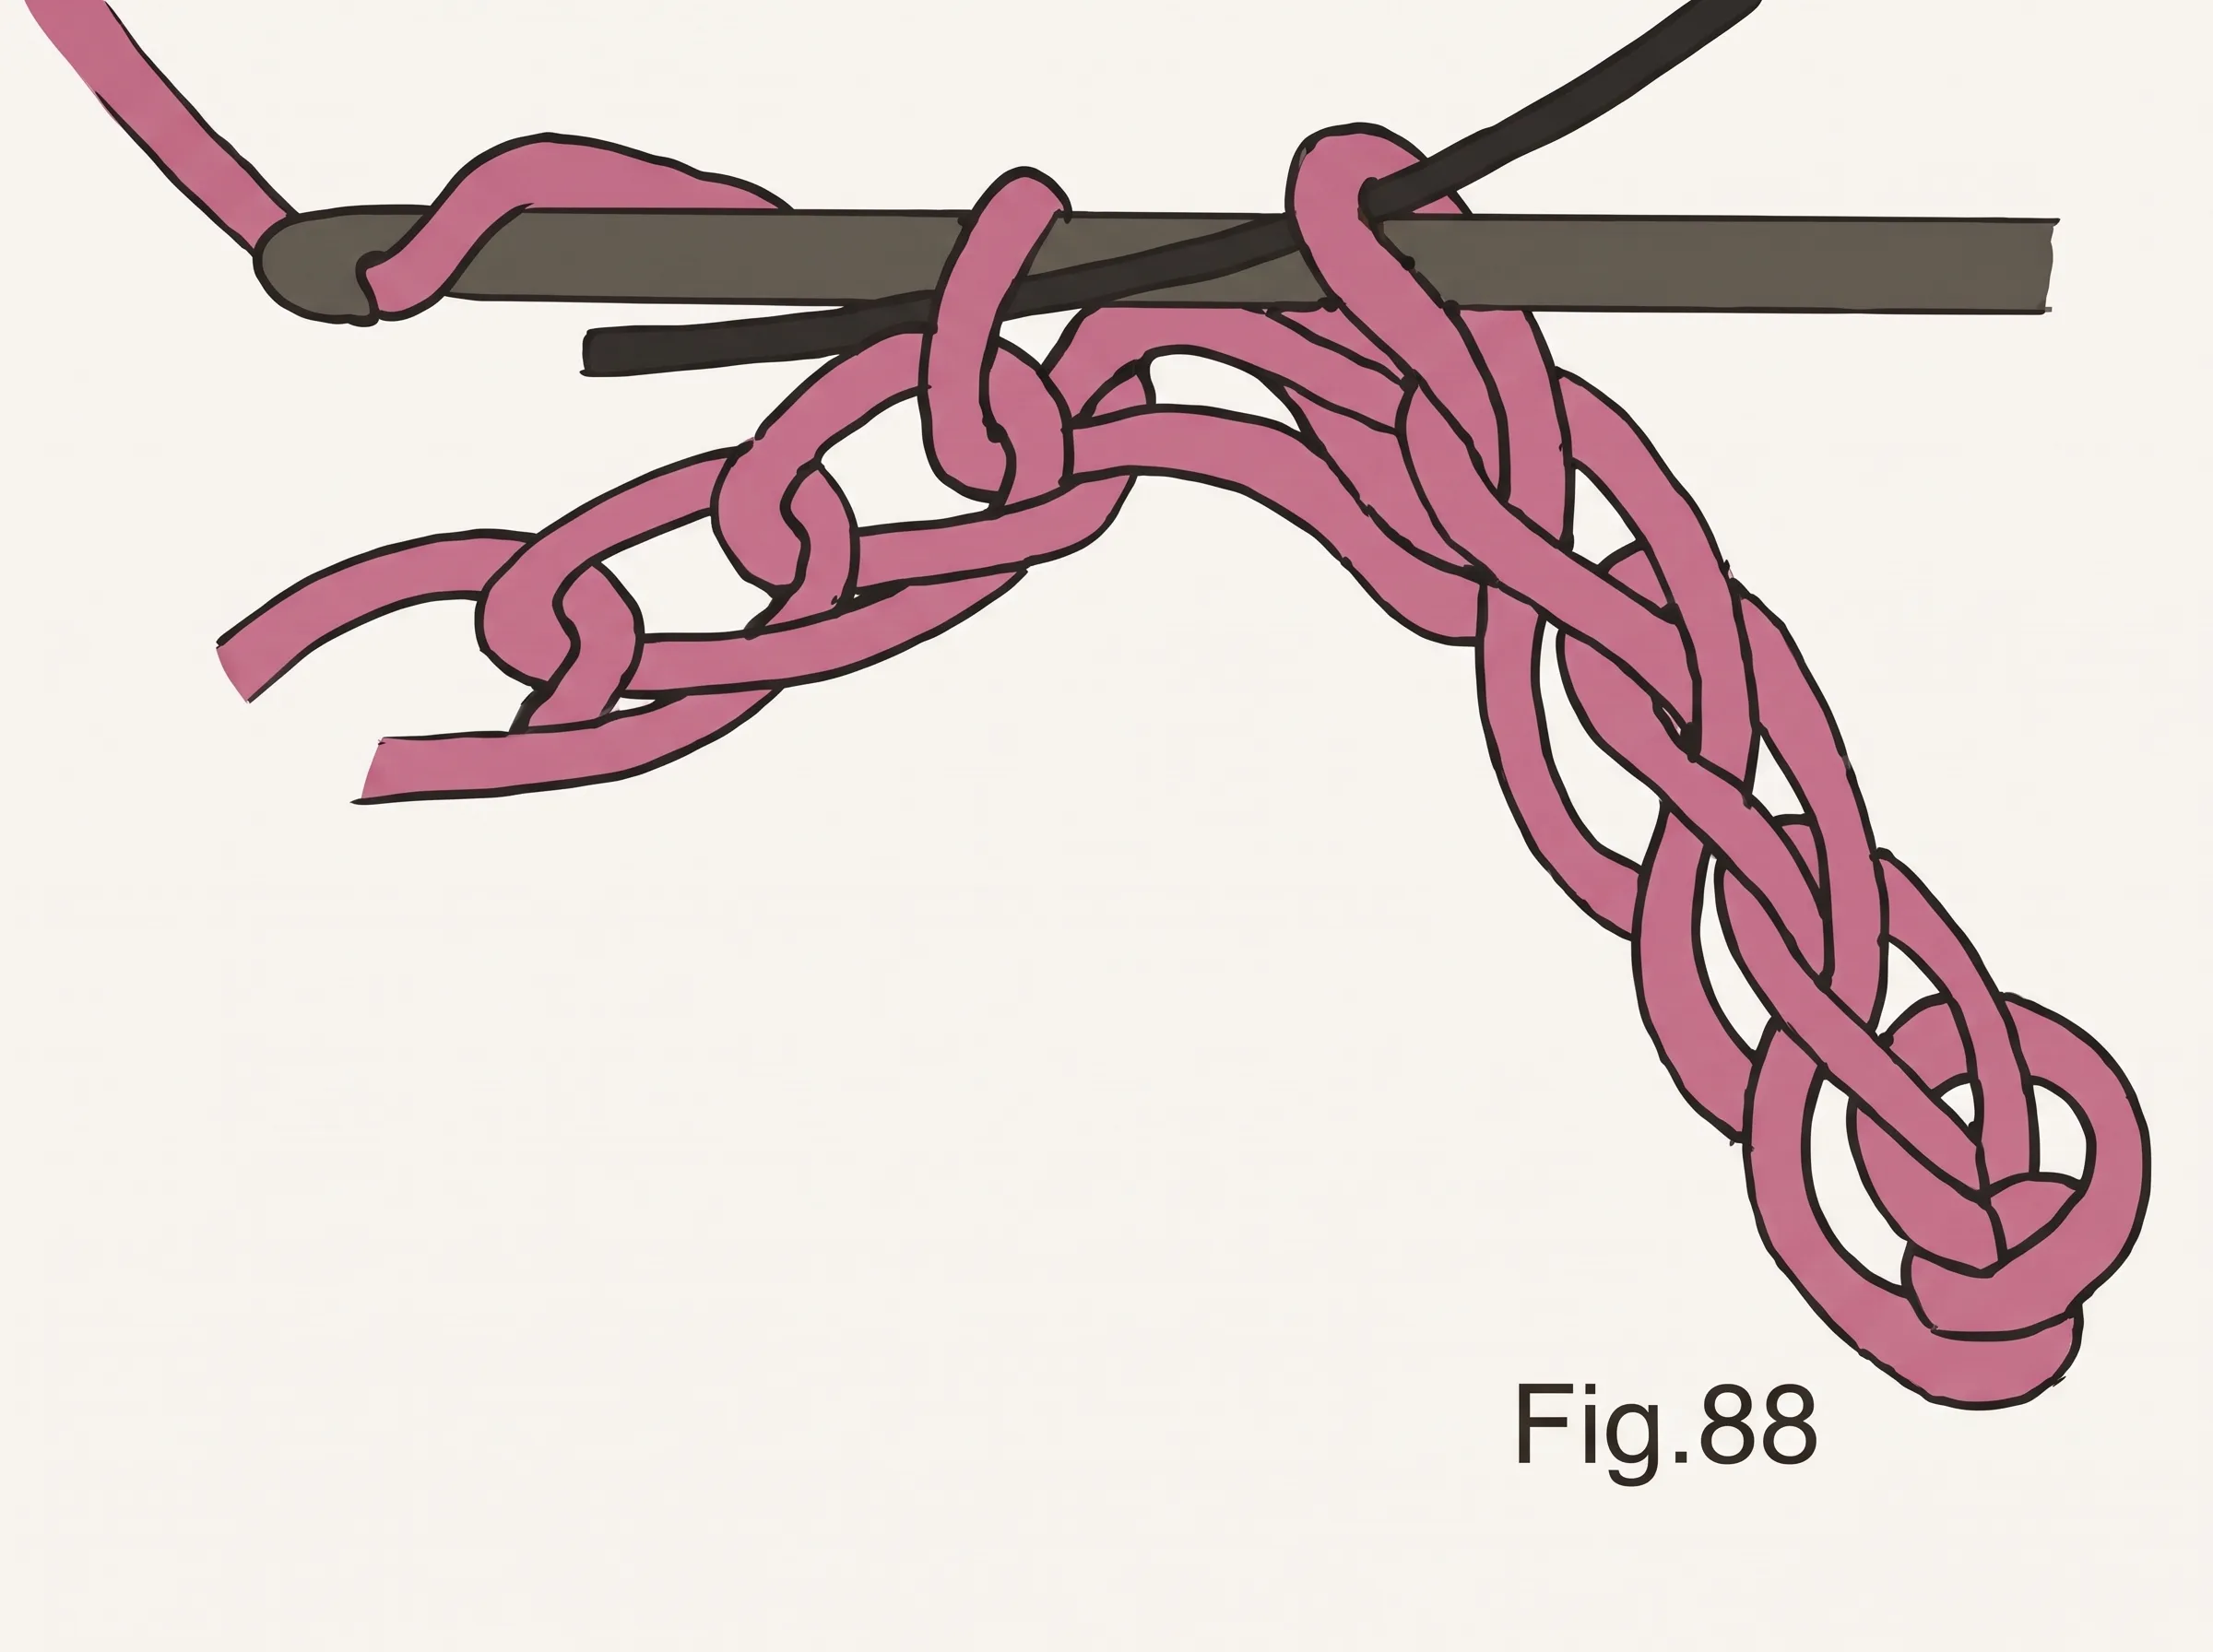
- Insert your hook into the stitch or chain specified.
- Yarn over (wrap yarn over hook).
- Draw the yarn through both the stitch AND the loop on your hook in one movement (Fig 87–88) — 1 slip stitch made.
4. Single Crochet (sc) — The Most Used of All Basic Crochet Stitches
If you only learn one of the basic crochet stitches, make it the single crochet. It creates a tight, dense, durable fabric that appears in more beginner patterns than any other stitch — dishcloths, amigurumi toys, tote bags, ear warmers.

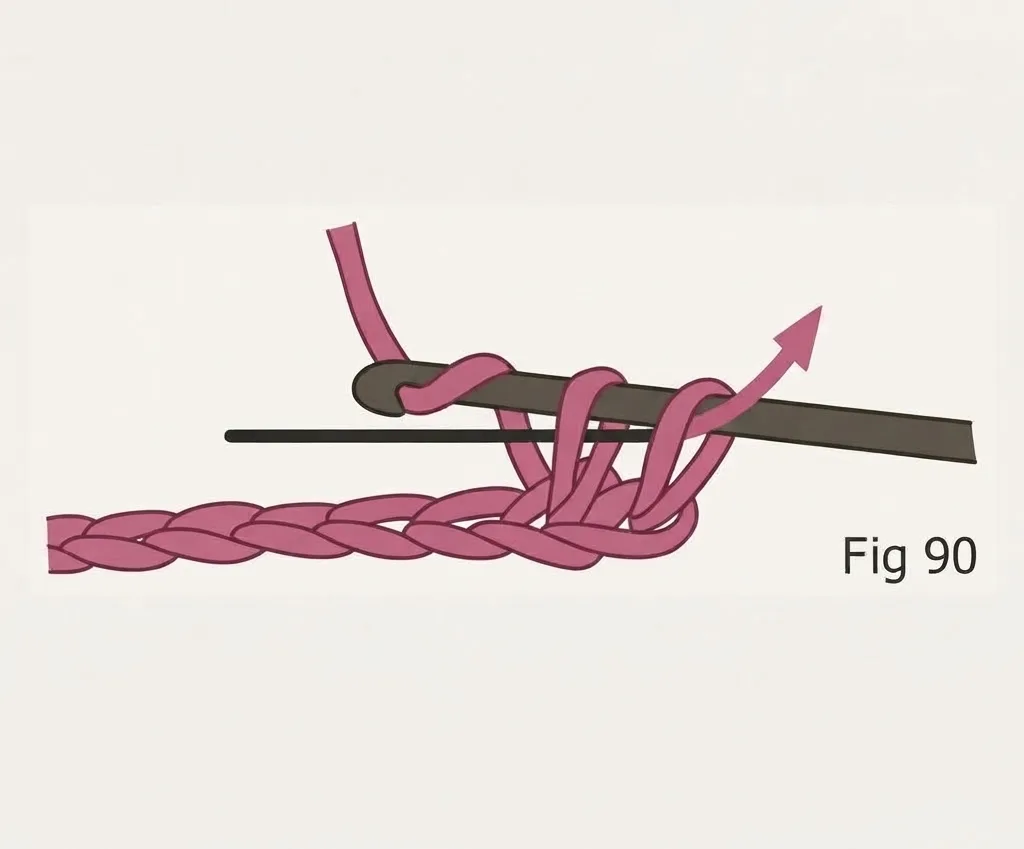

- Insert your hook into the 2nd chain from the hook (Fig 89).
- Yarn over and draw through the chain only — 2 loops on your hook (Fig 90).
- Yarn over again and draw through both loops — 1 single crochet made (Fig 91).
- Insert into the next chain and repeat.
5. Half Double Crochet (hdc) — Soft and Squishy
The half double crochet sits between single and double crochet in height and creates a wonderfully squishy fabric. It’s a favourite for scarves, baby hats, and cosy cowls because it works up faster than single crochet while still feeling dense and warm.
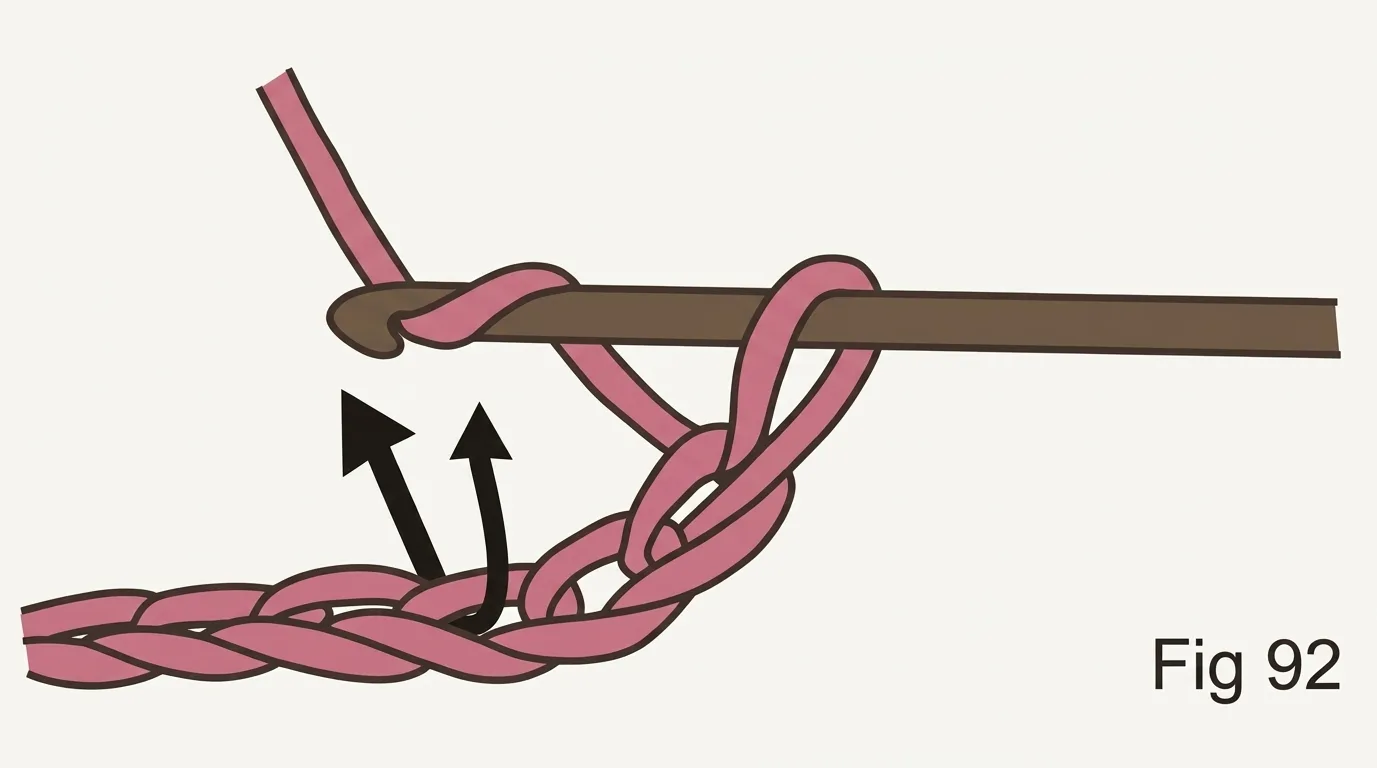
- Yarn over first — before inserting your hook (Fig 92).
- Insert your hook into the 3rd chain from the hook.
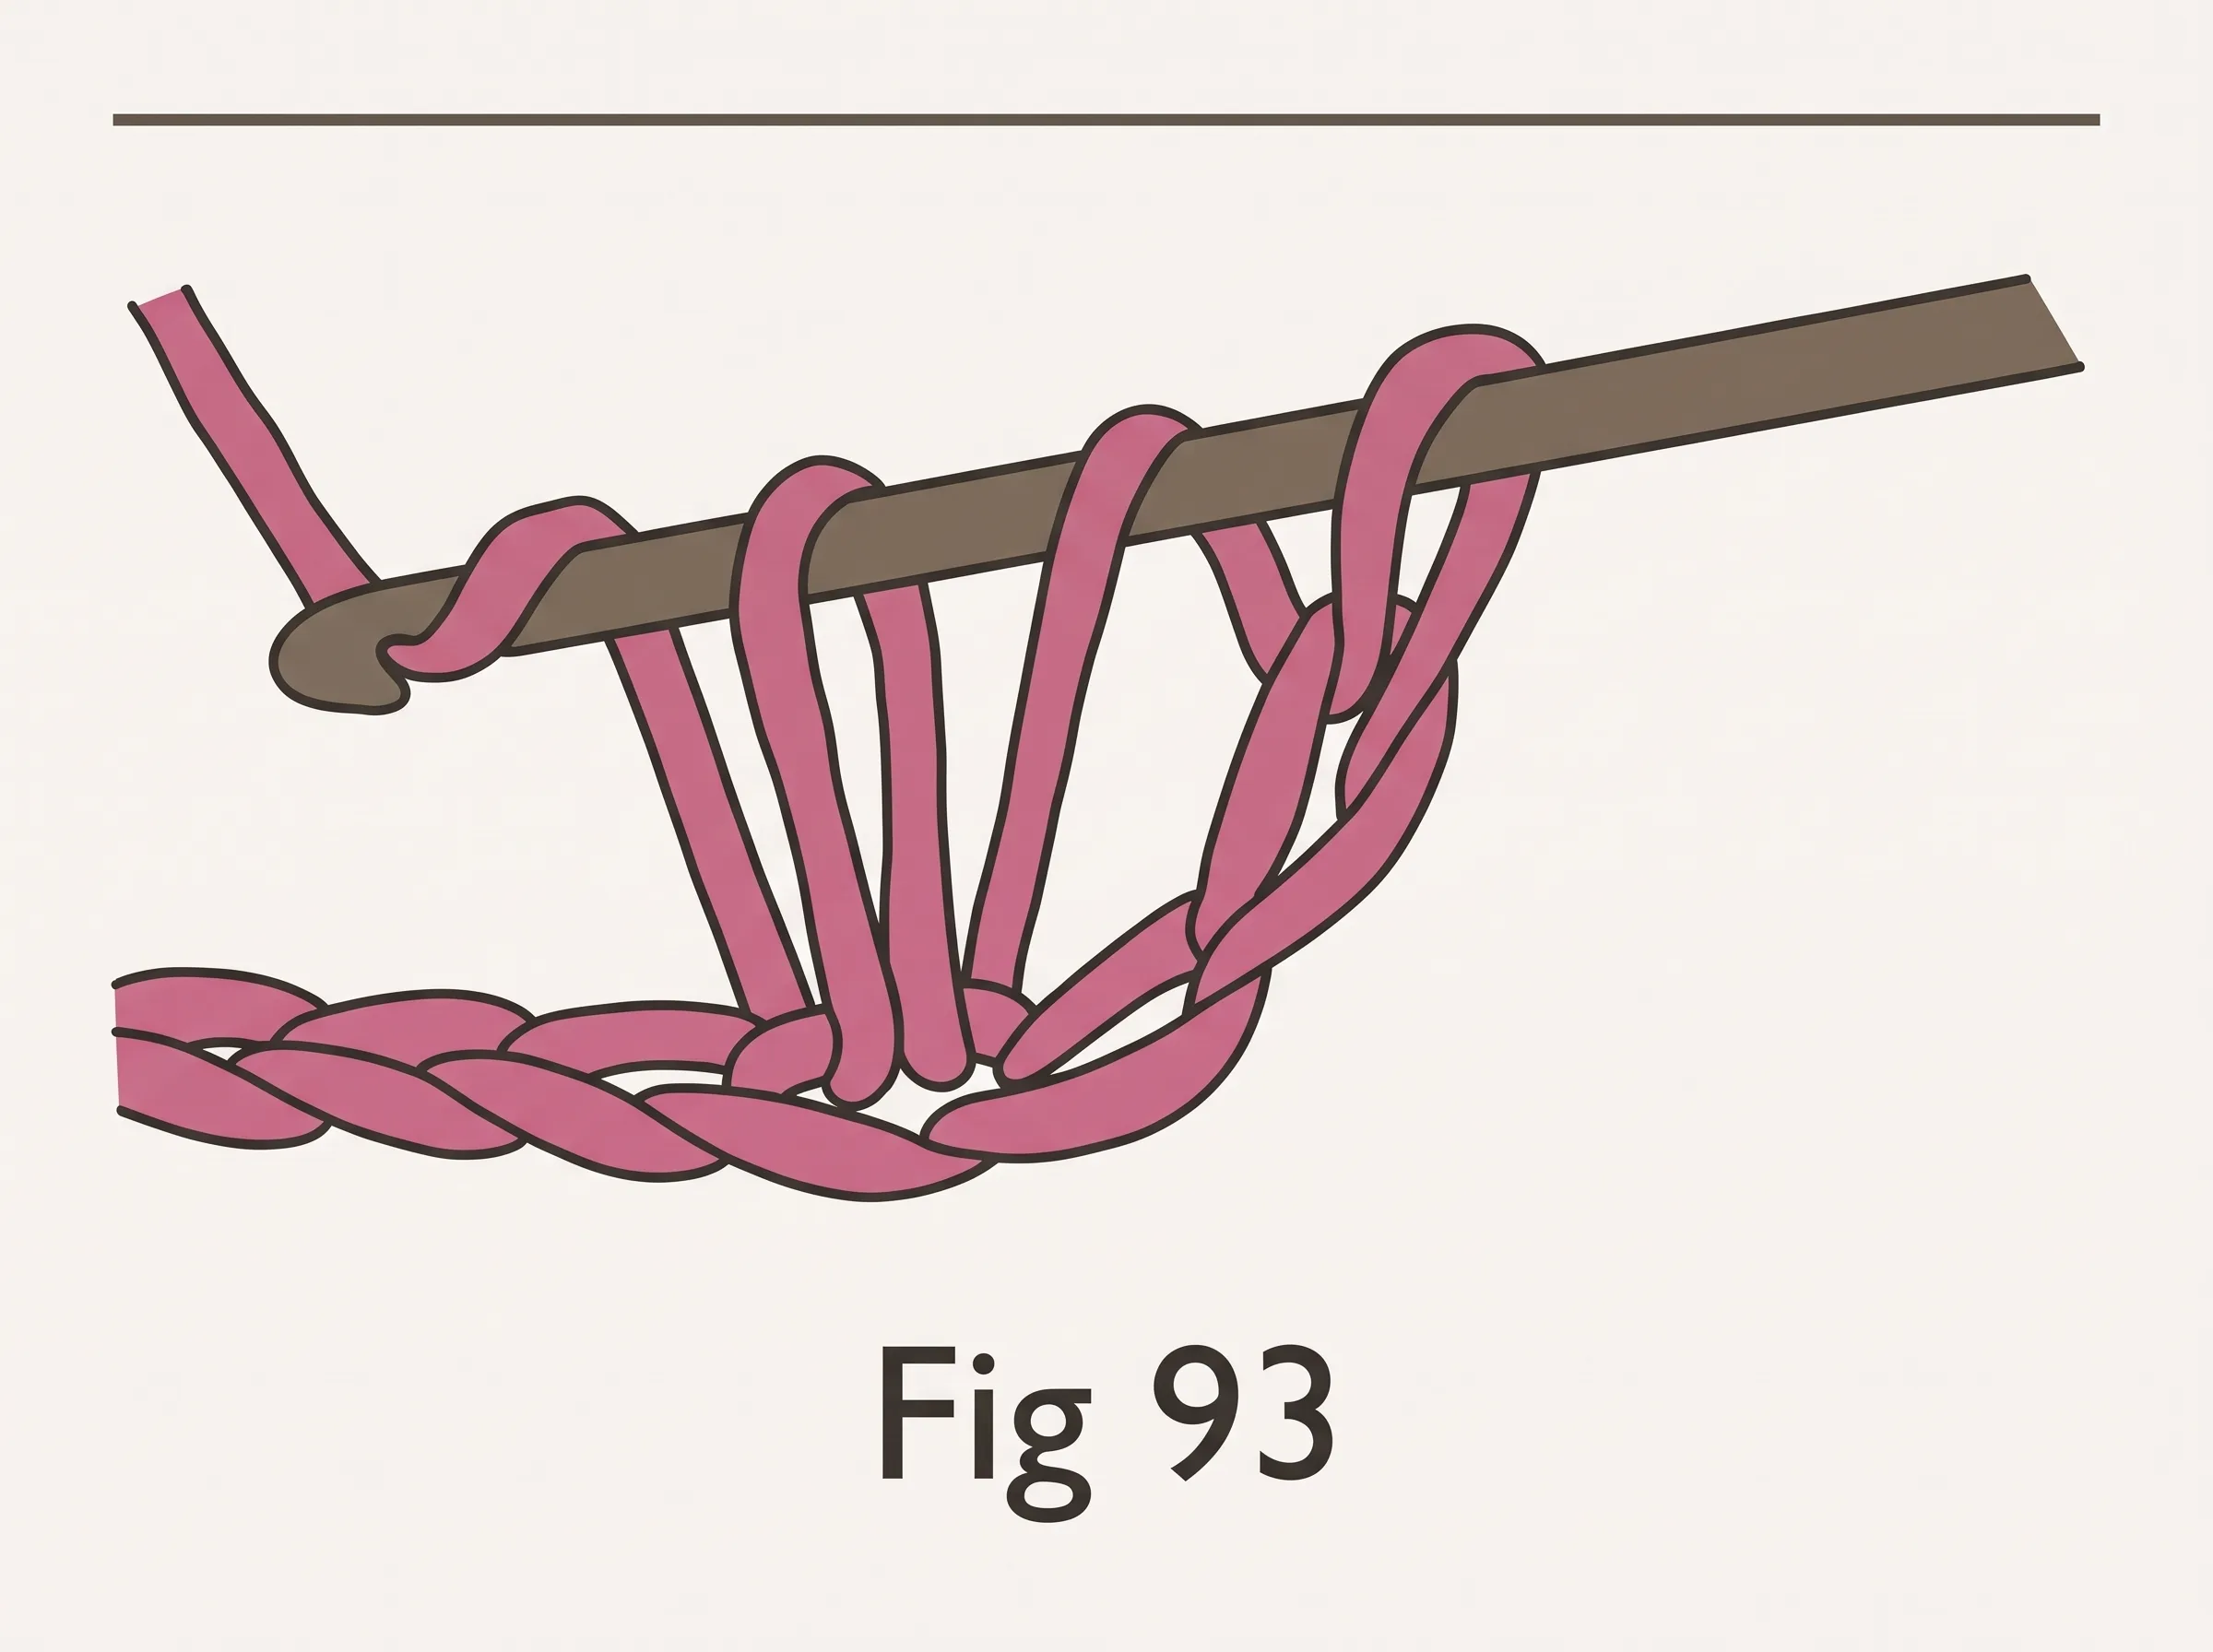
- Yarn over and draw through the chain only — 3 loops on your hook (Fig 93).
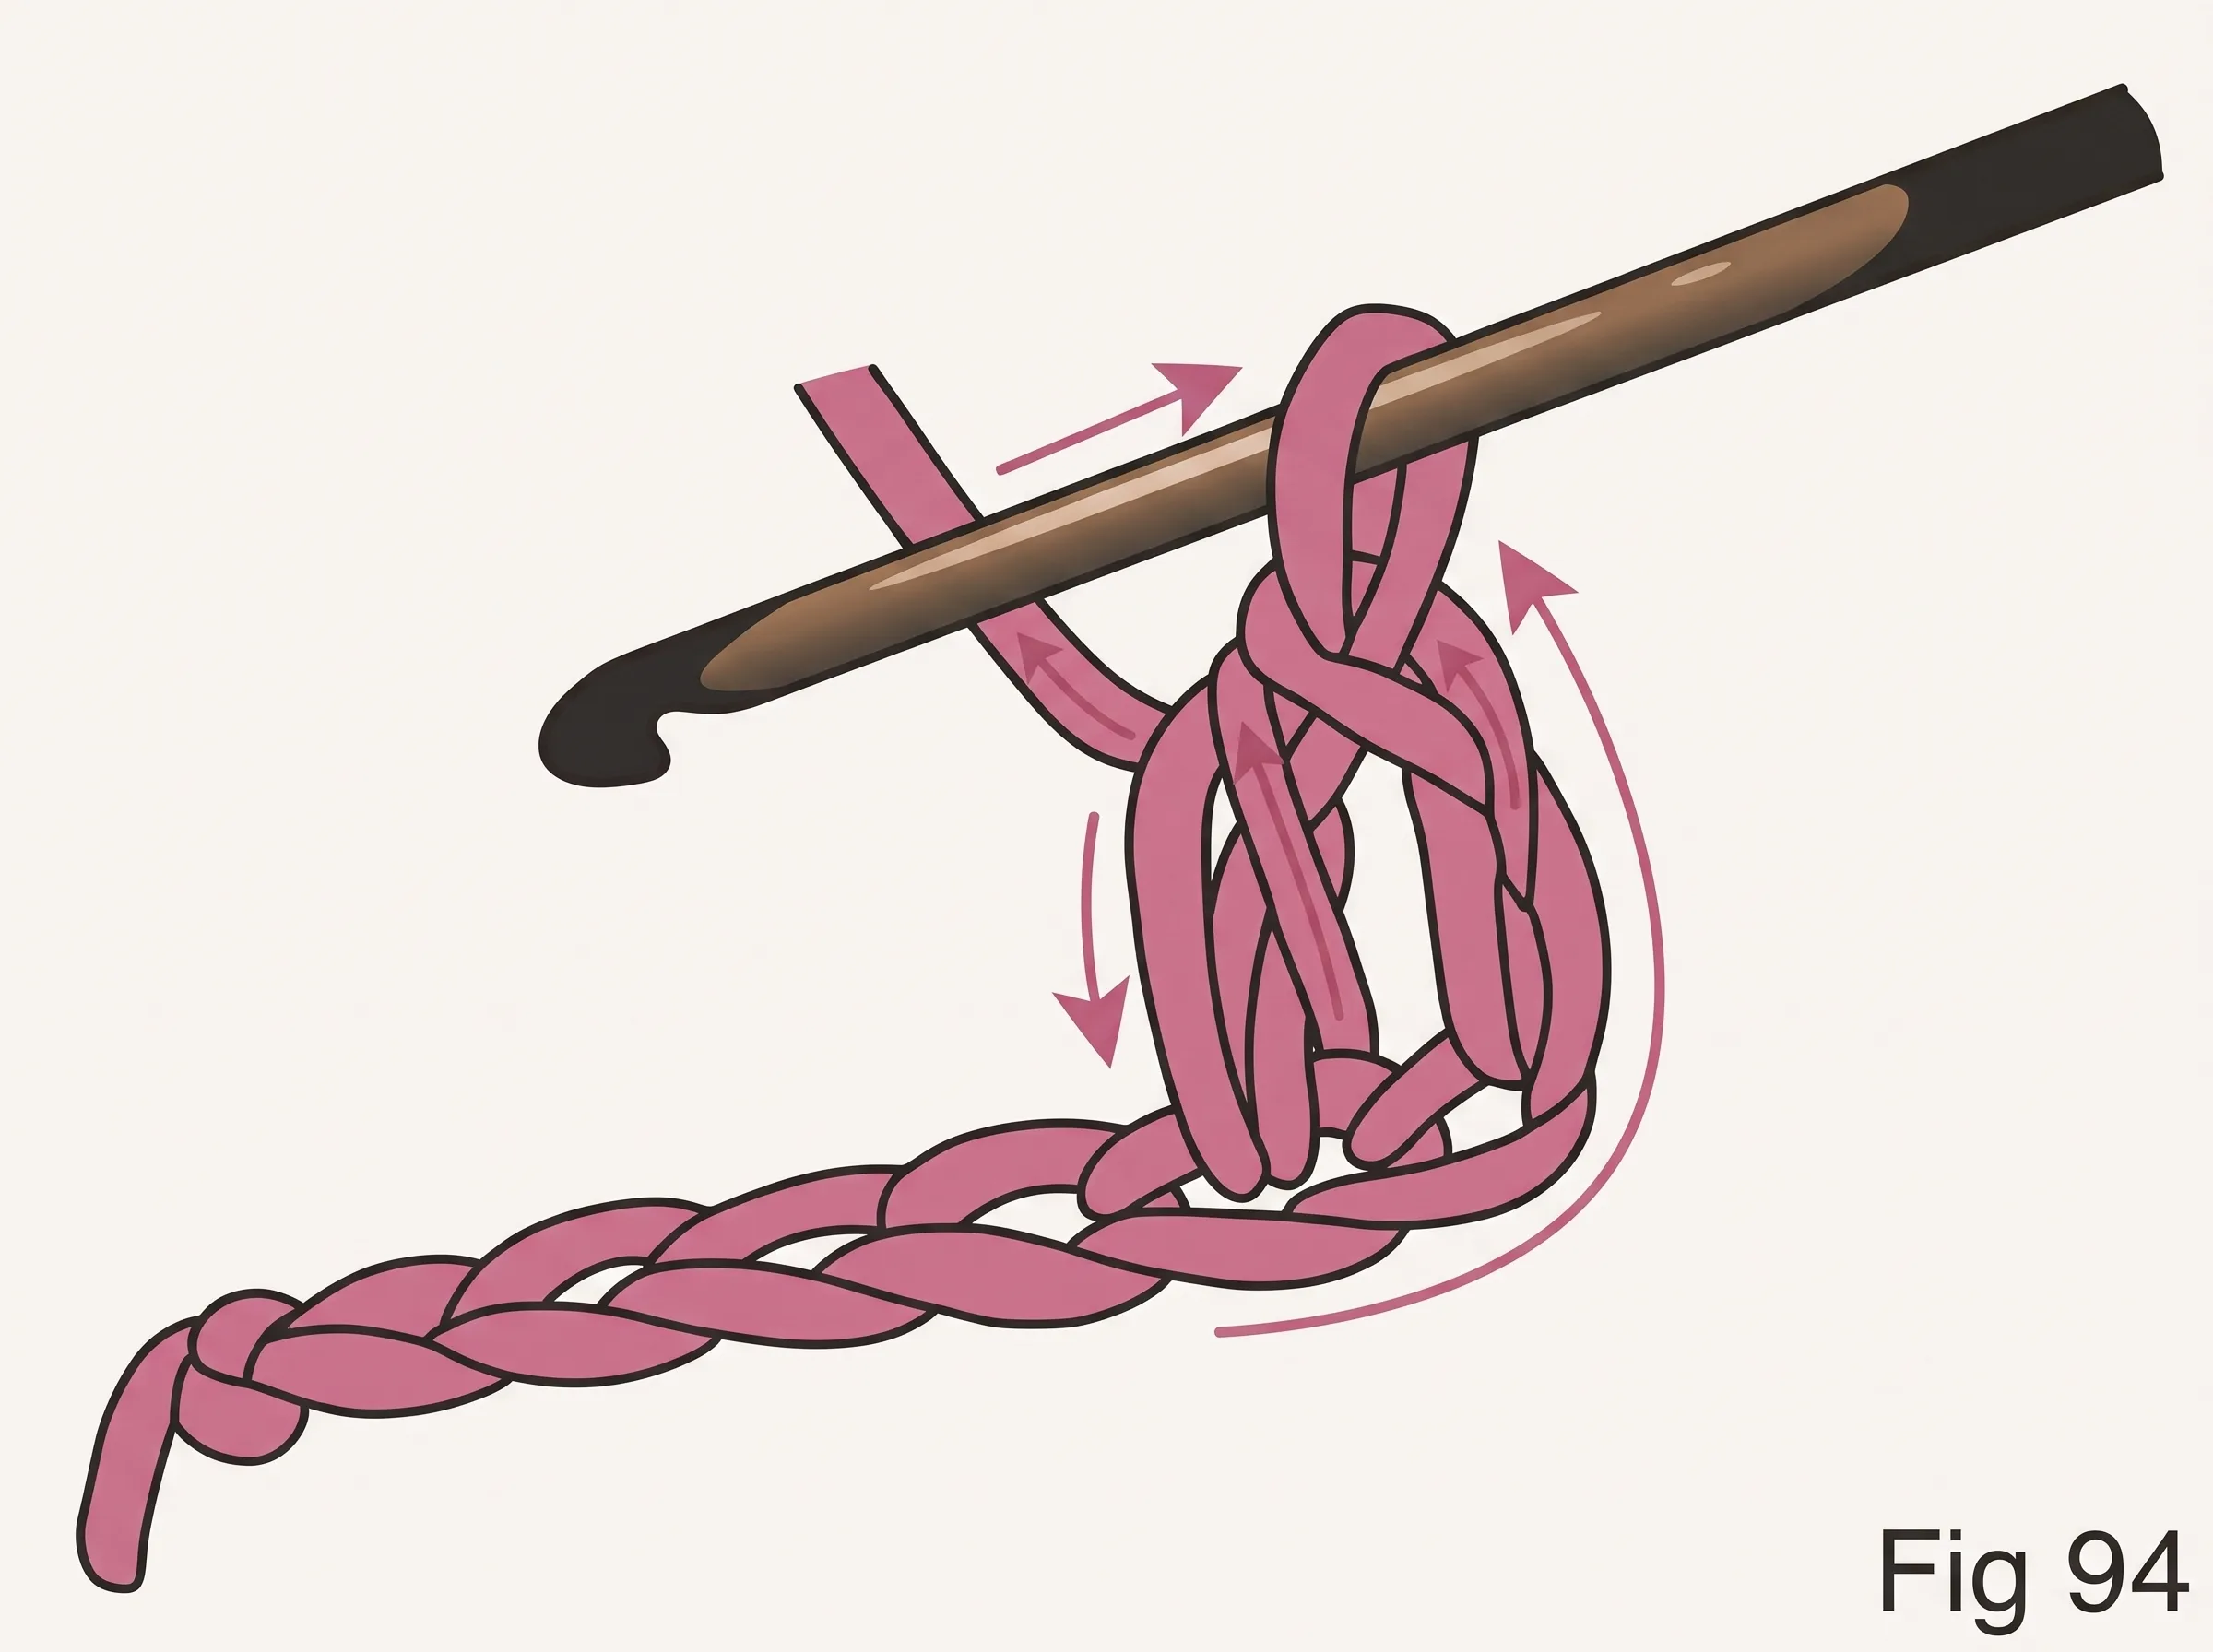
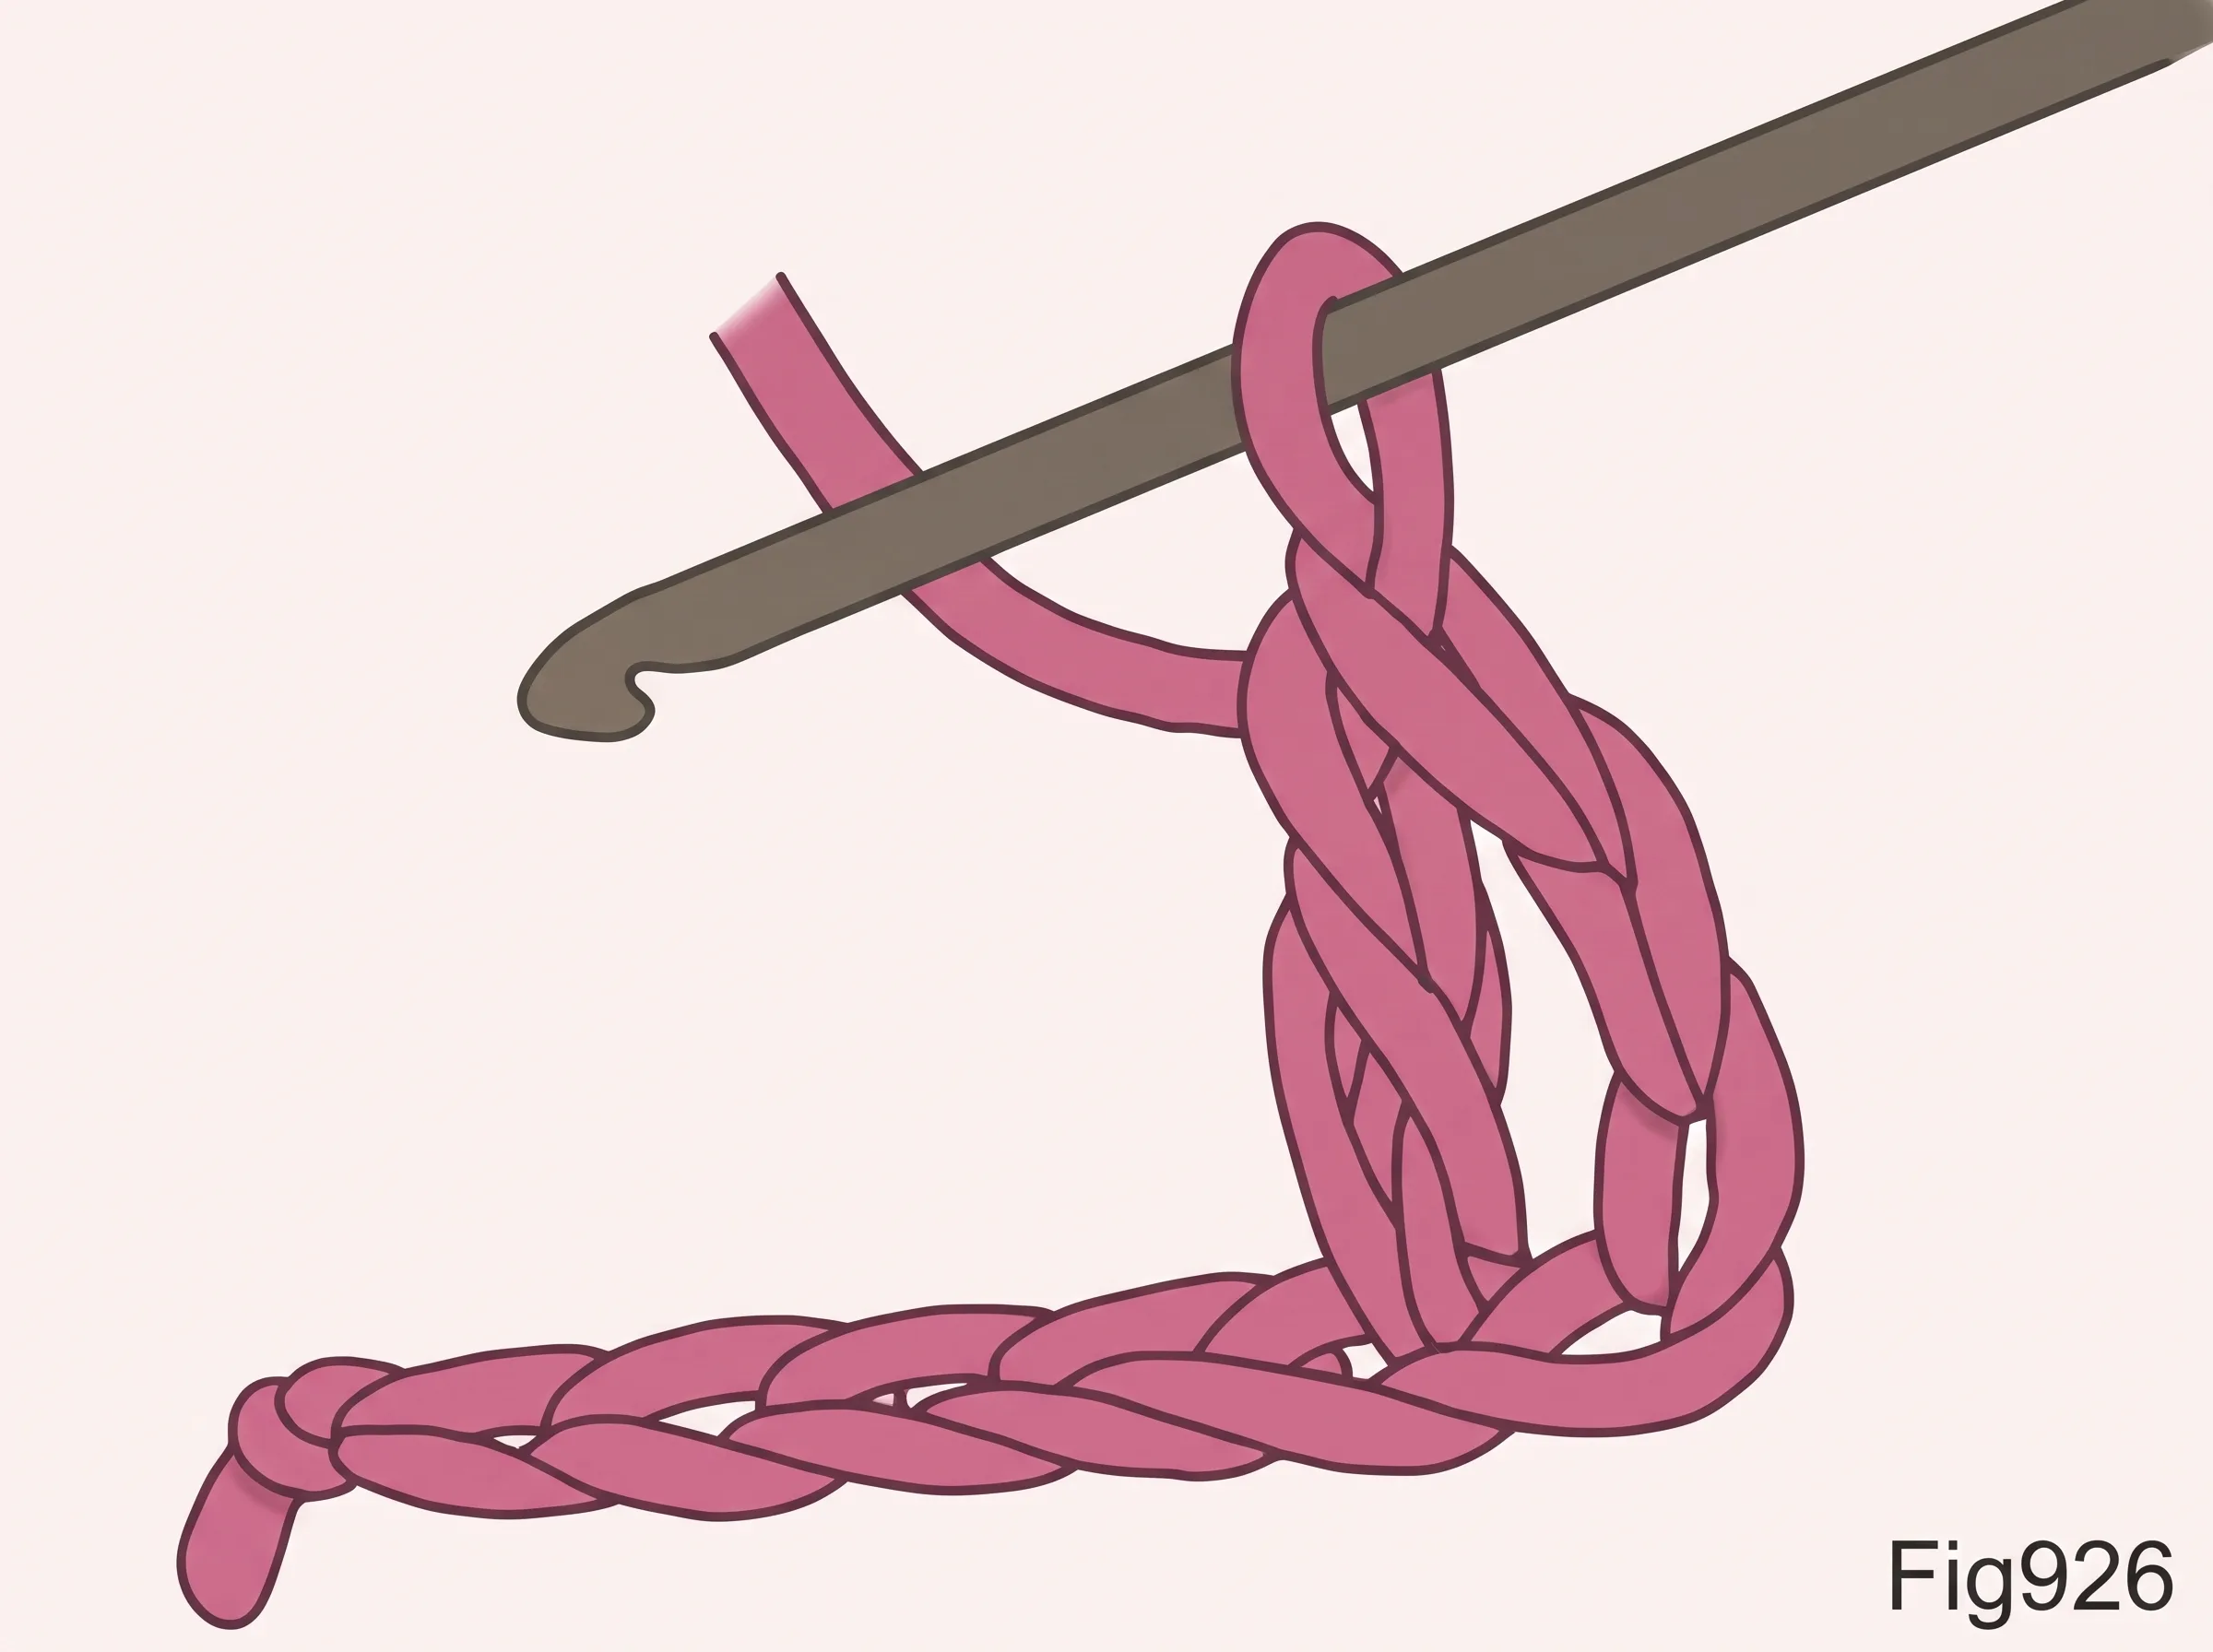
- Yarn over once more and draw through all 3 loops at once — 1 hdc made (Fig 94).
6. Double Crochet (dc) — The Workhorse of Basic Crochet Stitches
The double crochet is the most used tall stitch among the basic crochet stitches. It works up quickly, which is why most blanket, shawl, and garment patterns are written in double crochet. Once you know single crochet and double crochet, you can honestly make most things.
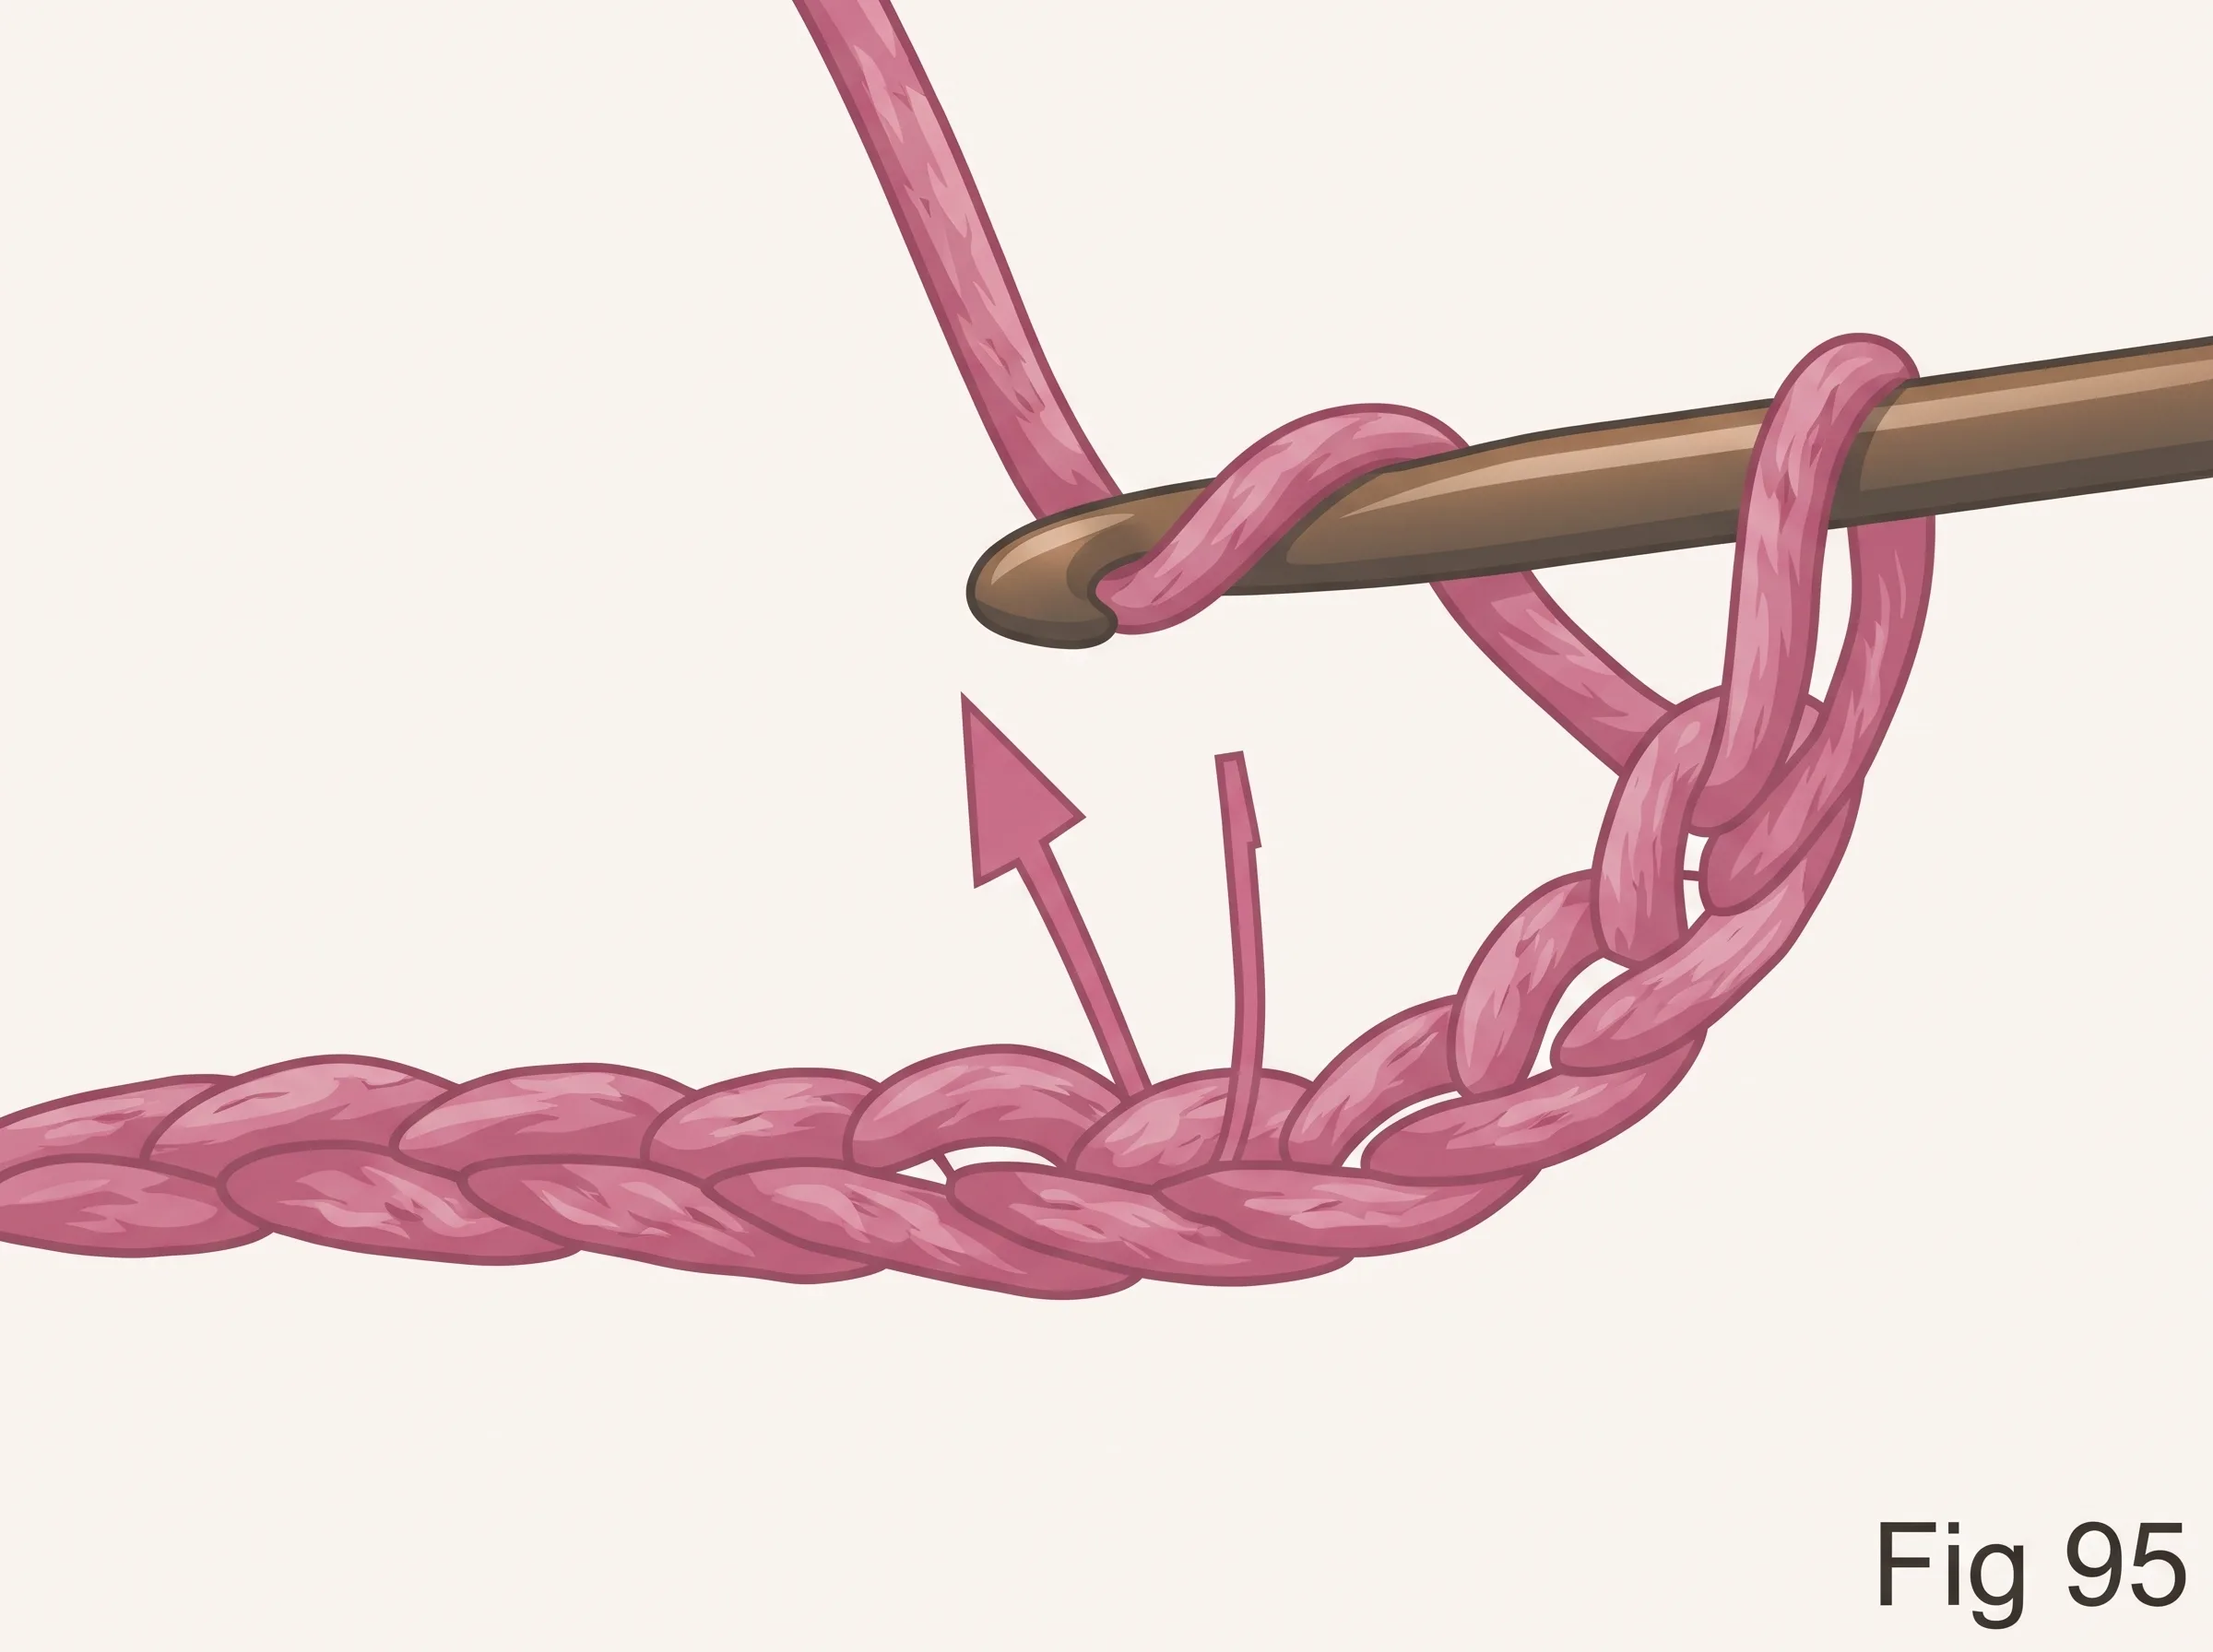

- Yarn over and insert your hook into the 4th chain from the hook (Fig 95).
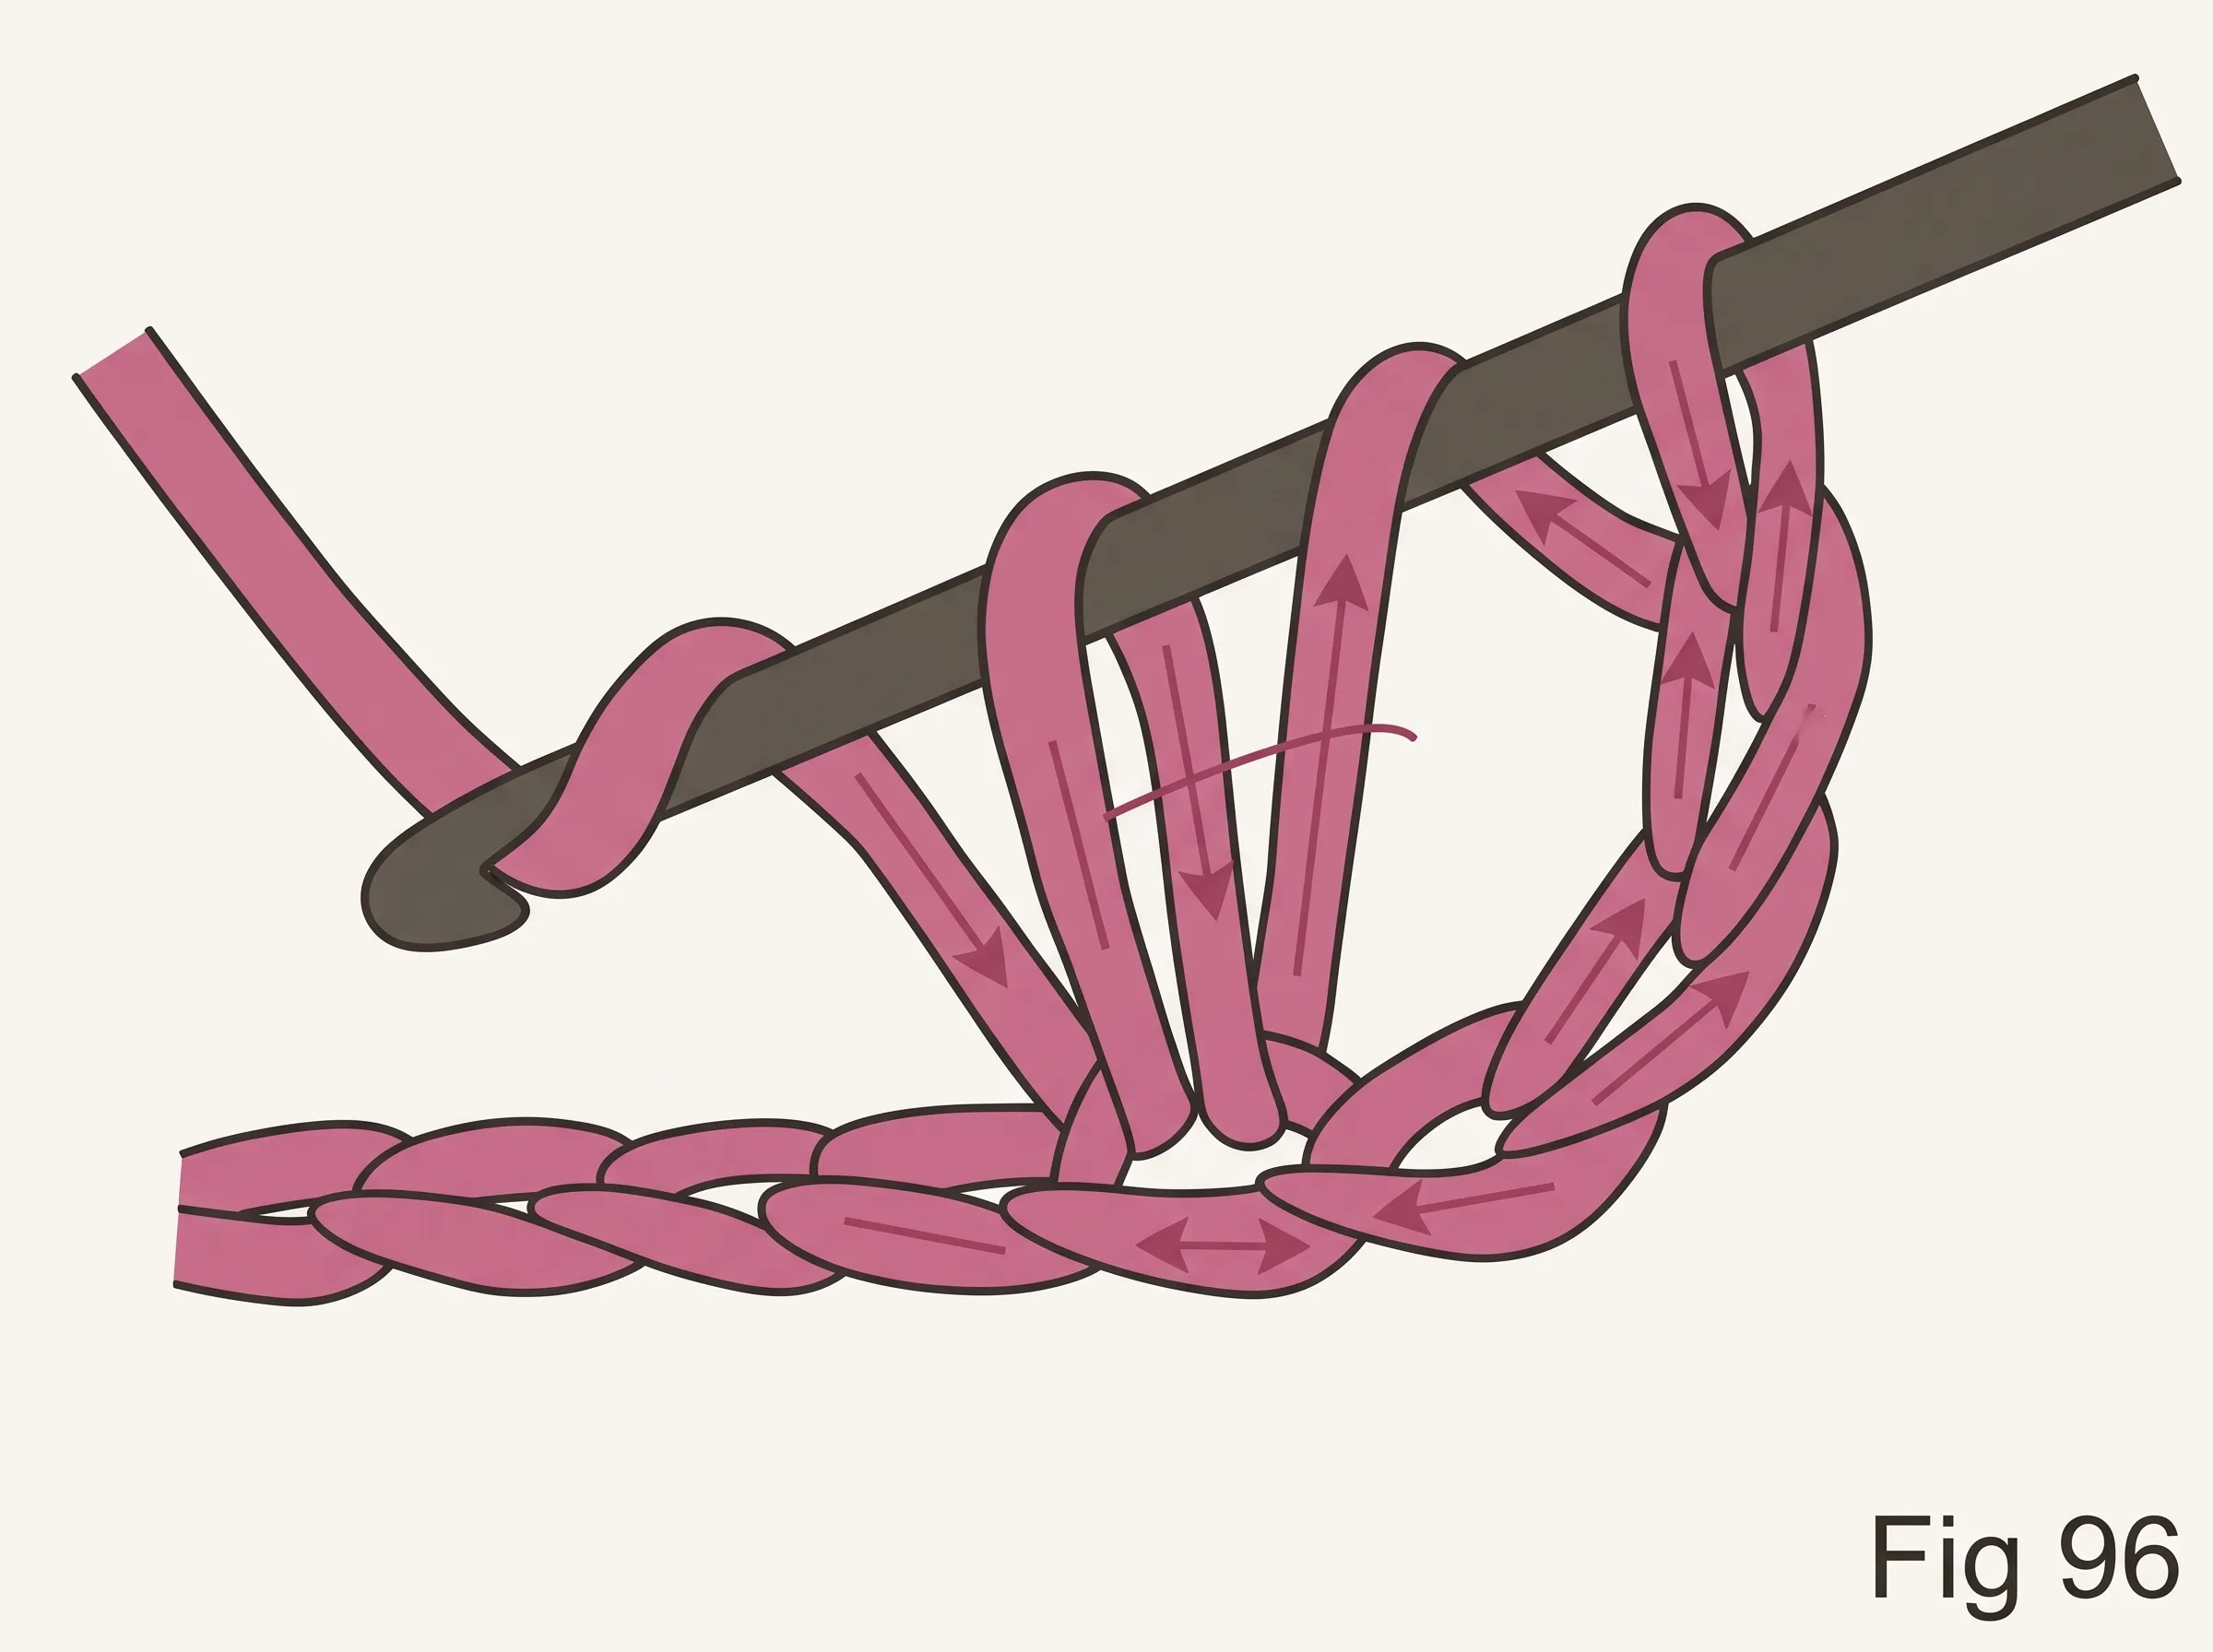
- Yarn over and draw through the chain only — 3 loops on your hook (Fig 96).
- Yarn over and draw through the first 2 loops only — 2 loops remain (Fig 97).
- Yarn over again and draw through the remaining 2 loops — 1 double crochet made (Fig 98).
7. Treble Crochet (tr) — Tall and Lacy
The treble crochet is the tallest of the everyday basic crochet stitches, roughly twice the height of a single crochet. It creates open, airy fabric ideal for lace shawls, lightweight cardigans, and decorative edgings. For a full reference on standard crochet abbreviations, the Craft Yarn Council is a great resource.
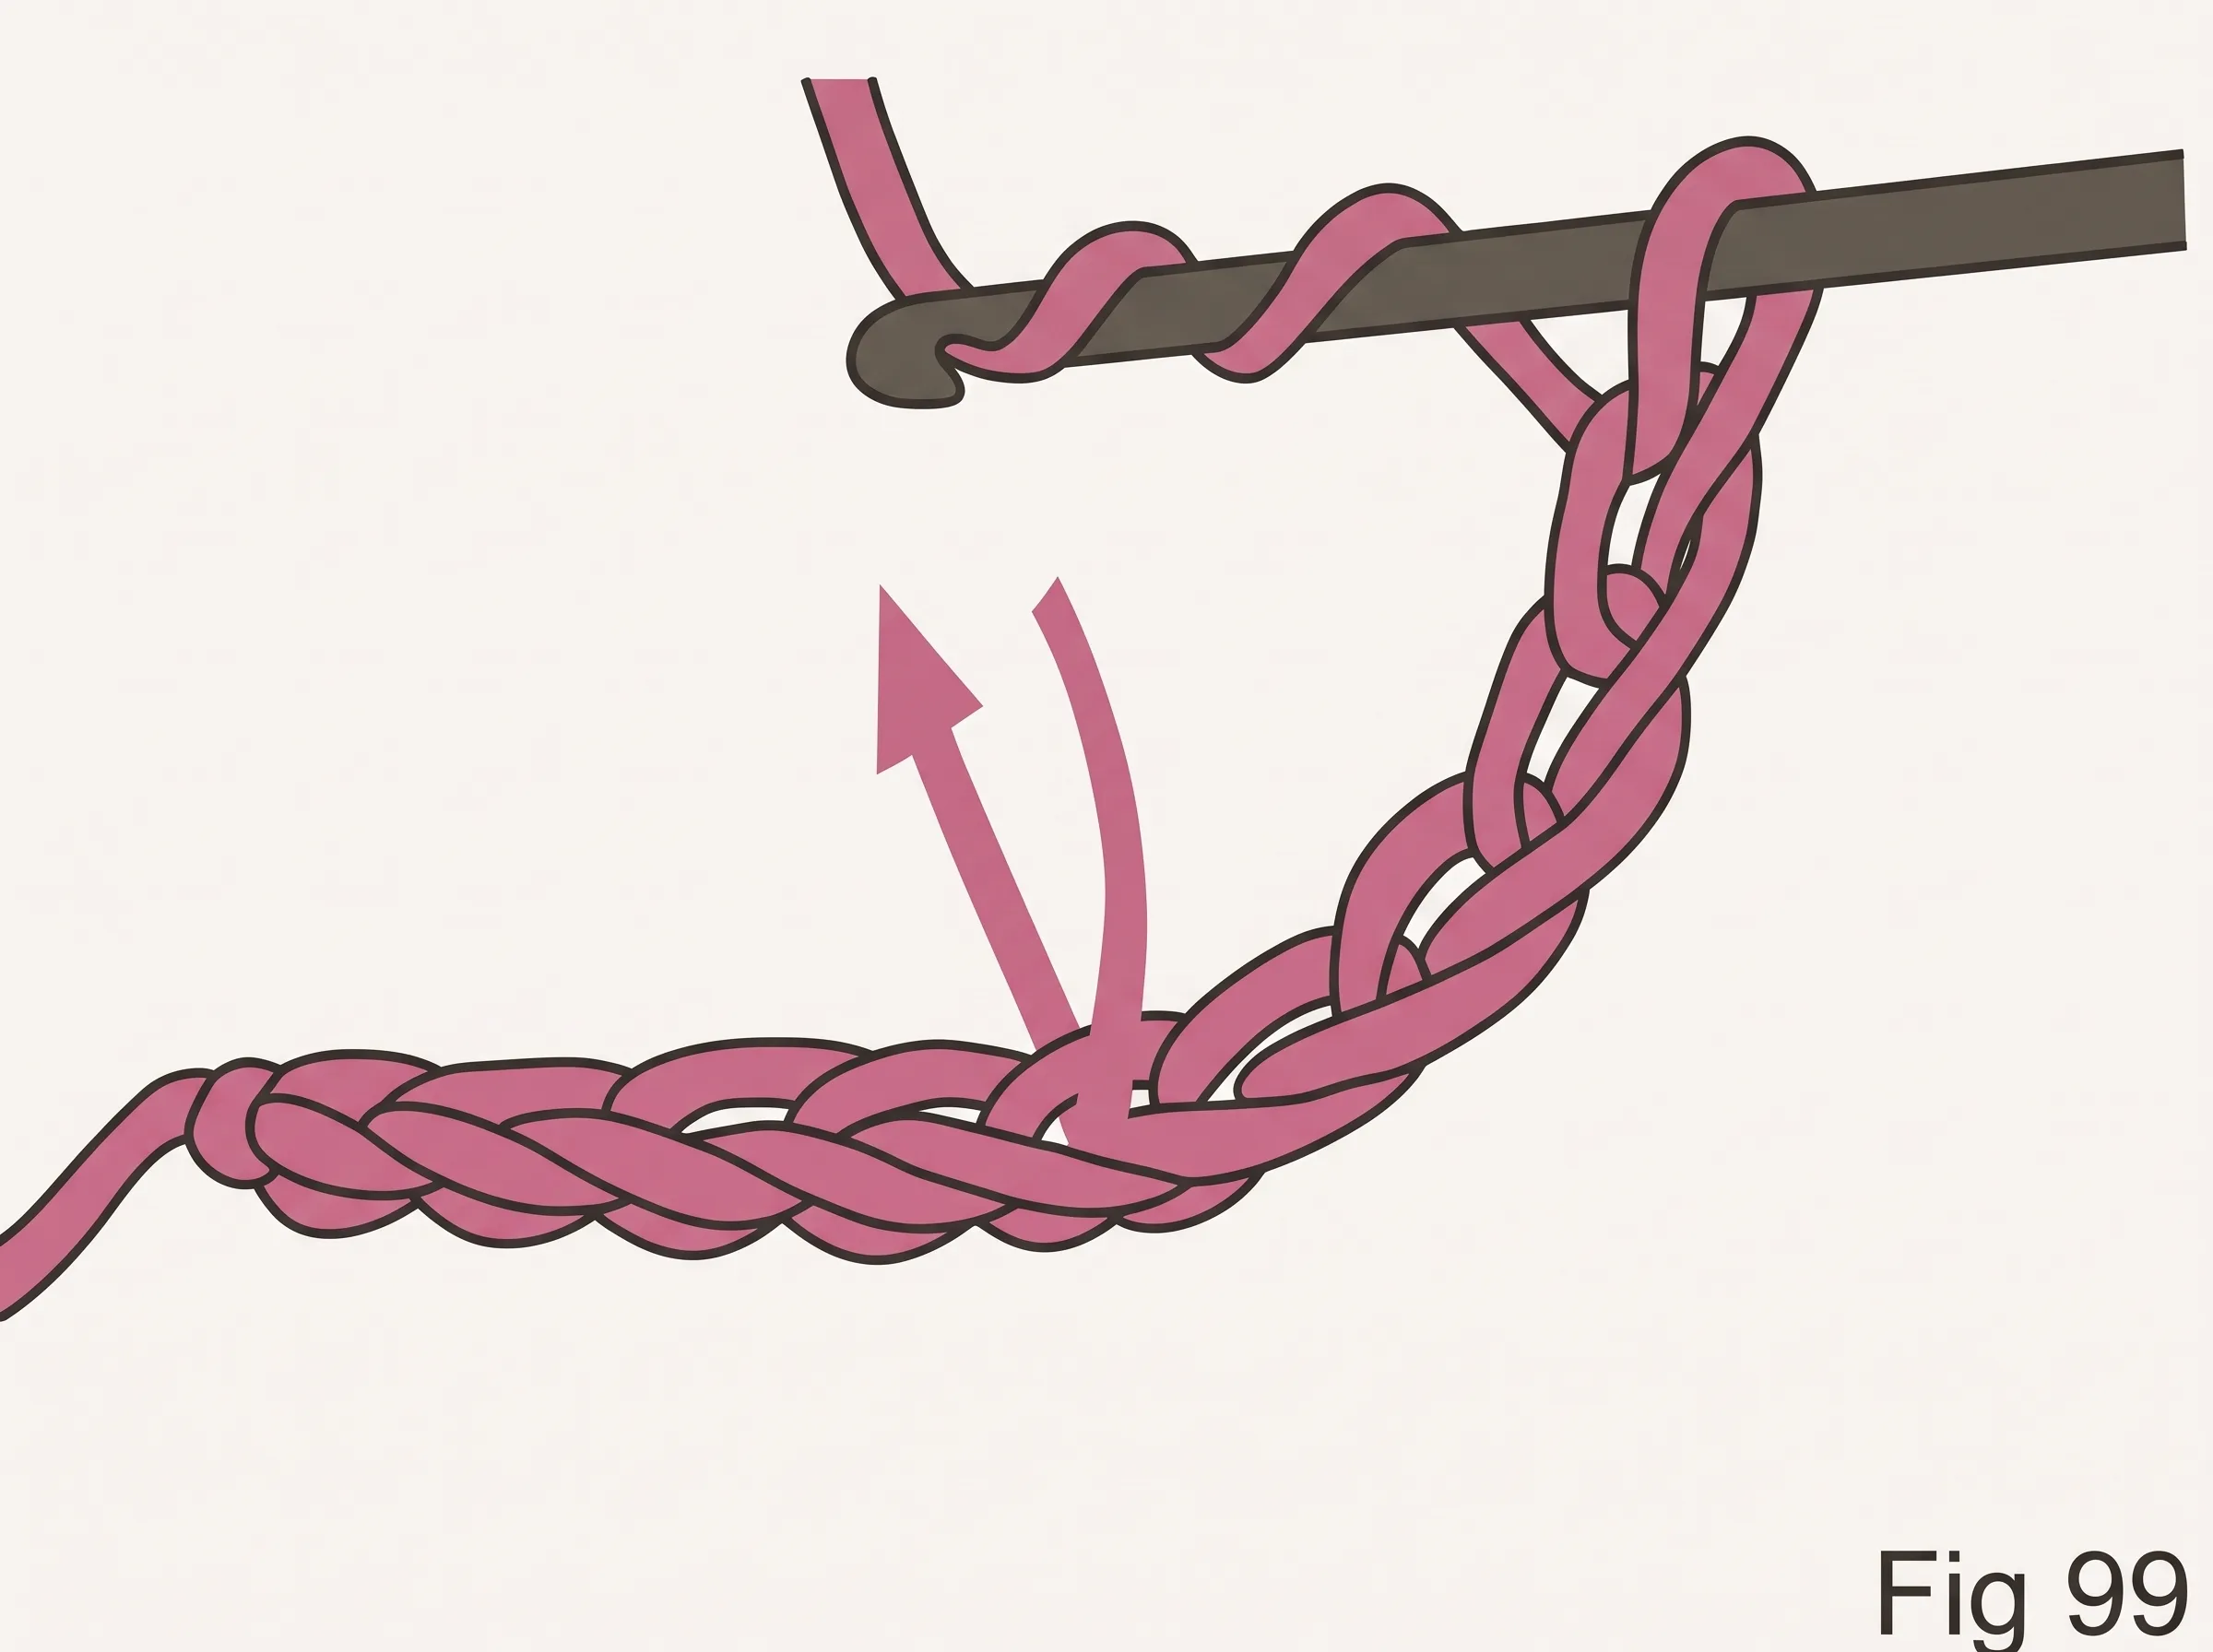
- Yarn over twice and insert your hook into the 5th chain from the hook (Fig 99).
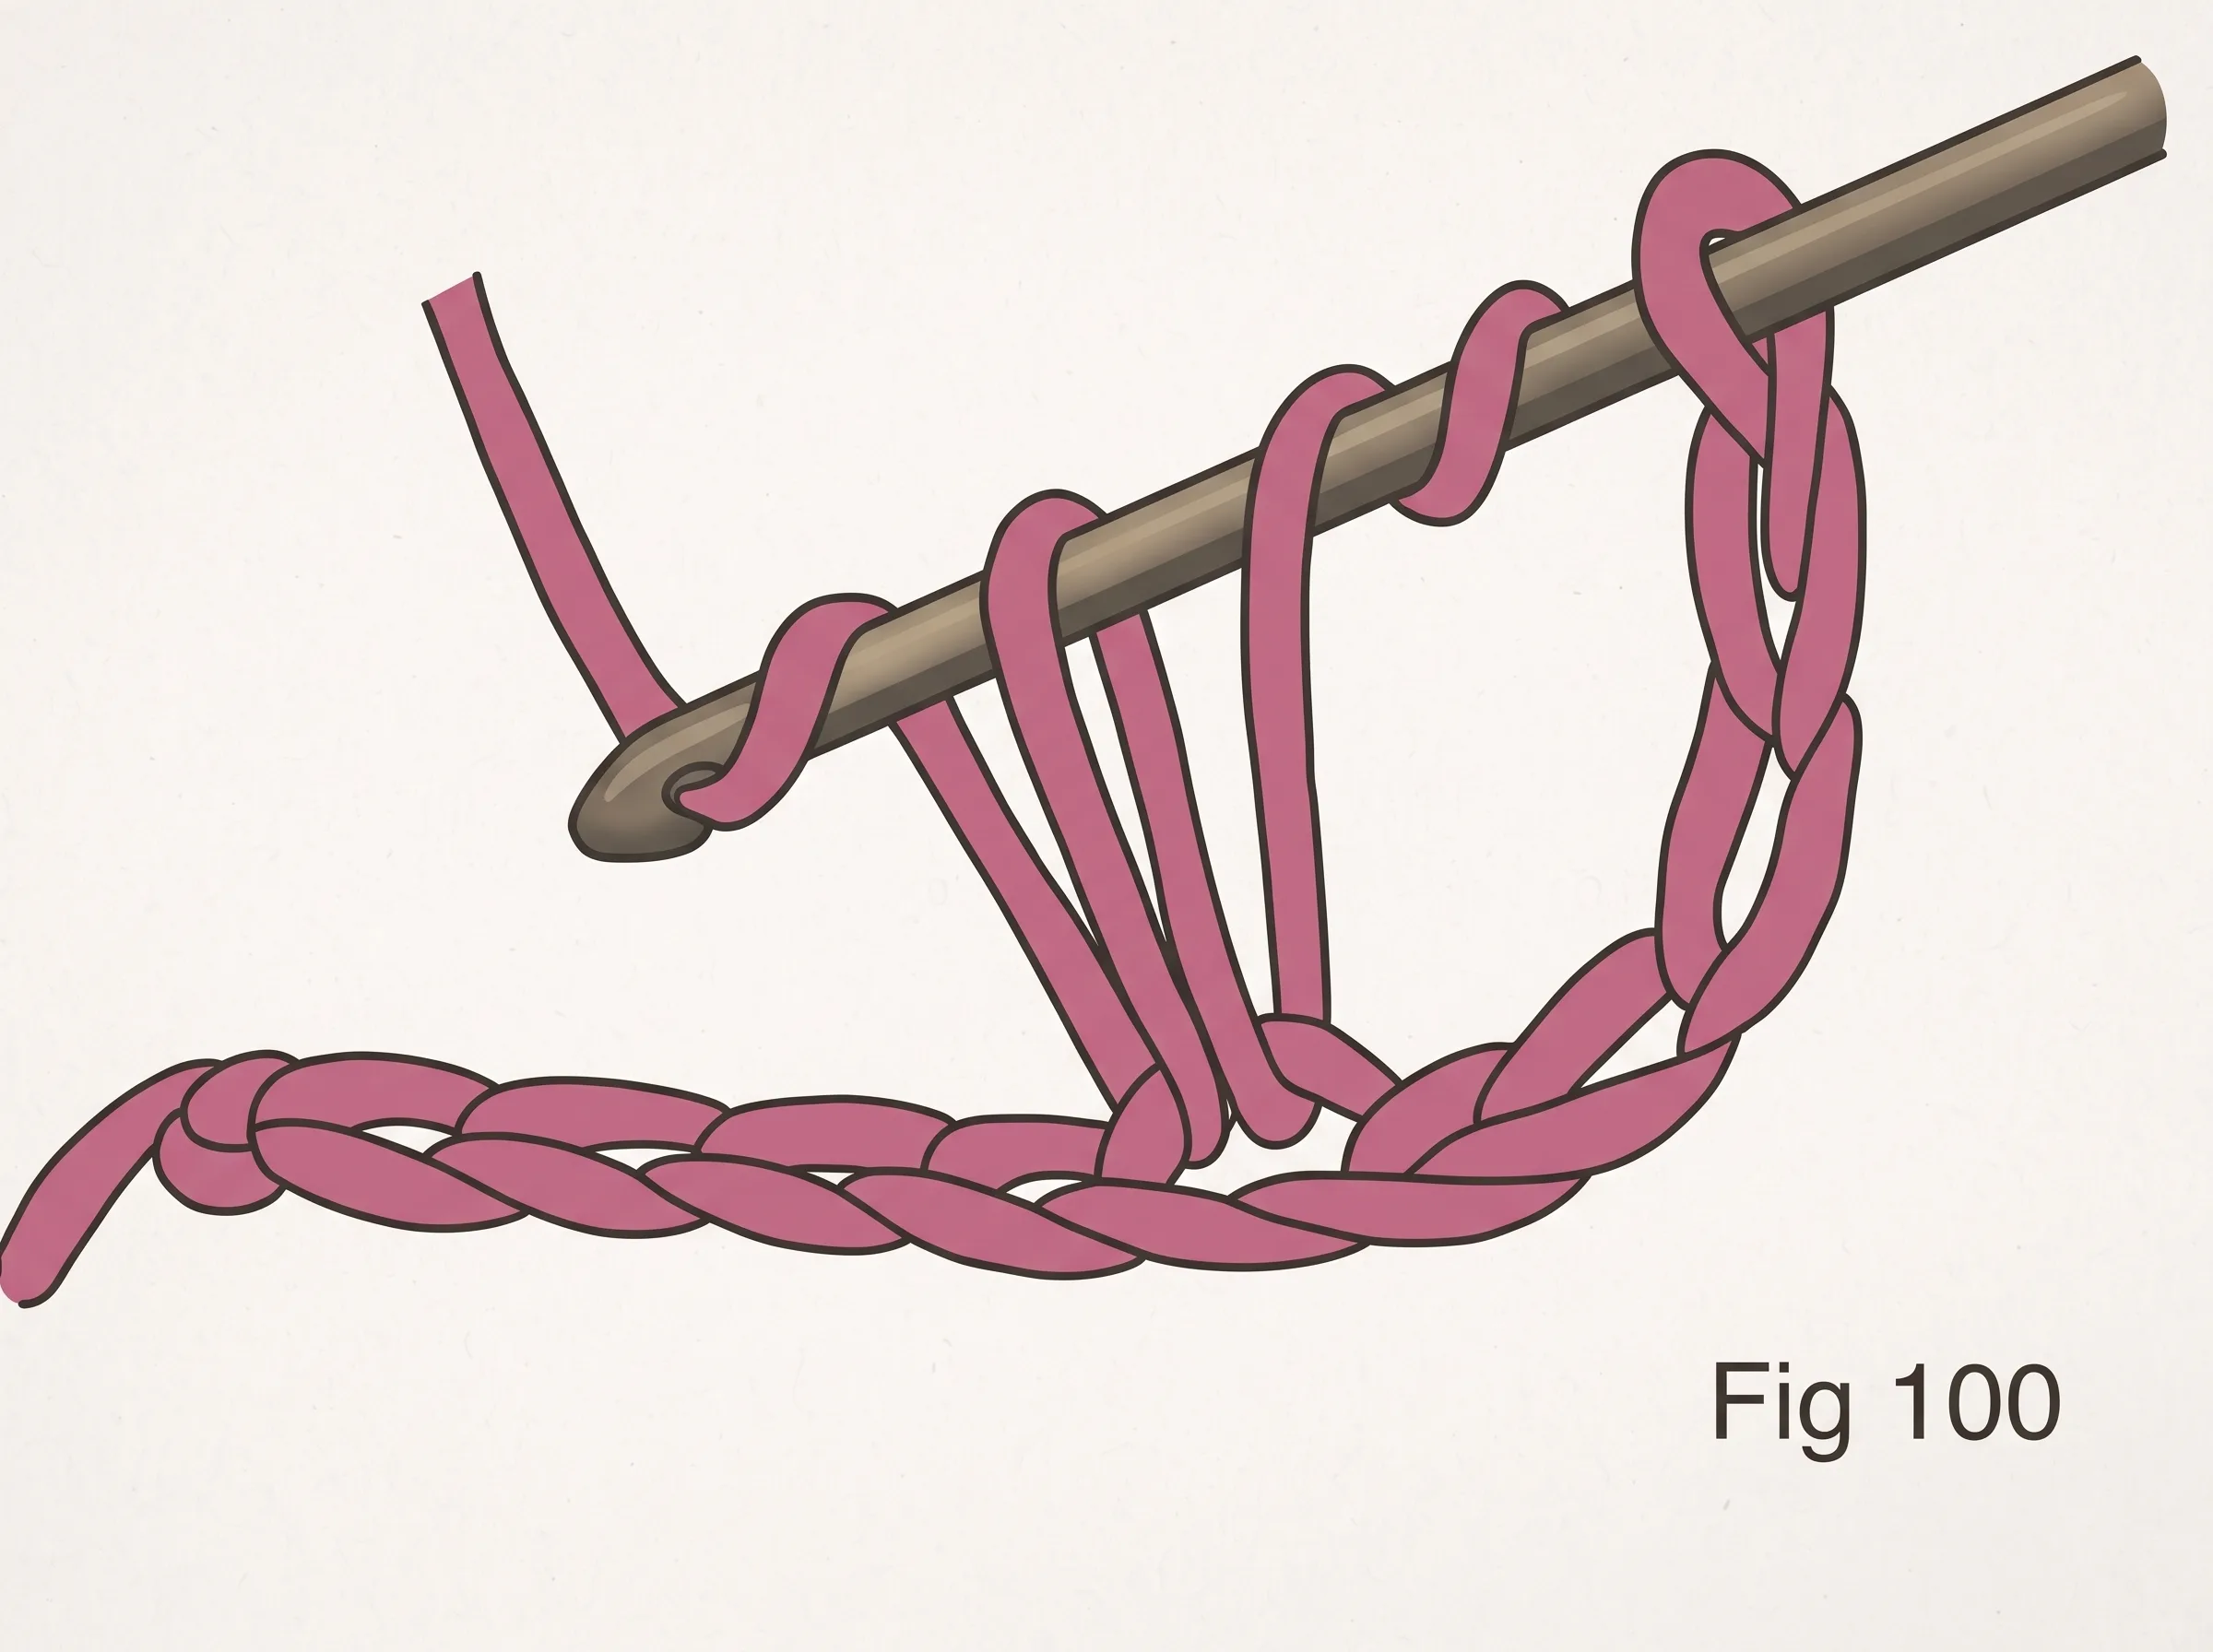
- Yarn over and draw through the chain only — 4 loops on your hook (Fig 100).
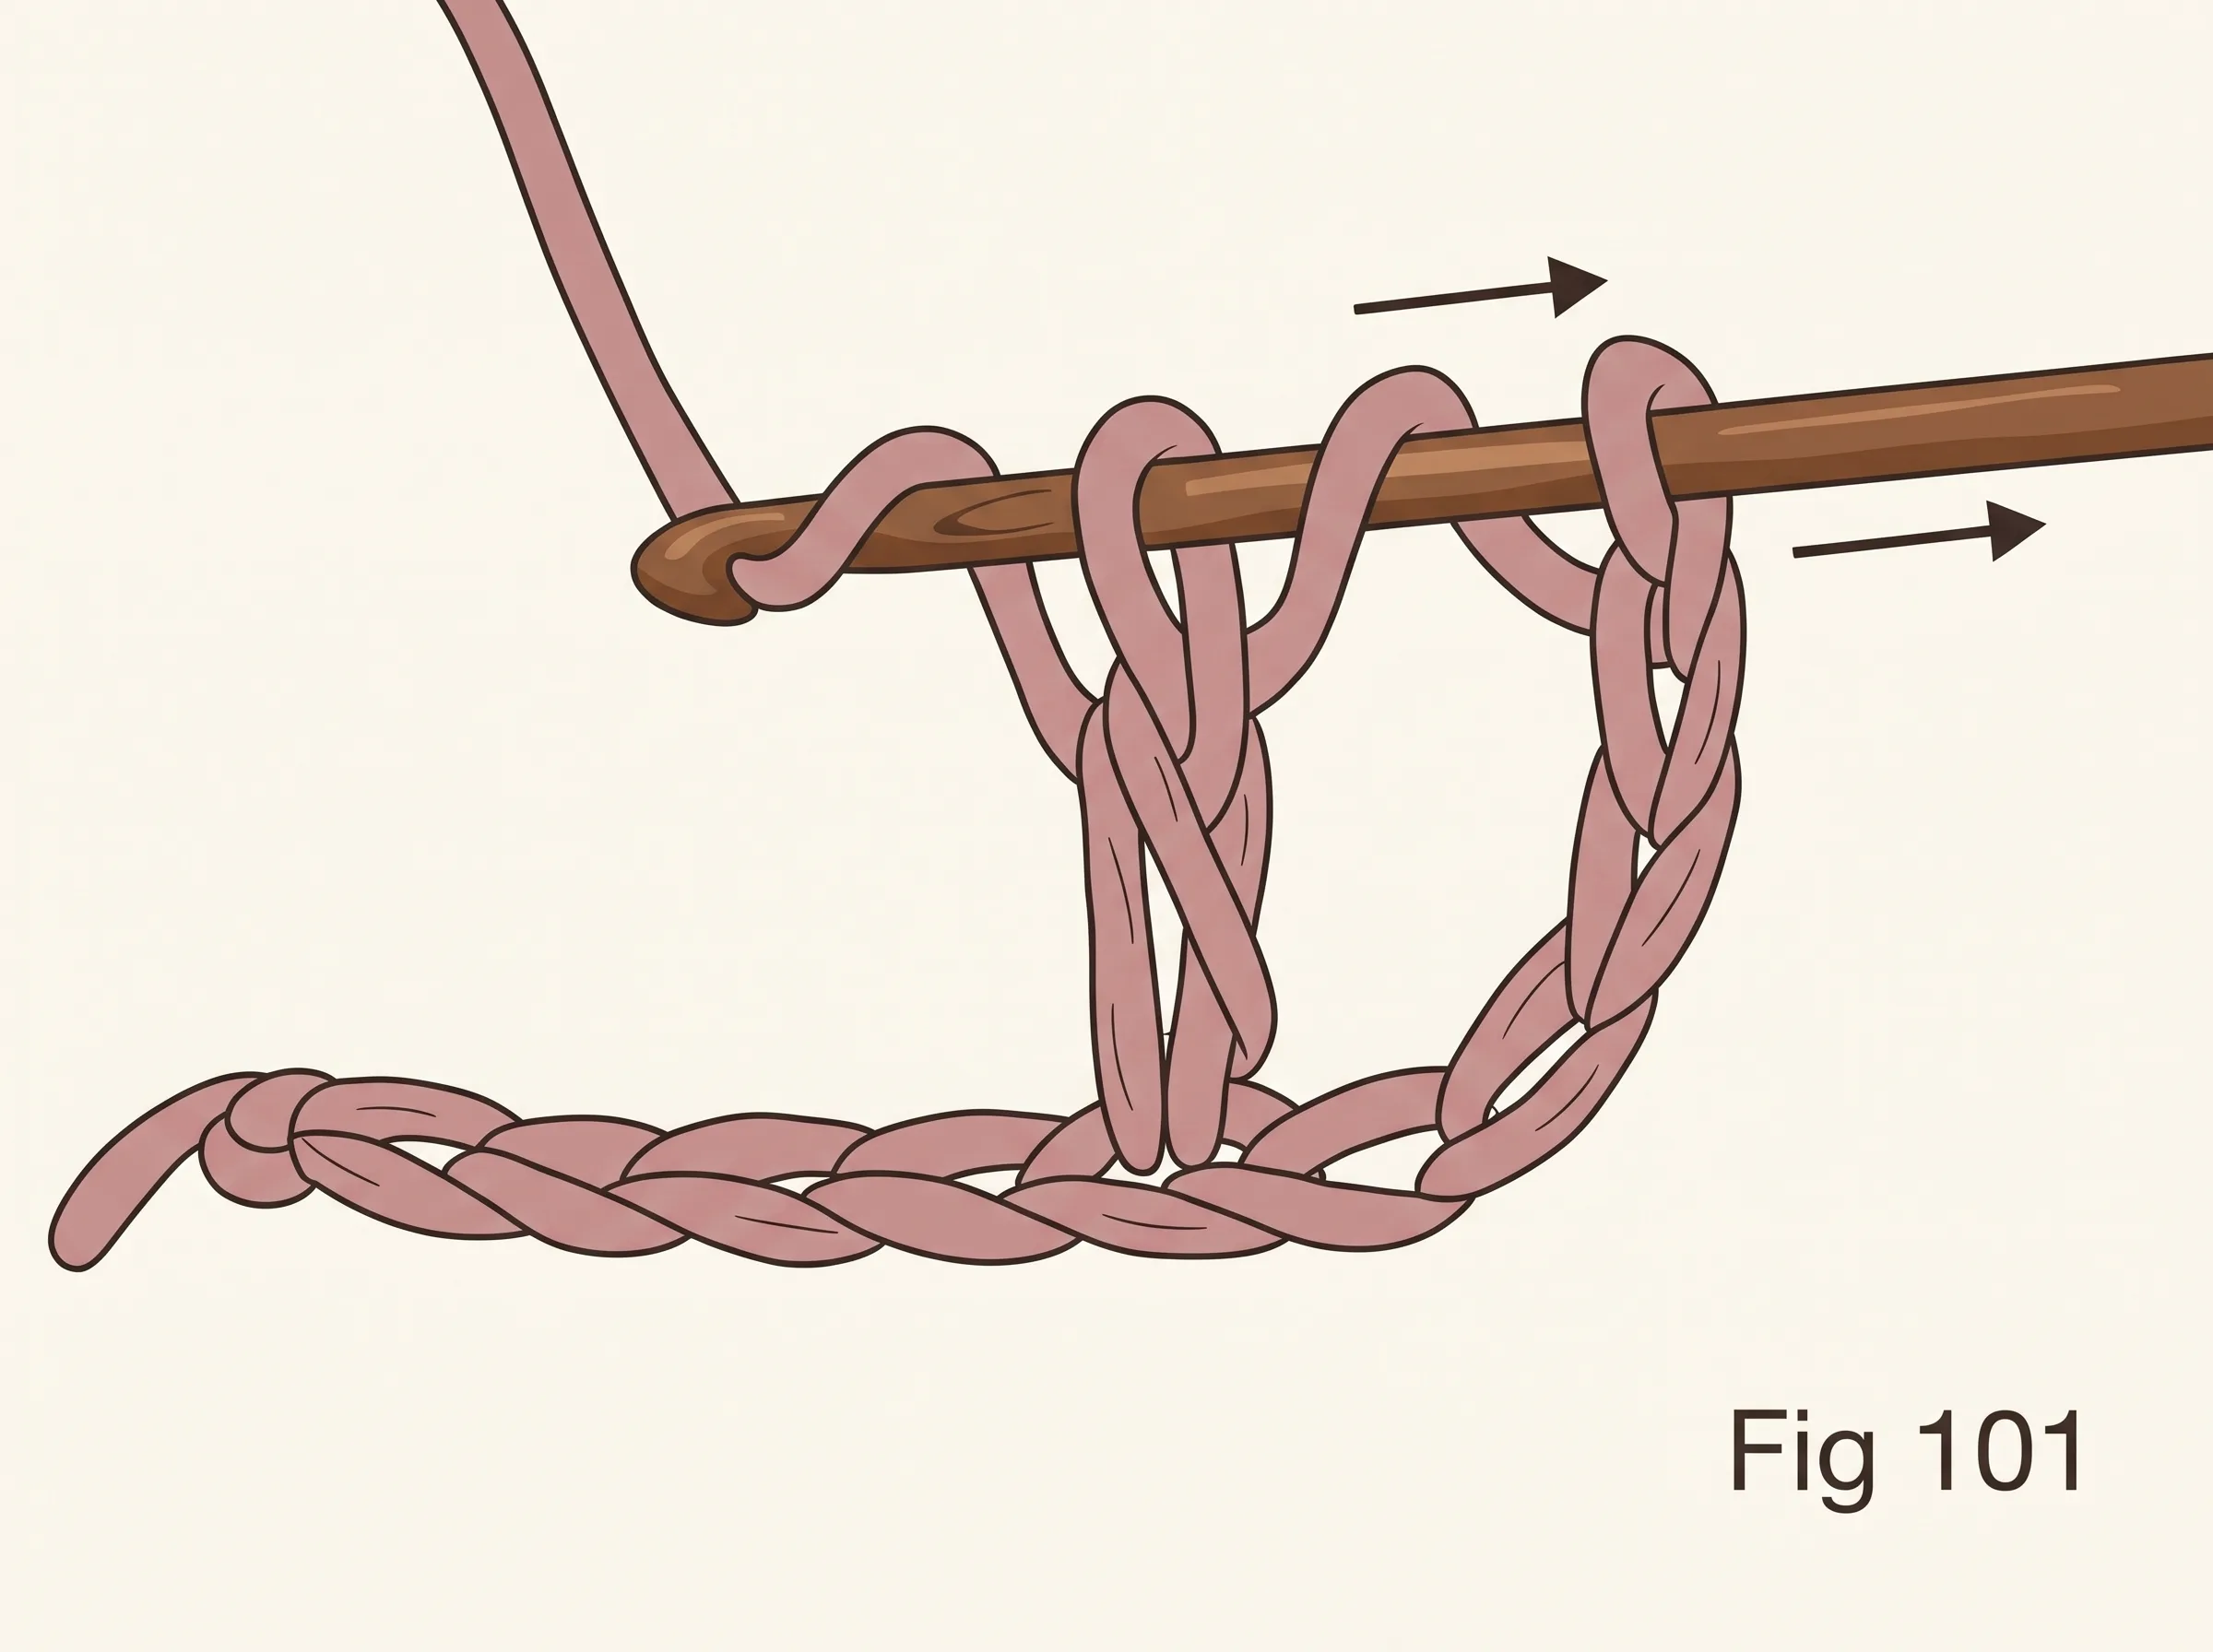
- Yarn over and draw through the first 2 loops — 3 loops remain (Fig 101).
- Yarn over and draw through the next 2 loops — 2 loops remain.
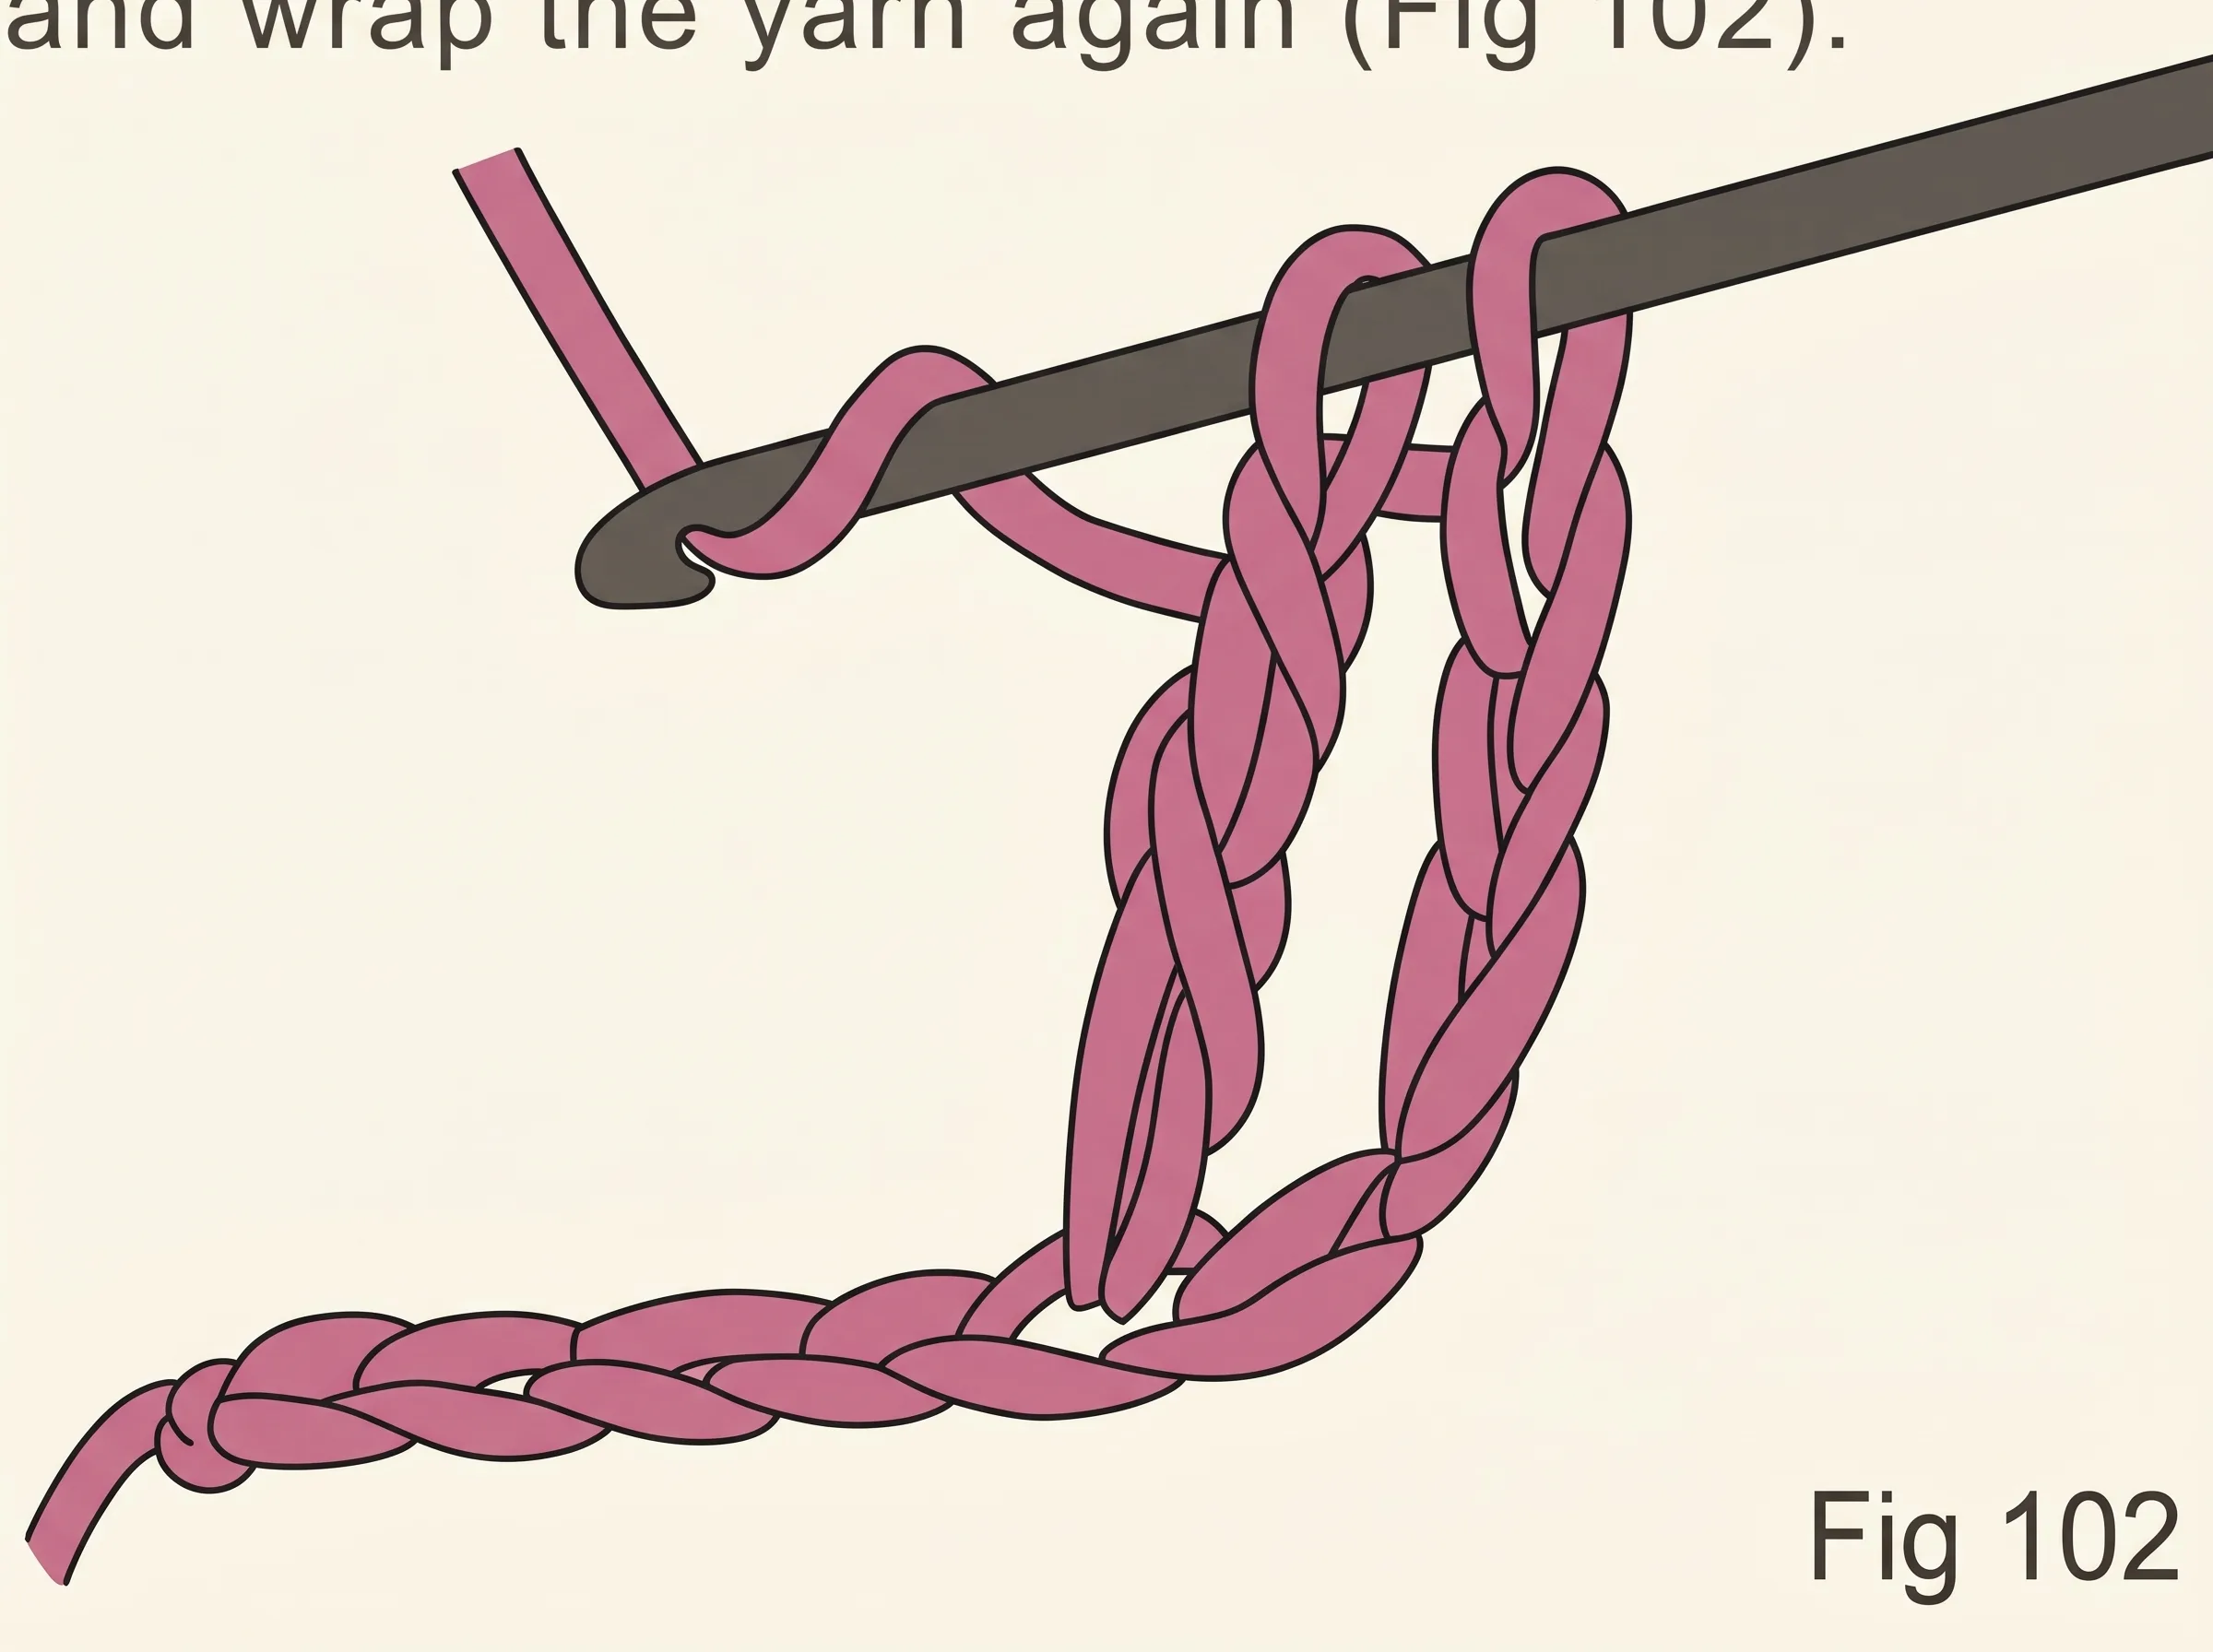
- Yarn over and draw through the last 2 loops — 1 treble crochet made (Fig 102).
US vs UK Crochet Stitch Names — Quick Reference Table
One of the most common points of confusion for anyone learning the basic crochet stitches: the same stitch has a completely different name in US vs UK patterns. Always check which terminology a pattern uses before you start.
| Abbreviation | US Term | UK Term |
|---|---|---|
| ch | Chain | Chain |
| sl st | Slip stitch | Slip stitch |
| sc | Single crochet | Double crochet (dc) |
| hdc | Half double crochet | Half treble (htr) |
| dc | Double crochet | Treble (tr) |
| tr | Treble crochet | Double treble (dtr) |
| yo / yoh | Yarn over | Yarn round hook (yrh) |
| st(s) | Stitch(es) | Stitch(es) |
| sp | Space | Space |
Which Basic Crochet Stitches Should You Learn First?
Start with the chain stitch and single crochet. Those two basic crochet stitches alone let you make a dishcloth, a bookmark, a headband, or a simple bag. Once those feel natural, add the half double crochet, then the double crochet.
- Day 1–2: Slip knot → chain stitch → single crochet
- Day 3–4: Half double crochet → your first small project
- Day 5–7: Double crochet → a simple blanket strip or square
- Week 2+: Treble crochet → lace edgings and open-stitch patterns
Once you’re comfortable with all these basic crochet stitches, check out our free pattern library and our beginner guides to put them to work on real projects.
Tips for Practising Basic Crochet Stitches
- Make swatches. Cast on 15 chains and practise one stitch across 10 rows — repetition builds muscle memory fast.
- Count every row. Your stitch count should stay the same row to row.
- Use light yarn. A pale, smooth worsted lets you see every loop clearly.
- Tension takes time. If your work curls, tension is too tight. If it’s full of holes, too loose. Both self-correct with practice.
- Embrace the frog. Unravelling (“frogging”) isn’t failure — it’s practice. The yarn is reusable.
You Now Know the Basic Crochet Stitches — What’s Next?
Seven stitches. That’s the whole foundation. From the slip knot to the treble crochet, these basic crochet stitches are everything you need to make the beautiful things you see on Pinterest and every crochet blog you admire.
Pick up your hook. Make your first chain. Keep going — every expert once sat exactly where you are right now.